Open Meters in the portfolio view left sidebar. The sections below follow the order you use in the product: review the main page, filter the table, assign meters, create virtual meters, then manage linked meters. For meter detail at a single site, switch to the building view and open Building meters.

Meters page

The portfolio Meters page title reads Meters with the subtitle Manage and monitor all meters across your portfolio.

Page actions

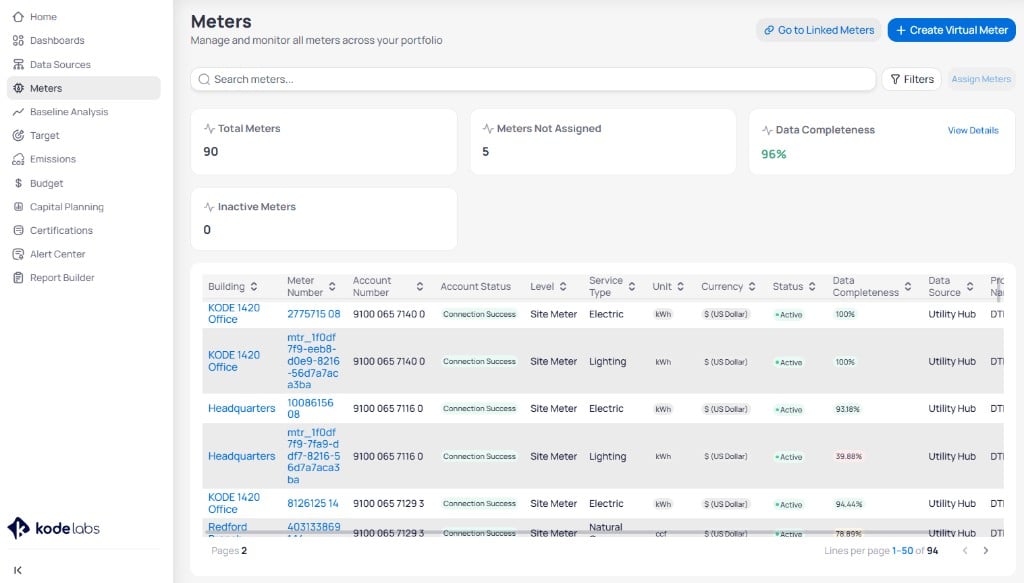
Portfolio Meters page showing Total Meters, Meters Not Assigned, Data Completeness at 96 percent, and Inactive Meters summary cards, search and filter bar, Assign Meters action, and a table with Building, Meter Number, Account Number, Account Status, Level, Service Type, Unit, Currency, Status, Data Completeness, Data Source, and Provider Name columns

Portfolio Meters page with summary cards, filters, and the meters table

Summary cards

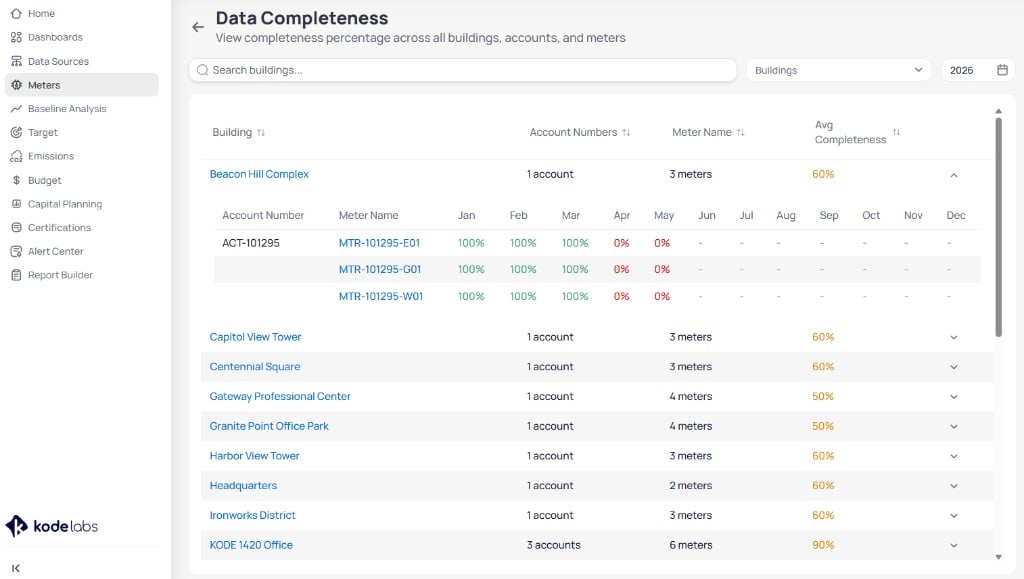
Four cards summarize portfolio health above the table. Click View Details on Data Completeness to open a drill-down by building, account, and month. For how EnerG scores coverage and why gaps matter, see Data completeness.
Mark meters inactive when a utility account closes or the provider issues a new meter number. Inactive meters stay available for historical regressions and M&V, but they should not count against current completeness if no new bills are expected. Leave inactive meters unassigned or excluded so they do not inflate gap alerts.
Data Completeness page with Search buildings field, Buildings filter, year selector set to 2026, and an expanded Beacon Hill Complex row showing account ACT-101295 and meters MTR-101295-E01, MTR-101295-G01, and MTR-101295-W01 with monthly completeness percentages in green and red

Data Completeness page with expandable building rows and monthly percentages

On the Data Completeness page, click a building name to open Building information. Click a meter name to open meter details.

Meters table

The table lists every meter in the portfolio. Each column header supports sorting. Use pagination at the bottom to move through large result sets. Click a Building or Meter Number link to open Building information or meter details. For what each column shows, see Meter table columns.

Filter meters

Use the search field above the table to find meters by number or name. Click Filters to show the filter row. The button highlights when filters are active.
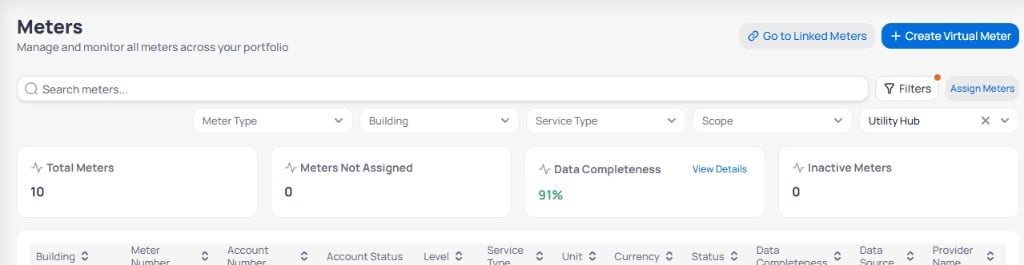
Portfolio Meters page with Search meters field, Filters button active, filter row showing Meter Type, Building, Service Type, Scope, and Data Source dropdowns with Utility Hub selected, summary cards for Total Meters, Meters Not Assigned, Data Completeness at 91 percent, and Inactive Meters, and Assign Meters button visible

Portfolio Meters with the filter row open and Utility Hub selected as Data Source

You must select a Data Source before Assign Meters becomes available.

Assign meters to buildings

Use Assign Meters to link meters from a data source to a building. You filter by Data Source, open the workflow, pick the building, then select meters from that feed.
1

Filter by Data Source

Click Filters to show the filter row. Select a Data Source such as Utility Hub. Assign Meters stays disabled until you choose a data source.
2

Click Assign Meters

Click Assign Meters next to the filter row. The Add Meters dialog opens.
3

Choose a building and click Next

On the Add Meters page, search for a building by name. Select one row in the table, then click Next.The table lists Building, Type, and Address for each site.
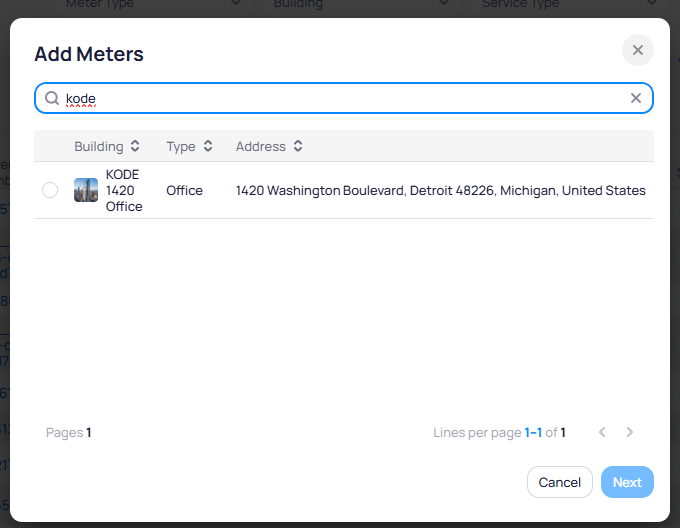
Add Meters modal with Search field containing kode, a table with Building Type and Address columns showing KODE 1420 Office selected as Office at 1420 Washington Boulevard Detroit, and Cancel and Next buttons

Add Meters dialog to select a building before meter assignment

4

Select meters and click Submit

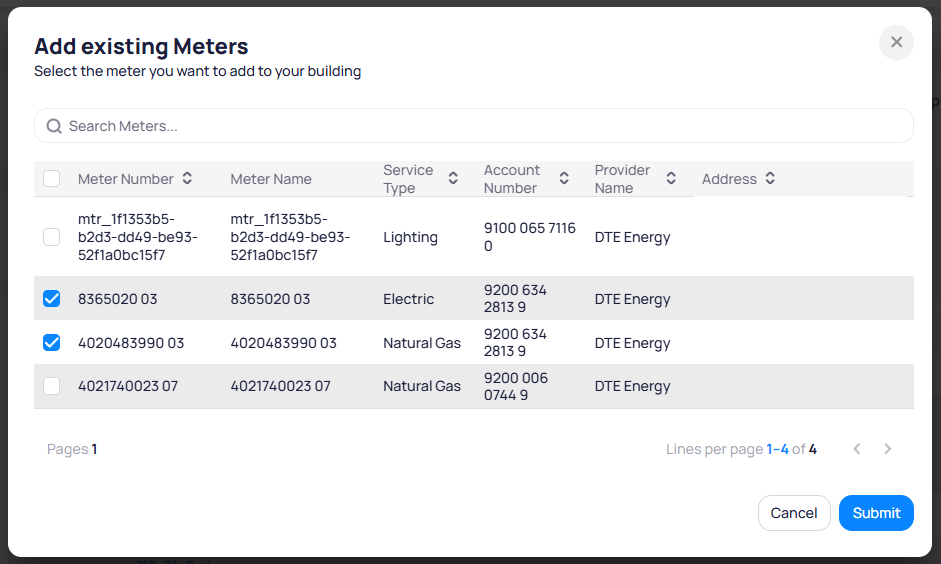
On the Add existing Meters page, search for meters if needed. Check each meter you want to assign. Review Meter Number, Service Type, Account Number, Provider Name, and Address, then click Submit.
Add existing Meters modal with subtitle Select the meter you want to add to your building, Search Meters field, and a table with Meter Number Meter Name Service Type Account Number Provider Name and Address columns showing Electric and Natural Gas meters from DTE Energy checked with Submit button

Add existing Meters dialog with selected meters ready to submit

Assigned meters appear in the portfolio Meters table and in Building meters for that site.

Create a virtual meter

Click + Create Virtual Meter in the top-right corner of the Meters page. calculate usage from other meters instead of a direct utility feed. Choose a Calculation Method:
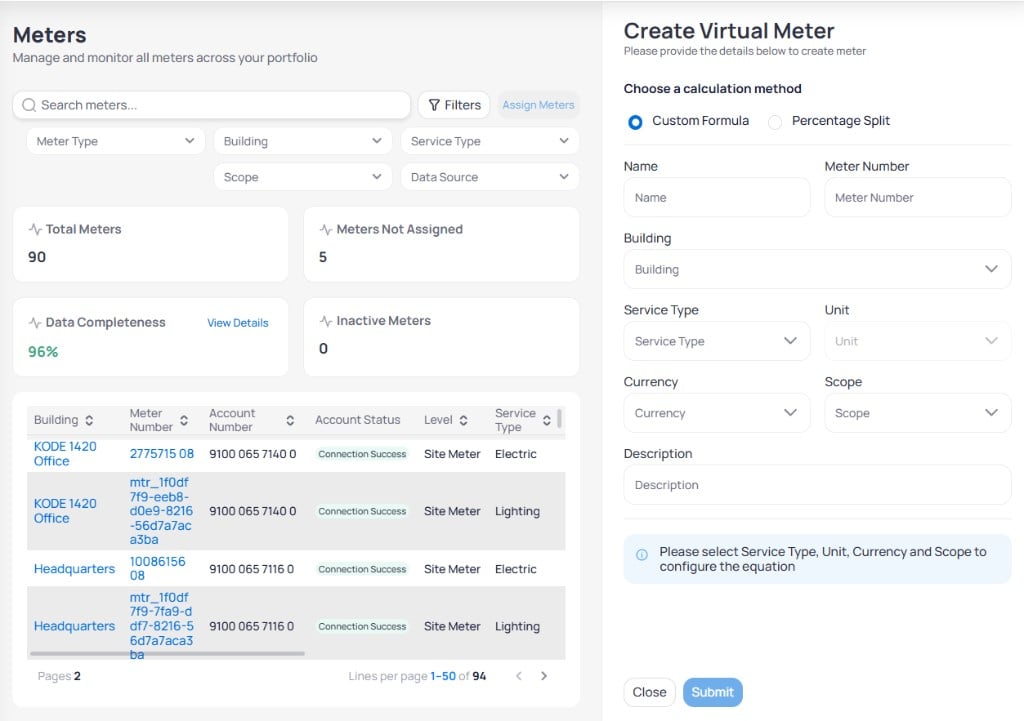
Create Virtual Meter panel with Custom Formula radio selected, fields for Name, Meter Number, Building, Service Type, Unit, Currency, Scope, and Description, and an info banner to select Service Type, Unit, Currency and Scope to configure the equation

Create Virtual Meter with Custom Formula selected
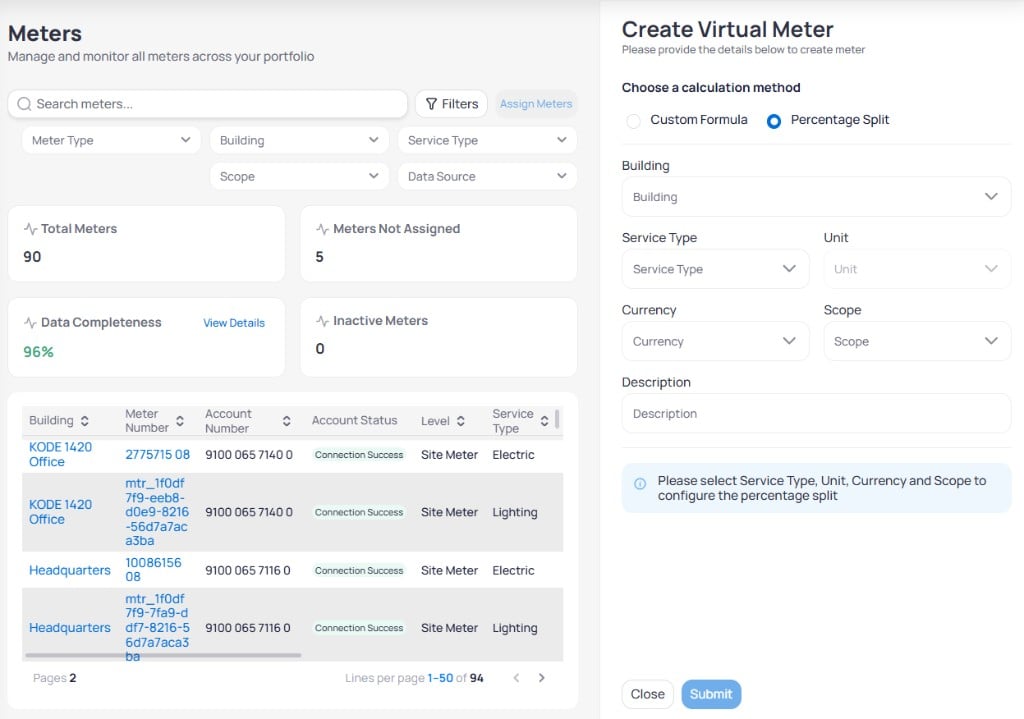
Create Virtual Meter panel with Percentage Split radio selected and an info banner to select Service Type, Unit, Currency and Scope to configure the percentage split

Create Virtual Meter with Percentage Split selected

1

Enter meter details

Provide Name, Meter Number, Building, Service Type, Unit, Currency, Scope, and an optional Description.
2

Configure the calculation

For Custom Formula, build the equation after required fields are set. For Percentage Split, define the share across source meters when EnerG prompts you.
3

Submit

Click Submit. The virtual meter appears in the portfolio table.

Linked meters page

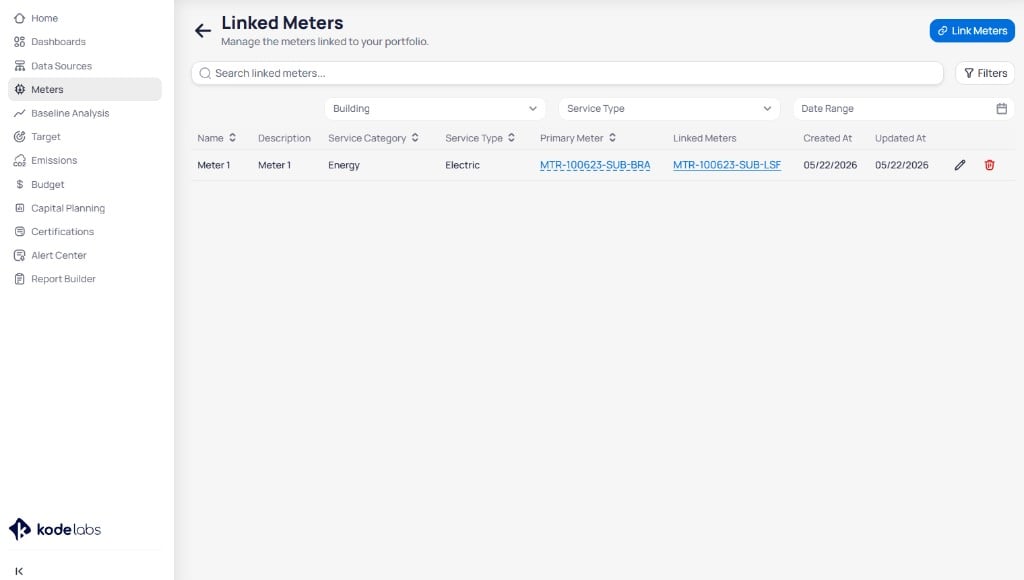
Click Go to Linked Meters on the Meters page to open the Linked Meters view. The page title reads Linked Meters with the subtitle Manage the meters linked to your portfolio.
Linked Meters page with Search linked meters field, Filters button, Building Service Type and Date Range dropdowns, Link Meters button in the top right, and a table with Name Description Service Category Service Type Primary Meter Linked Meters Created At Updated At columns and edit and delete action icons

Linked Meters page with search, filters, and the links table

Use the Search linked meters… field to find links by name. Click Filters to show Building, Service Type, and Date Range filters when you need to narrow a large portfolio. The table lists every meter link with sortable columns. Click a meter ID under Primary Meter or Linked Meters when you need to review billing data, completeness, or properties for that meter before you change the link. Use the row actions at the right end of each link.
  • Edit (pencil icon) — Open the Edit Meter Link modal to change the name, description, linked meters, or which meter is primary.
  • Delete (trash icon) — Remove the link. The individual meters stay in EnerG; only the relationship is removed.
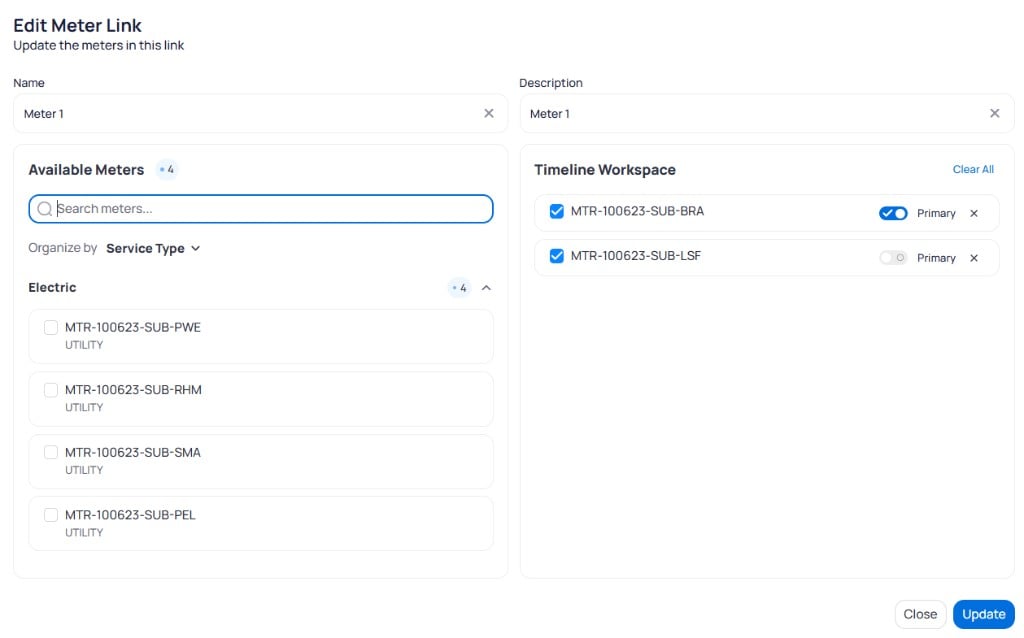
Edit Meter Link modal with Name and Description fields, Available Meters panel organized by Electric service type with checkboxes, Timeline Workspace showing two meters with Primary toggles one on and one off, and Close and Update buttons

Edit Meter Link modal with available meters and timeline workspace

1

Open the link for editing

On the Linked Meters page, click the edit icon on the link row.
2

Update the link

Change Name or Description if needed. In Available Meters, select or clear meters to add or remove them from the Timeline Workspace. Turn Primary on for the meter that should drive the stitched timeline.
3

Save changes

Click Update. The table refreshes with your changes.
Meter links stitch timelines across related feeds so analytics stay continuous when accounts or meter numbers change. Create a new link from the Linked Meters page.
1

Click Link Meters

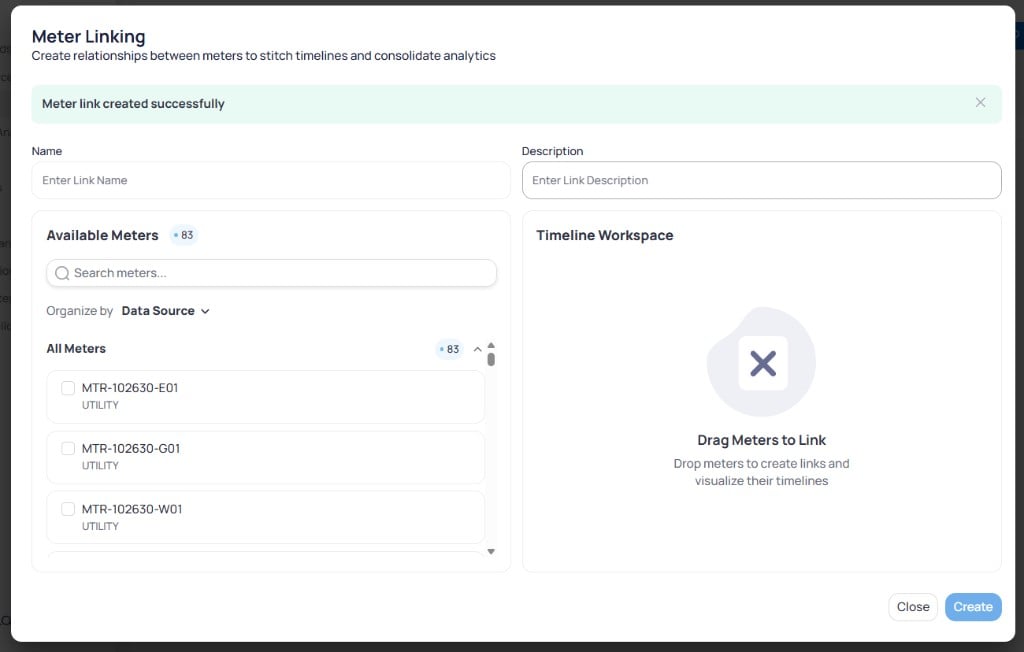
On the Linked Meters page, click Link Meters in the top-right corner. The Meter Linking modal opens.
Meter Linking modal with Name and Description fields, Available Meters panel with Organize by Data Source and a scrollable meter list, empty Timeline Workspace with Drag Meters to Link instruction, and Close and Create buttons

Meter Linking modal before meters are added to the workspace

2

Enter a name and description

Fill in Name and Description so operators can recognize the link later.
3

Select two meters

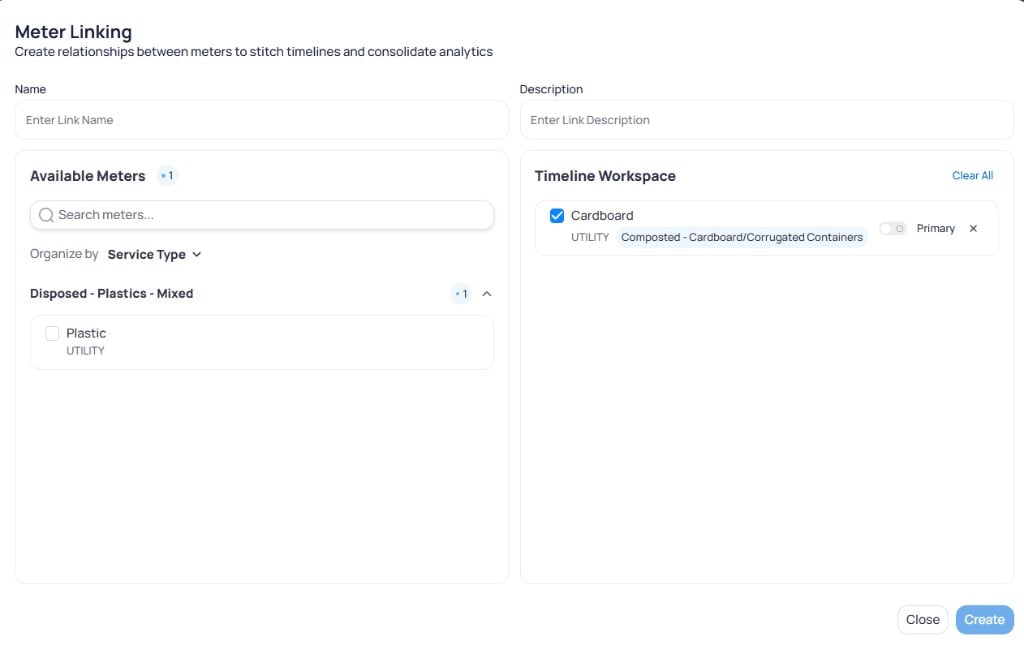
In Available Meters, search or organize the list by Data Source or Service Type. Select the first meter you want to link, then select the second meter. You can check meters in the list or drag them into the Timeline Workspace.
Meter Linking modal with Name and Description fields, Available Meters organized by Service Type on the left, Timeline Workspace on the right showing Cardboard meter with Primary toggle, and Close and Create buttons

Meter Linking workspace with meters selected and a primary meter designated

4

Choose the primary meter

In the Timeline Workspace, turn Primary on for the meter that should anchor comparisons. Leave Primary off for the secondary meter.
5

Click Create

Click Create. A success message confirms the link. The new row appears on the Linked Meters table.
Link meters that represent the same physical account across a meter change or data source migration. Keep service type and scope aligned so stitched timelines do not mix unrelated commodities.

Next steps

Portfolio data sources

Connect feeds before you assign meters across the portfolio.

Building meters

Review and edit meters after you open a building.

Alert center

Resolve data quality alerts for portfolio meters.

Portfolio Home

Select a building to continue work in the building view.

Data sources and meters

Understand how feeds and meters organize portfolio data.

Data and meter fields

Look up meter columns, service types, and status values.
Last modified on August 18, 2026