Device discovery is a building-level feature. Select a building from the sites list before starting discovery.
Device discovery identifies equipment integrated into a data source and registers it in Cloud BMS. The process scans the external system, returns a list of devices and points, and lets you select which ones to add to the database.

Start discovery

You can start discovery from two locations. Shared results and Activity Log behavior are the same for both paths.
1

Open data sources

Navigate to your building and click Data Sources in the left navigation bar.
2

Start bulk discovery

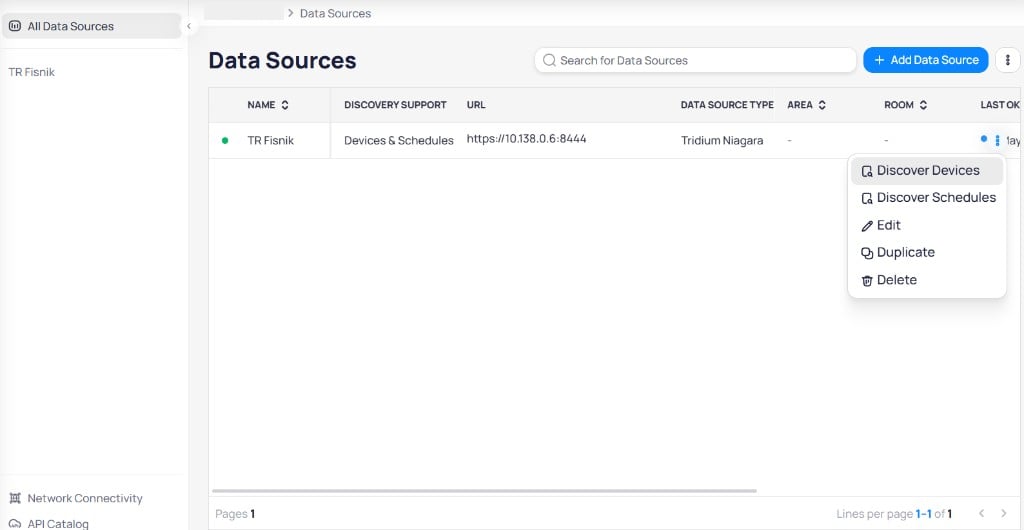
Click the three-dot menu to the right of the search bar and select Discover. Select the data sources you want to discover and click Next. Wait for the discovery process to complete.
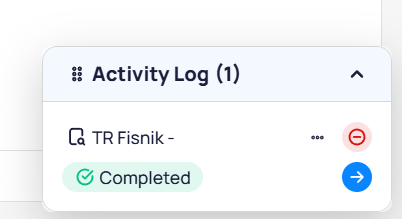
After discovery starts, the Activity Log appears in the lower right corner. It shows the discovery job name, data source, and status. You can expand, collapse, or move the Activity Log while discovery runs. You can also navigate to other modules without interrupting progress. Wait for the status to show Completed before reviewing results.
Activity Log panel showing one entry for TR Fisnik with a green Completed status badge and navigation arrow

The Activity Log confirms when the discovery job finishes

Discovery results

After discovery completes, the Device Discovery page displays five tabs. Each tab shows a count badge with the number of items it contains. Use Restart discovery to re-run discovery, or Complete Discovery to finalize the process. Each tab includes an Export button to download its contents.
Adding devices to the database is not the final step. After you finish selecting devices, click Complete Discovery, then Refresh Cache. If you skip Refresh Cache, devices can appear in Cloud BMS while data collection never starts. You can also run Refresh Cache later from the data source connector menu.

New devices

The New Devices tab lists devices that are not yet in Cloud BMS. Filter by All to see every new device, or Possible Duplicates to see devices that may already exist under a different identifier. You can browse these devices in two views:
  • Devices List — shows each device as a row with its path and new point count. Click the copy icon to copy a device path. Expand a device to see its individual points.
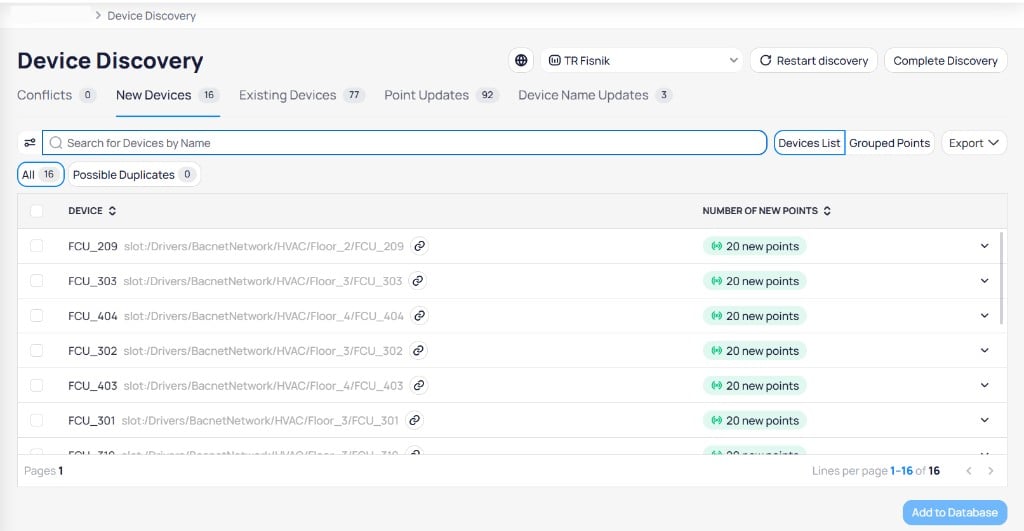
Device Discovery page on the New Devices tab in Devices List view, showing FCU devices with their BACnet paths, copy icons, and 20 new points each, with All 16 and Possible Duplicates 0 filter tabs

Devices List shows each device with its path and the number of new points

  • Grouped Points — groups results by point name. Each row shows how many new devices and new points share that name. Expand a point name to see the individual devices.
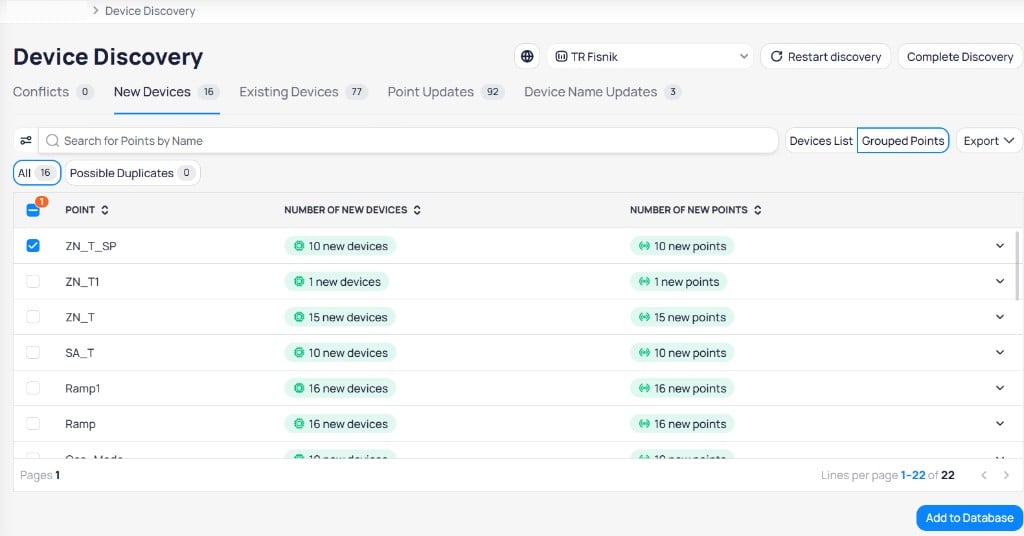
Device Discovery page in Grouped Points view showing point names like ZN_T_SP and SA_T with columns for Number of New Devices and Number of New Points

Grouped Points organizes results by point name across all discovered devices

Add devices to the database

1

Select devices and points

Check the devices and points you want to register. The selection count appears above the table (for example, “3 device(s) selected on this page”). Click Select all devices in New Devices to select everything across all pages.
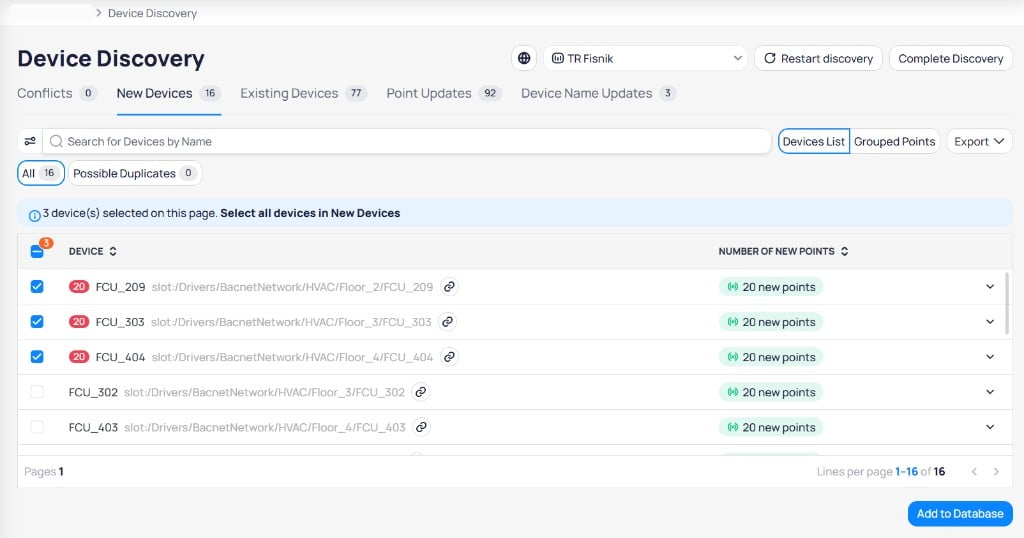
Device Discovery New Devices tab with three FCU devices checked, each showing a blue 20 badge for selected points, and a message showing 3 devices selected with an option to select all devices

Selected devices display a point count badge and the selection summary appears above the table

2

Add to database

Click Add to Database. The selected devices and points are registered in Cloud BMS and move to the Existing Devices tab.
You can add devices incrementally. Select a few devices, click Add to Database, then return to add more from the remaining list.

Existing devices

The Existing Devices tab shows devices already registered in Cloud BMS. It supports both Devices List and Grouped Points views, plus Filters for narrowing results. It contains three sub-tabs:
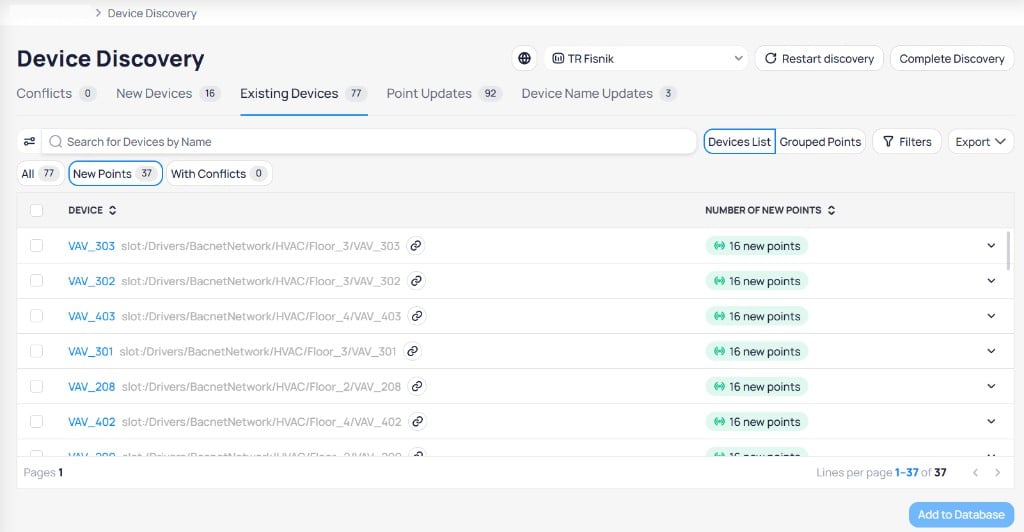
Device Discovery Existing Devices tab with New Points sub-tab selected showing 37 devices, VAV devices listed with BACnet paths, 16 new points each, Devices List and Grouped Points toggle, Filters button, and Export button

The Existing Devices tab with New Points sub-tab showing VAV devices with 16 new points each

Expand a device row to see its individual points. Select the device and its points, then click Add to Database to register the new points.
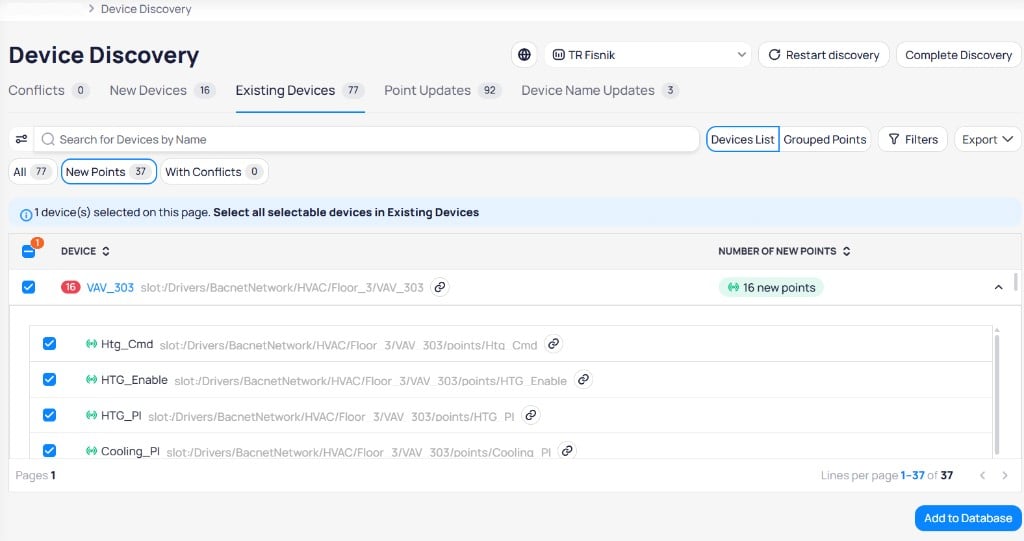
Existing Devices tab with VAV_303 expanded showing four new points with BACnet paths including Htg_Cmd, HTG_Enable, HTG_PI, and Cooling_PI, all selected with checkboxes, and Add to Database button at the bottom right

Expand an existing device to select new points for registration

Conflicts

Conflicts occur when Cloud BMS has previously discovered a device or point, but can no longer find it in the data source. Common causes include:
  • Renaming a device or point in the external system
  • Changing a device or point location in the external system
  • Deleting and re-adding a device or point in the external system
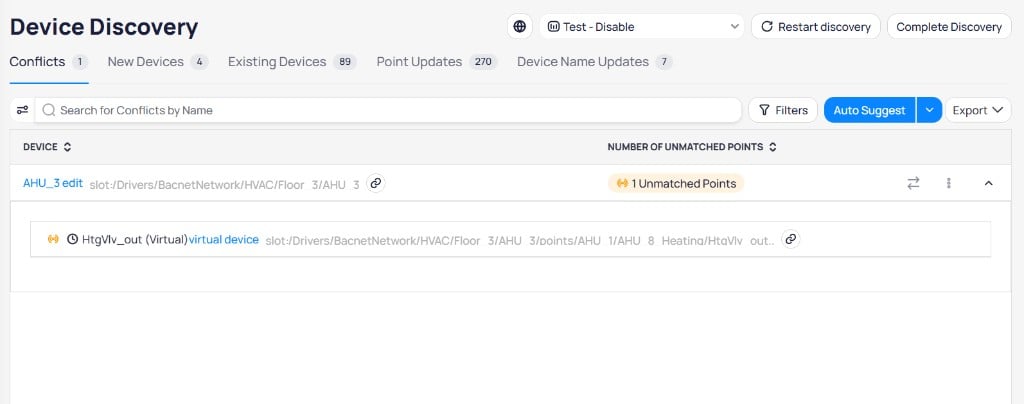
These orphaned devices and points remain in a Down status because Cloud BMS cannot communicate with them. When the renamed or relocated version appears during discovery, it comes in as a new device. Adding it without resolving the conflict creates duplicate data. Cloud BMS marks a device as a possible duplicate when it detects that a newly discovered device may already exist in the database under a different identifier. The Conflicts tab lists devices that have been rediscovered. Each row shows the device name, path, and the number of unmatched points. Expand a device to see its unmatched points, including any virtual device references.
Conflicts tab showing AHU_3 edit device with 1 Unmatched Points, expanded to show HtgVlv_out Virtual point with its BACnet path, with Auto Suggest button, Filters, and Export controls

The Conflicts tab showing a device with one unmatched point expanded to reveal the virtual device detail

Merge devices

Merging resolves conflicts by pairing unmatched points from the old device record with their counterparts on the rediscovered device.

Merge a single device

1

Open the matchmaking view

On the Conflicts tab, click the Match Points icon (two arrows) on the device you want to merge.
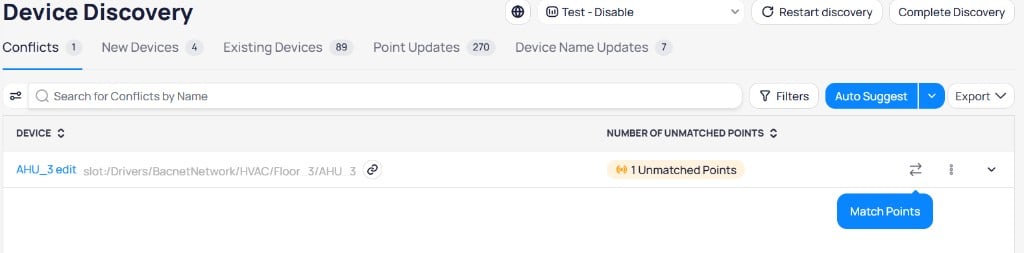
Conflicts tab showing AHU_3 edit device with 1 Unmatched Points and the Match Points button tooltip visible on the two-arrows icon

Click Match Points on a conflict row to start the merging process

2

Match points

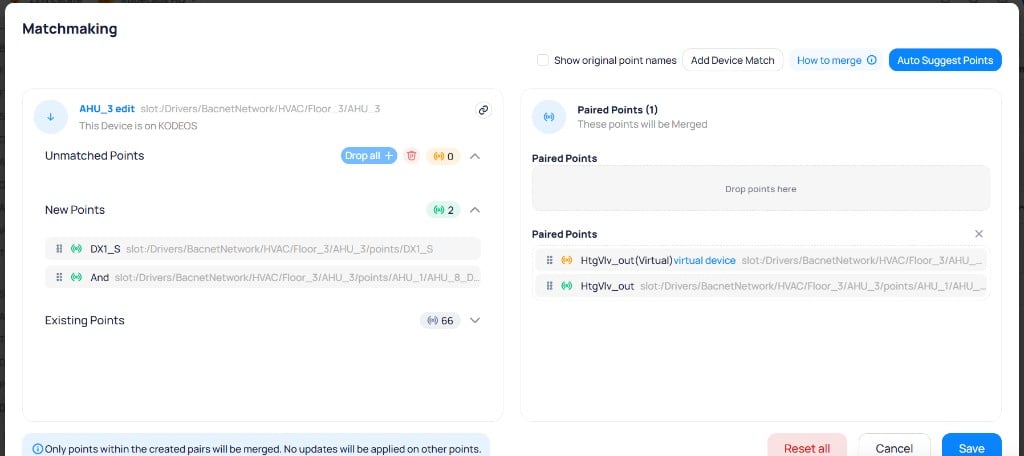
The Matchmaking view opens. If a match is found, Auto Suggest Points runs automatically and pairs the points for you. You can also drag and drop points manually into the Paired Points area to create or adjust pairings.The left panel shows the device on Cloud BMS with its Unmatched Points, New Points, and Existing Points. The right panel shows Paired Points that will be merged. Click Save to apply the merge.
Matchmaking dialog for AHU_3 edit showing Unmatched Points section with Drop all button, New Points with DX1_S and And listed, Existing Points count of 66, and Paired Points on the right with HtgVlv_out Virtual paired with HtgVlv_out, plus Show original point names, Add Device Match, How to merge, and Auto Suggest Points controls

The Matchmaking view shows unmatched and new points on the left, paired points on the right

3

Add a device match

Click Add Device Match. The Device Match Selection dialog opens with a searchable list of devices. Select the device you want to pair with and click Add.
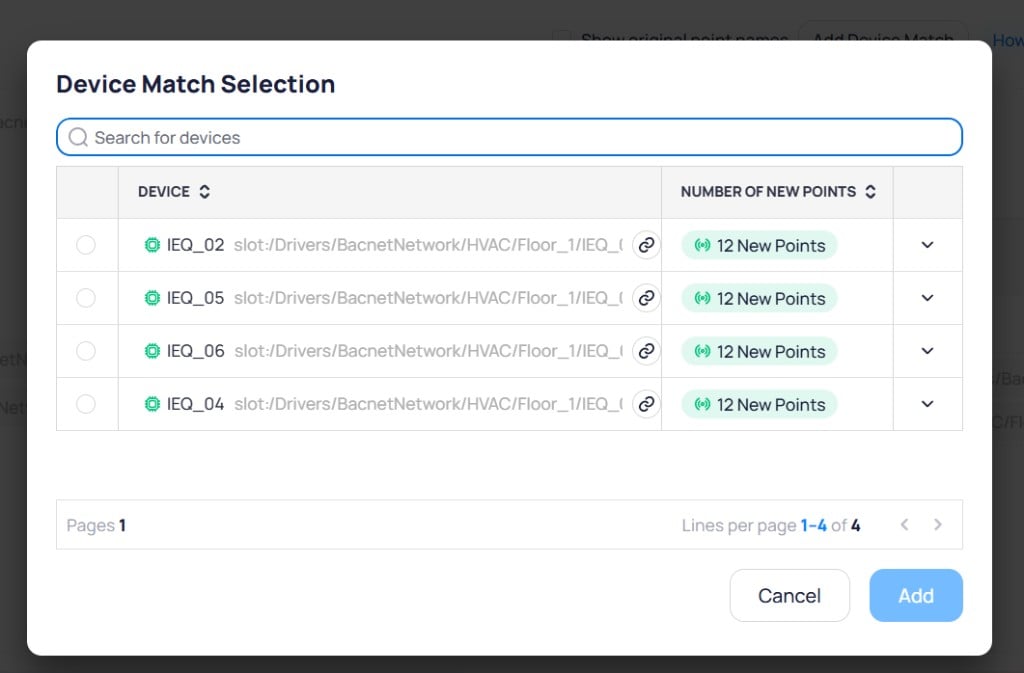
Device Match Selection dialog with search bar, device table showing IEQ_02, IEQ_05, IEQ_06, and IEQ_04 with 12 New Points each, and Cancel and Add buttons

Search and select the device to pair with from the Device Match Selection dialog

Only points within created pairs are merged. No updates are applied to other points. Drag and drop points to the specified area to merge them.

Global auto-suggest

When many devices have conflicts, click Auto Suggest on the Conflicts tab to run the matching process across all unmerged devices at once. The Devices Autosuggest page displays results with a Match Status for each device. Filter by All, Match Found, or Match Not Found. Click Step by Step Merging to review each device individually. Confirm or adjust the suggested pairs, then proceed to apply each merge.
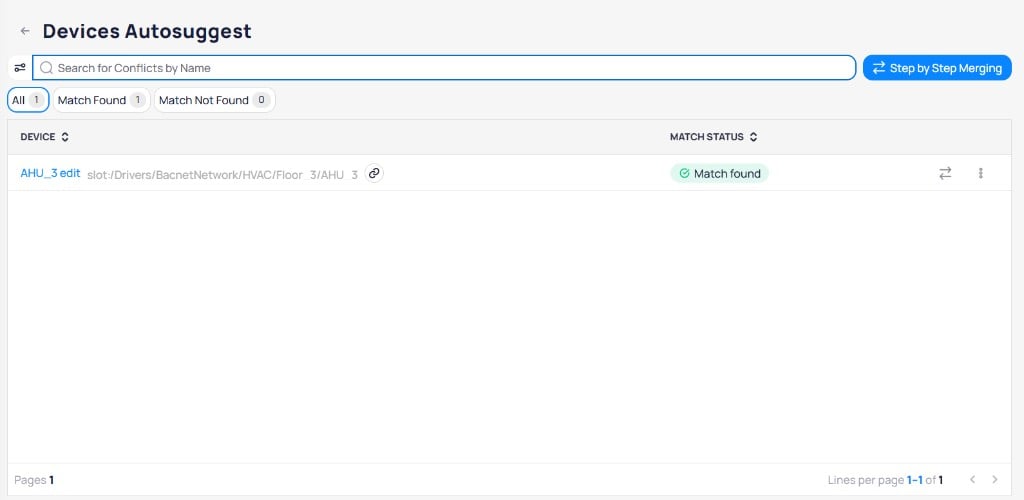
Devices Autosuggest page with sub-tabs for All 1, Match Found 1, and Match Not Found 0, showing AHU_3 edit device with Match found status, and Step by Step Merging button in the upper right

Devices Autosuggest shows the match status for each conflicting device with a Step by Step Merging option

Point updates

The Point Updates tab shows existing points whose properties differ from the last discovery. Filter results using the sub-tabs: The table displays Point, Device, Update Type, and Update Status columns. The Update Status column shows the old and new values (for example, °F > null). Select the points you want to sync and click Update points to apply the changes to Cloud BMS.
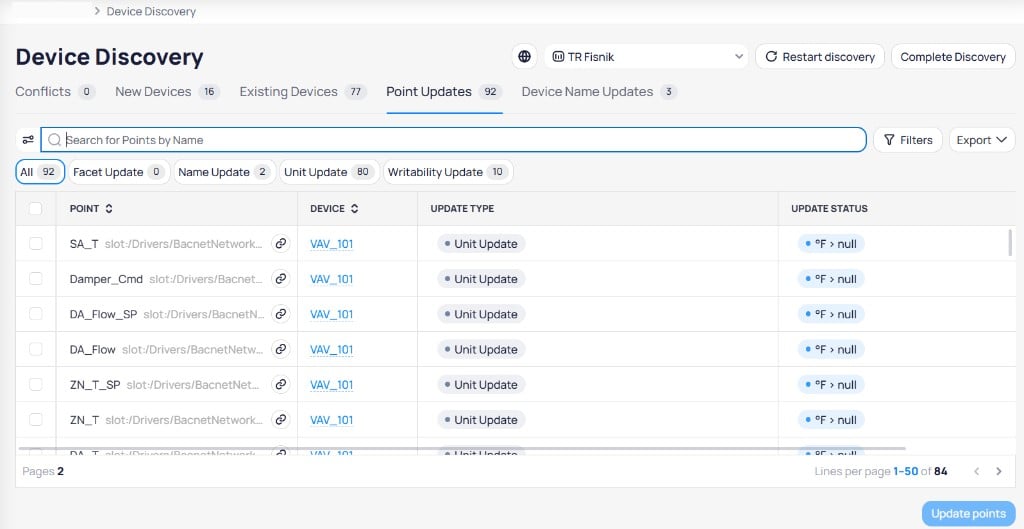
Point Updates tab with sub-tabs for All 92, Facet Update 0, Name Update 2, Unit Update 80, and Writability Update 10, showing a table of points from VAV_101 with Unit Update type and Update Status showing °F to null

Point Updates shows each changed point with its update type and the old-to-new value transition

Device name updates

The Device Name Updates tab shows devices whose name changed in the external system since the last discovery. The table displays the Current Name (KODEOS) alongside the Updated Name (Data Source) with the device path. Select the devices you want to update and click Update Devices to sync the names in Cloud BMS.
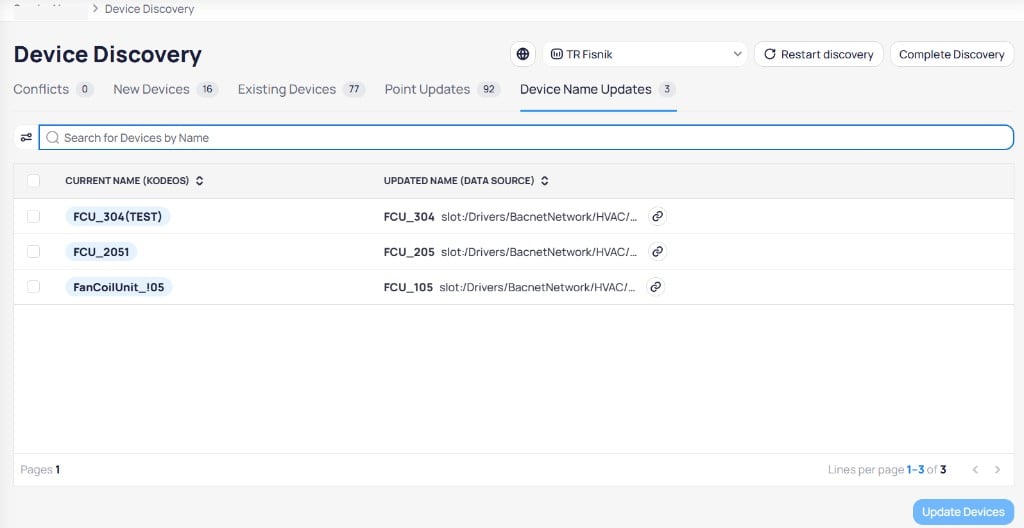
Device Name Updates tab showing three devices with Current Name KODEOS column listing FCU_304 TEST, FCU_2051, and FanCoilUnit_I05, and Updated Name Data Source column listing FCU_304, FCU_205, and FCU_105 with their BACnet paths

Device Name Updates compares the current Cloud BMS name with the updated name from the data source

Export discovery results

Each tab includes an Export button. Click it to open the export dialog where you set a File Name, choose an Export Type (for example, Export Devices), and select which Columns to include. Click Export to download the file.
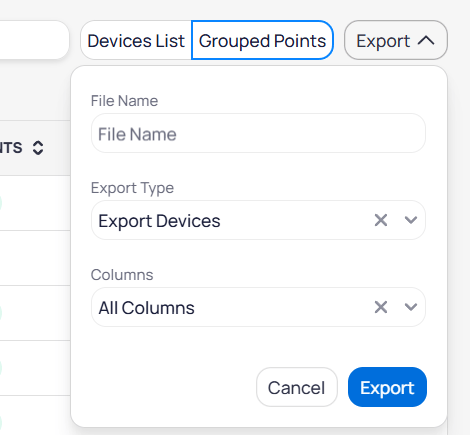
Export dialog with File Name field, Export Type dropdown set to Export Devices, Columns dropdown set to All Columns, and Cancel and Export buttons

The export dialog lets you name the file, choose the export type, and select columns

Each tab exports its own data:
  • Conflicts — devices or points with conflicts
  • New Devices — list of new devices or new points
  • Existing Devices — list of new points on existing devices
  • Point Updates — points with updates, including details on what changed

Next steps

Data sources

Configure and monitor your data source connections.

Devices

View and manage the equipment registered through discovery.
Last modified on August 18, 2026