

Policies list
To access notification policies, navigate toFDD > Policies. The Policies page displays all configured policies in a sortable table.
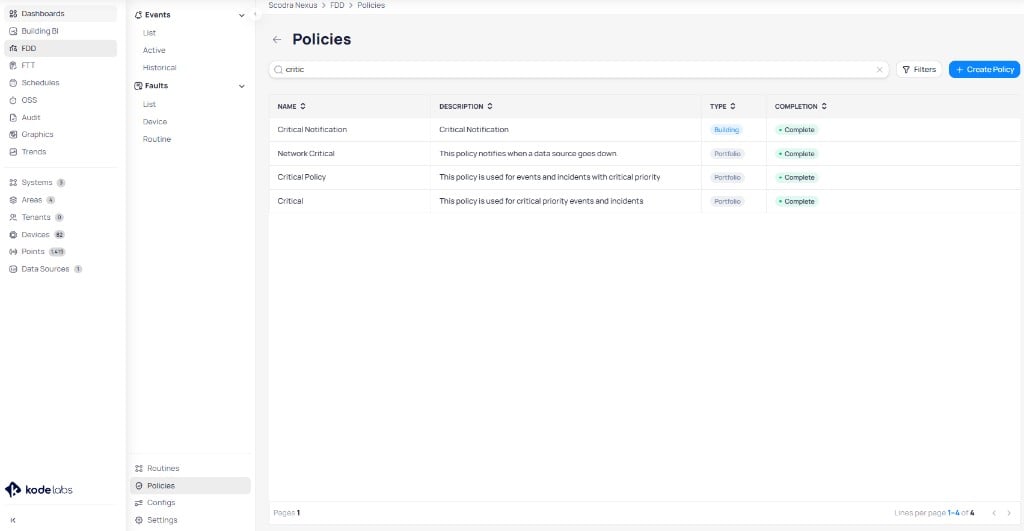
Use the search bar to filter policies by name or description. Select
Filters to narrow results by specific criteria.
Edit a policy at the same level where it was created. Edit portfolio policies in Portfolio view and building policies in the Building view.
Manage policies
Select the three-dot menu on any policy row to access row actions.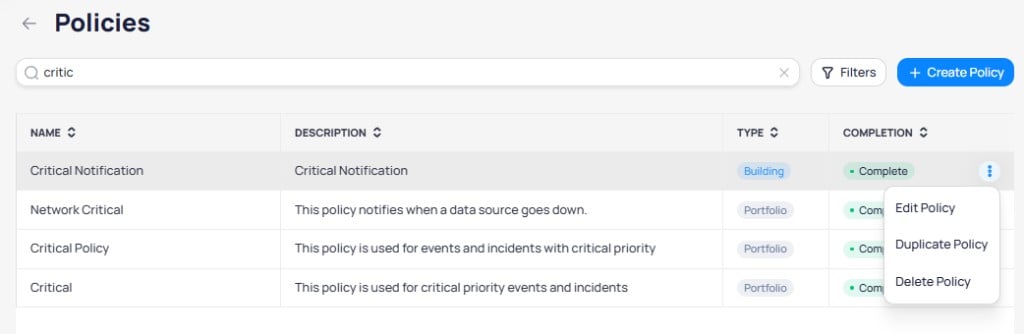
- Edit Policy: Open the policy wizard to modify settings.
- Duplicate Policy: Create a copy of the policy with the same configuration.
- Delete Policy: Remove the policy permanently.
Create a policy
Select+ Create Policy to open the policy wizard. The wizard has two steps: Details and Notify.
Step 1: Details
The Details step defines the policy name, notification channels, and content.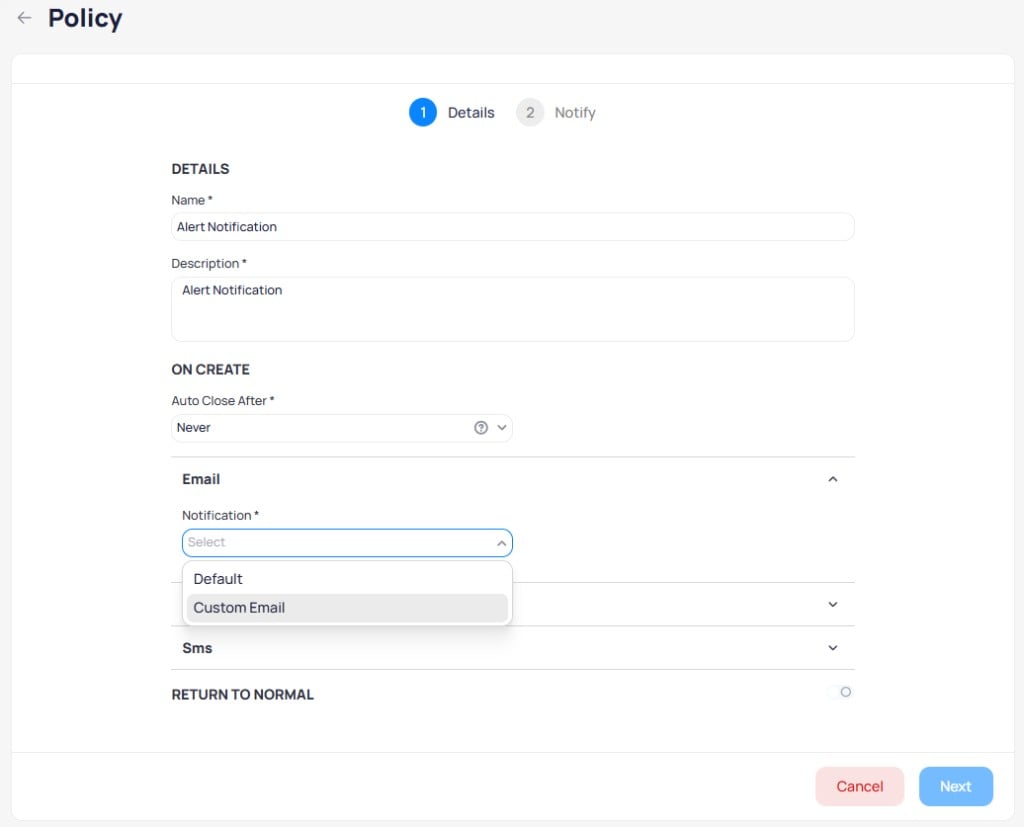
The Details step with notification channel configuration
Policy information
- Name: Enter a descriptive name that identifies the policy’s purpose, such as “Critical HVAC - Engineering Team.”
- Description: Provide a brief summary of when and why this policy is used.
On Create
TheOn Create section controls what happens when a new event is generated.
Auto Close After sets how long an event stays active before automatically closing. The default value is Never, which keeps events open until they are manually resolved or the fault condition clears.
Notification channels
Each channel can be expanded to configure its notification type and content. The available channels are:- Email: Send structured email notifications with event details.
- Push: Send in-app push notifications to mobile devices.
- Sms: Send text message notifications with event information.
Email notification options
For each email channel, select one of two notification types from theNotification dropdown:
Default uses the standard KODE email template. When you select Default, choose the fields to include in the email from the Fields multi-select dropdown. The available fields are:
- Building
- Client Name
- Device Name
- Event Description
- Event Name
- Event Note
- Event Status
- Floor
- Location
- Next Escalation
- Point Name
- Point Value
- Possible Solution
- Priority
- Routine Description
- Routine Name
- Start Time
View event button that links directly to the event in Cloud BMS.
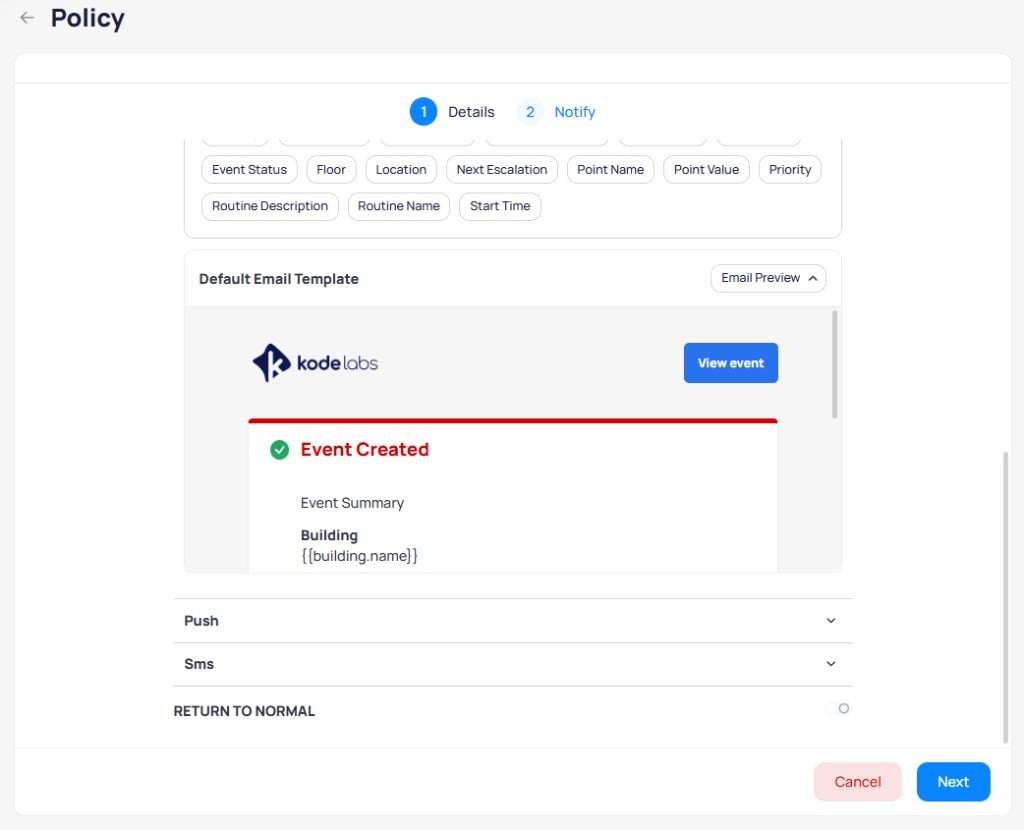
Default email template preview for event creation notifications
- Fields: Choose which data fields appear in the email body from the same field list as Default.
- Subject: Define a custom subject line using dynamic tokens. The default subject pattern is
Event {{status}} - {{building.name}} - {{devices.name}} - {{name}}. Select from the available subject tokens to insert dynamic values: Building, Client Name, Device Name, Event Description, Event Name, Event Note, Event Status, Floor, Location, Next Escalation, Point Name, Point Value, Priority, Routine Description, Routine Name, and Start Time.
Return to normal
TheReturn to Normal toggle controls whether a notification is sent when a fault condition clears and the event ends. When enabled, the return-to-normal section provides the same channel configuration (Email, Push, Sms) as the On Create section.
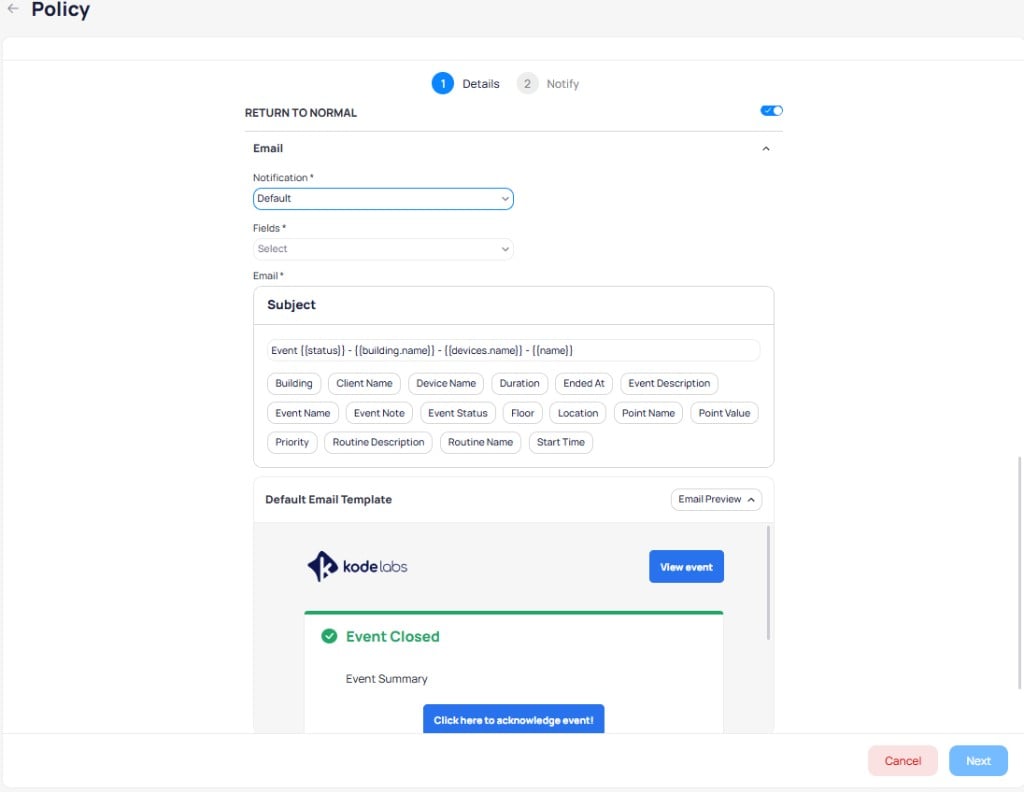
Return to Normal configuration with the Event Closed email template
Click here to acknowledge event! button. The available fields for return-to-normal notifications include two additional options beyond the On Create fields:
- Duration
- Ended At
Step 2: Notify
The Notify step defines the recipients, escalation tiers, and external data sources for the policy. The page is organized into collapsible sections.External Data Source
Select+ Add to connect an external data source for work order delivery from this policy. This section is optional.
When you configure an external data source at the policy level, it applies to every configuration that uses this policy. A configuration-level external data source overrides the policy setting for that configuration only.
Details
Choose one of two recipient configurations: Group Configuration assigns the same notification channels to all selected recipients.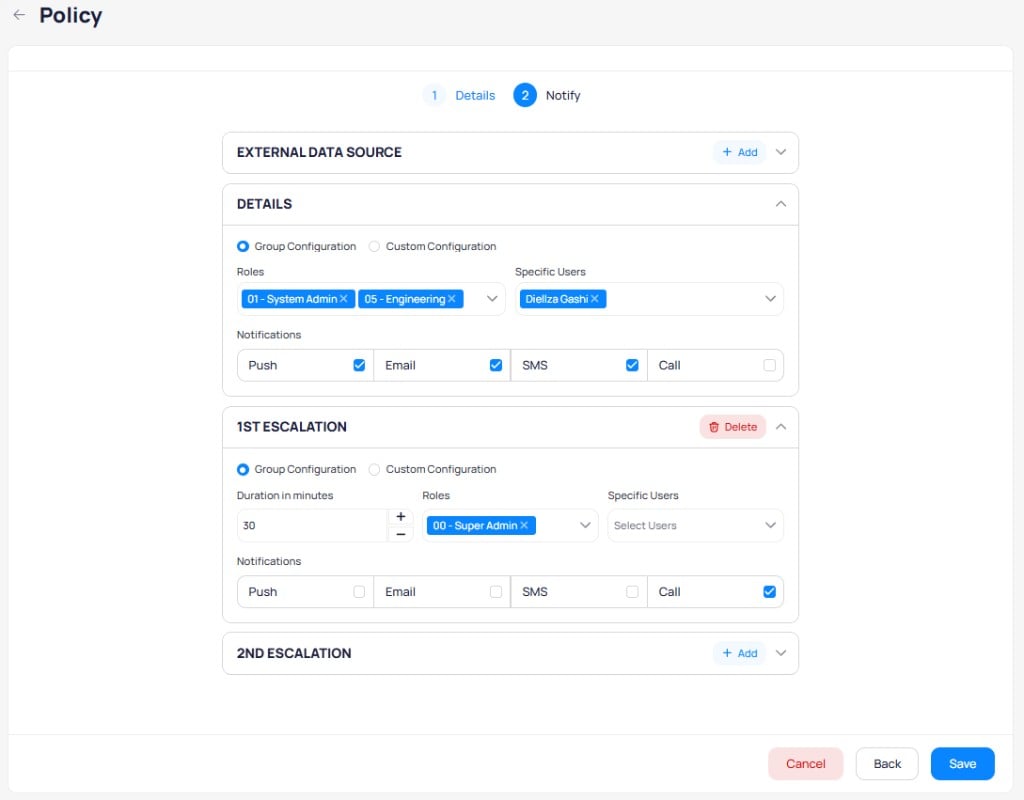
Group Configuration with roles, specific users, and shared notification channels
- Roles: Select one or more roles (for example,
01 - System Admin,05 - Engineering). - Specific Users: Select individual users to receive notifications.
- Notifications: Enable one or more channels for all recipients:
Push,Email,SMS, andCall.
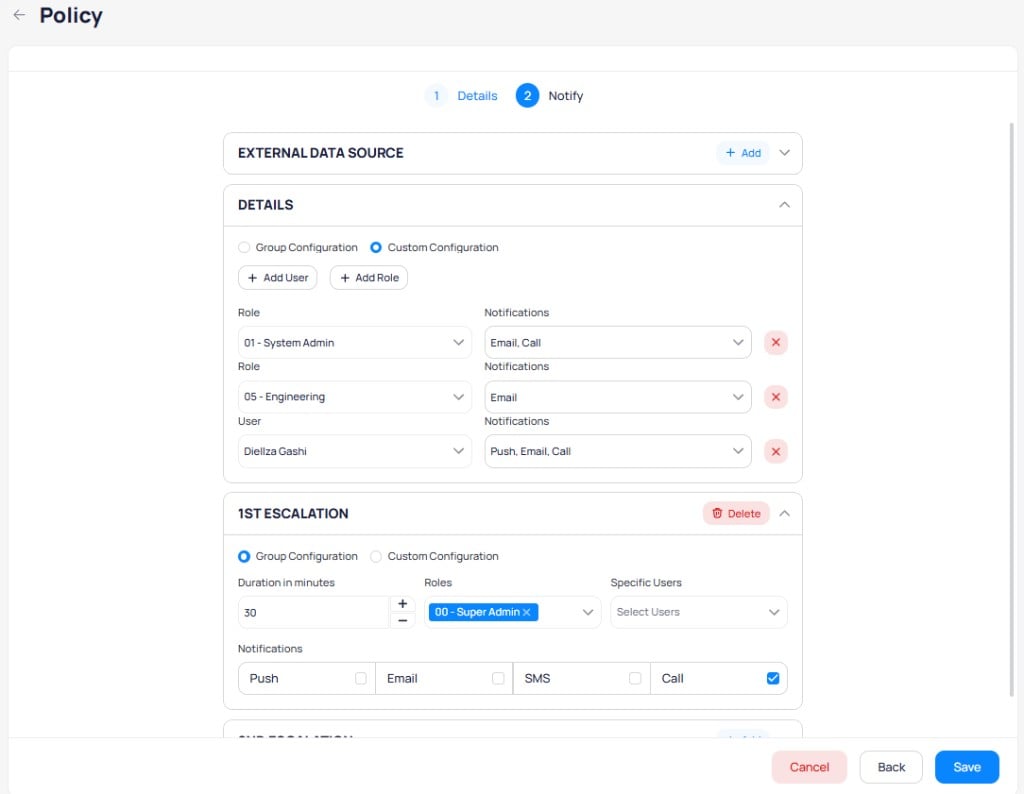
Custom Configuration with per-recipient notification channel assignments
- Select
+ Add Useror+ Add Roleto add recipients. - For each recipient row, choose the notification channels from the
Notificationsdropdown (for example,Email, Callfor one role andPush, Email, Callfor a specific user). - Select the red X icon to remove a recipient row.
Escalation tiers
Add escalation tiers to notify additional recipients if events remain unresolved.- 1st Escalation: Set the
Duration in minutesbefore escalation triggers. AssignRolesandSpecific Usersfor this tier with their own notification channels. SelectDeleteto remove the tier. - 2nd Escalation: Select
+ Addto configure a second escalation tier with the same options.
Users you add in the Notify step become event assignees when FDD sends a notification. Only those assignees can acknowledge events covered by this policy.
Save to create the policy.
Assign a policy
You can assign policies at two levels:- During routine configuration: Select routines from the Configs list, select
Configure, and choose the policy from the dropdown. - During event review: Update the policy assigned to a specific event from the event details panel.
Policies assigned at the routine level apply to all future events generated by that routine. Event-level assignments override the routine default for that specific event.
Notification behavior
FDD sends notifications at specific points in the event and incident lifecycle:- Event Created: A notification is sent when a new event is generated. The subject line follows the pattern “Event Created - Event Name.”
- Incident Created: When related events merge into an incident, a single notification is sent.
- Incident Priority Changed: When the incident priority escalates (for example, from Alert to Warning to Critical), a notification is sent at each level.
Channel behavior
Each notification channel delivers event information in a format suited to the channel:- Email: Structured email with event summary fields, a
View eventlink, and aClick here to acknowledge event!button. When an event closes and return-to-normal is enabled, the email displays an “Event Closed” header with a green accent. - Push: In-app push notifications. You can insert dynamic tokens such as
View Event LinkandAcknowledge Event Link. The preview shows placeholders such asURLandackURL. - SMS: Text message notifications. You can insert the same dynamic tokens as Push.
- Call: An automated voice call that reads out the event details. Call content cannot be customized.
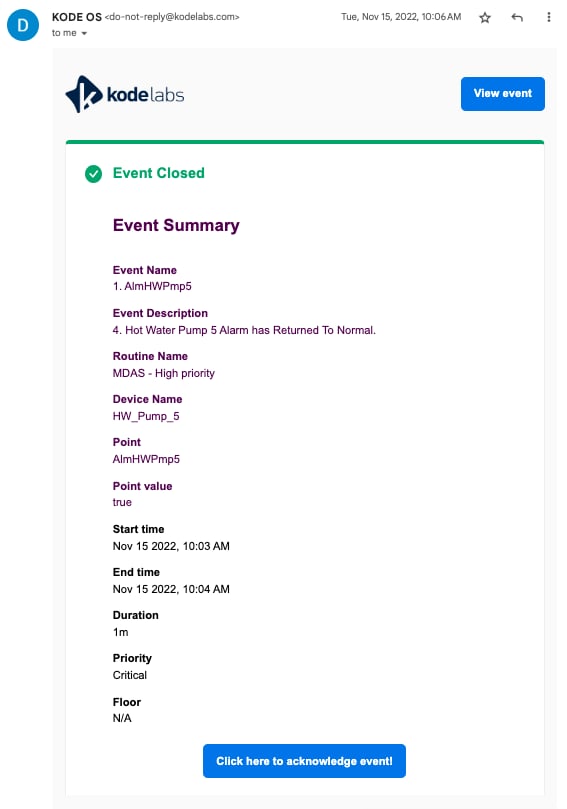
A return-to-normal email notification showing the Event Closed status with event summary details
Acknowledge behavior
Only users assigned to the policy can acknowledge events for that policy. FDD adds policy recipients as event assignees when it sends a notification. If your account or role is not listed in the policy Notify step, the Acknowledge button and notification acknowledgment links are unavailable. Recipients must also have access to the building where the event occurs. Without building assignment, they do not receive notifications and cannot acknowledge events. When an assignee acknowledges an event through the notification link or in Cloud BMS, subsequent assignees who select the acknowledge button receive a message indicating the event has already been acknowledged.Next steps
Configuration
Set up monitoring rules and assign notification policies to routines.
Events
Monitor and investigate fault events with streaming and incident views.
Work order integration
Configure automatic work order generation from FDD events.