> ## Documentation Index
> Fetch the complete documentation index at: https://documentation.kodelabs.com/llms.txt
> Use this file to discover all available pages before exploring further.
# Schedules
> Automate equipment operation with time-based schedules, holiday overrides, and AI-powered Optimized Start/Stop.
Schedules is a building-level module. Select a building from the [sites list](/products/kode-os/sites-and-map) to access its schedules. Mass write is accessible at the portfolio level.
Schedules automate equipment operation based on time. Define when devices should turn on and off, set temperature setpoints for occupied and unoccupied periods, and configure holiday overrides. Cloud BMS supports two schedule types:
* **Weekly schedules** -- define recurring time-based events for regular building operation
* **Calendar schedules** -- define exception dates for holidays and special events that can be referenced by weekly schedules
```mermaid actions={false} theme={"theme":{"light":"github-dark","dark":"github-dark"}}
---
config:
theme: neutral
---
flowchart LR
SCH[Schedule] -- "controls" --> DEV[Device]
OSS[OSS Algorithm] -- "optimizes" --> SCH
OSS -. "inputs" .- SENS[Sensor Data]
OSS -. "inputs" .- WX[Weather Data]
classDef sky stroke:#374D7C,fill:#E2EBFF,color:#374D7C
classDef peach stroke:#FBB35A,fill:#FFEFDB,color:#8F632D
classDef green fill:#B0E4CC,color:#285A48,stroke:#285A48
class SCH sky
class DEV peach
class OSS green
class SENS,WX green
```
## Navigate to schedules
Click `Sites` in the left navigation bar and select the building.
Click `Schedules` in the left sidebar menu. The schedules list displays all configured schedules for the selected site.
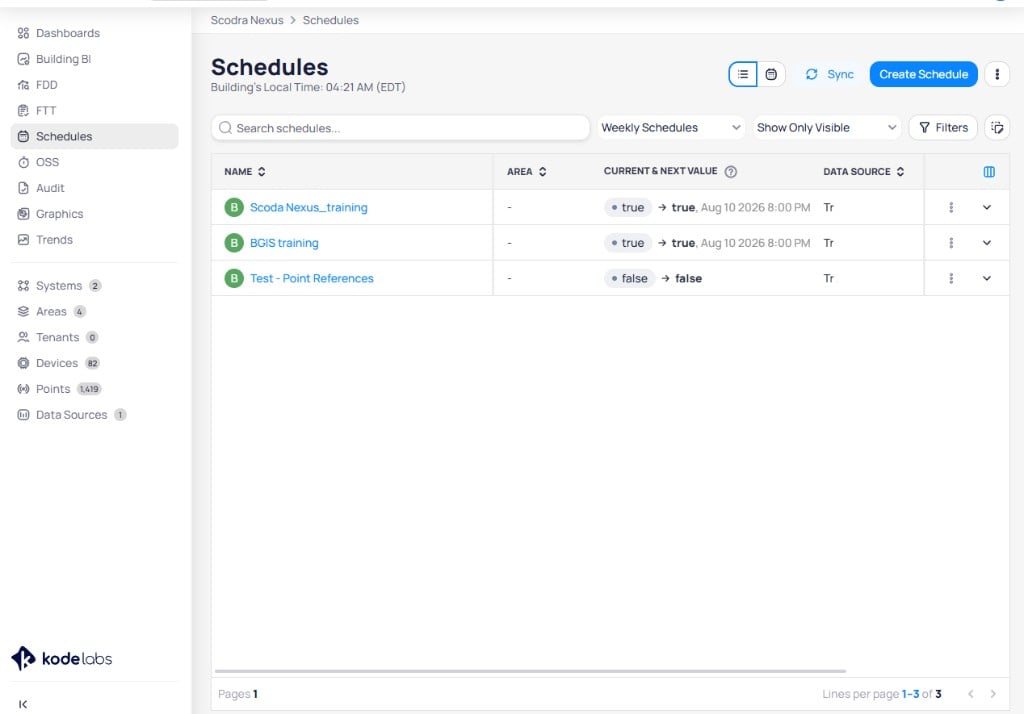 The schedules list displays the building's local time and shows each schedule's current value and next scheduled value with timestamp. Use the toolbar to:
* **Search** for schedules by name
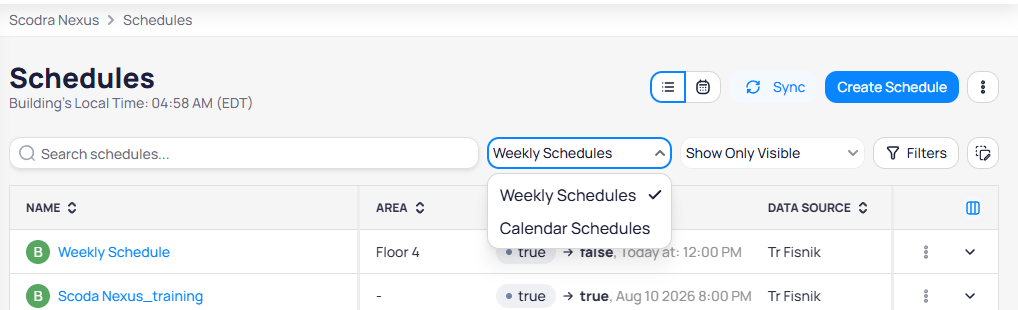
* **Filter** by schedule type (`Weekly Schedules` or `Calendar Schedules`) and visibility
* **Sync** schedules with the external building automation system
* Toggle between list and calendar view using the view icons
The schedules list displays the building's local time and shows each schedule's current value and next scheduled value with timestamp. Use the toolbar to:
* **Search** for schedules by name
* **Filter** by schedule type (`Weekly Schedules` or `Calendar Schedules`) and visibility
* **Sync** schedules with the external building automation system
* Toggle between list and calendar view using the view icons
 ### Schedule actions
Click the three-dot menu on a schedule row to access schedule-level actions.
### Schedule actions
Click the three-dot menu on a schedule row to access schedule-level actions.
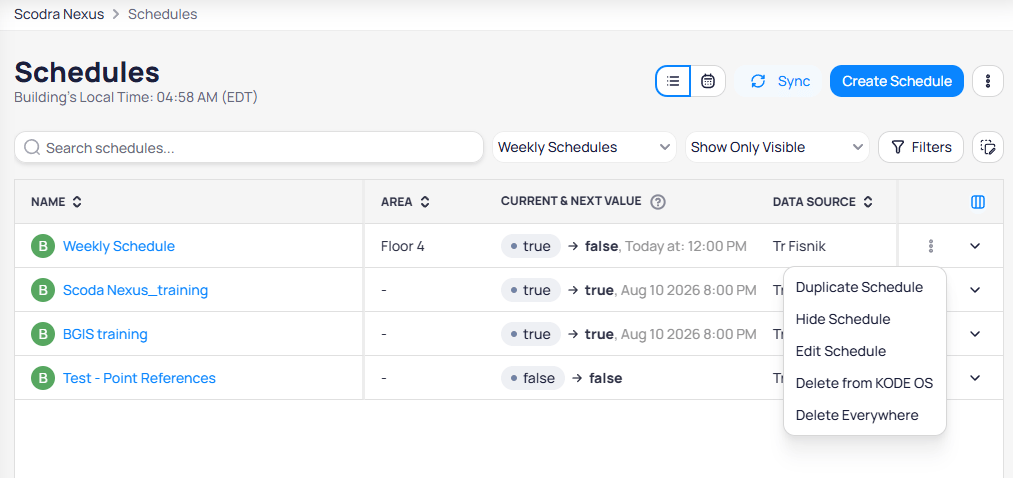 * **Duplicate Schedule** -- create a copy of the schedule with the same configuration
* **Hide Schedule** -- hide the schedule from the list without deleting it (use `Show Only Visible` filter to toggle hidden schedules)
* **Edit Schedule** -- open the schedule details page to modify its configuration
* **Delete from Cloud BMS** -- remove the schedule from Cloud BMS only, keeping it in the data source
* **Delete Everywhere** -- remove the schedule from both Cloud BMS and the connected data source
### Batch update
Click the batch update icon in the toolbar to open the Schedules Batch Update view.
* **Duplicate Schedule** -- create a copy of the schedule with the same configuration
* **Hide Schedule** -- hide the schedule from the list without deleting it (use `Show Only Visible` filter to toggle hidden schedules)
* **Edit Schedule** -- open the schedule details page to modify its configuration
* **Delete from Cloud BMS** -- remove the schedule from Cloud BMS only, keeping it in the data source
* **Delete Everywhere** -- remove the schedule from both Cloud BMS and the connected data source
### Batch update
Click the batch update icon in the toolbar to open the Schedules Batch Update view.
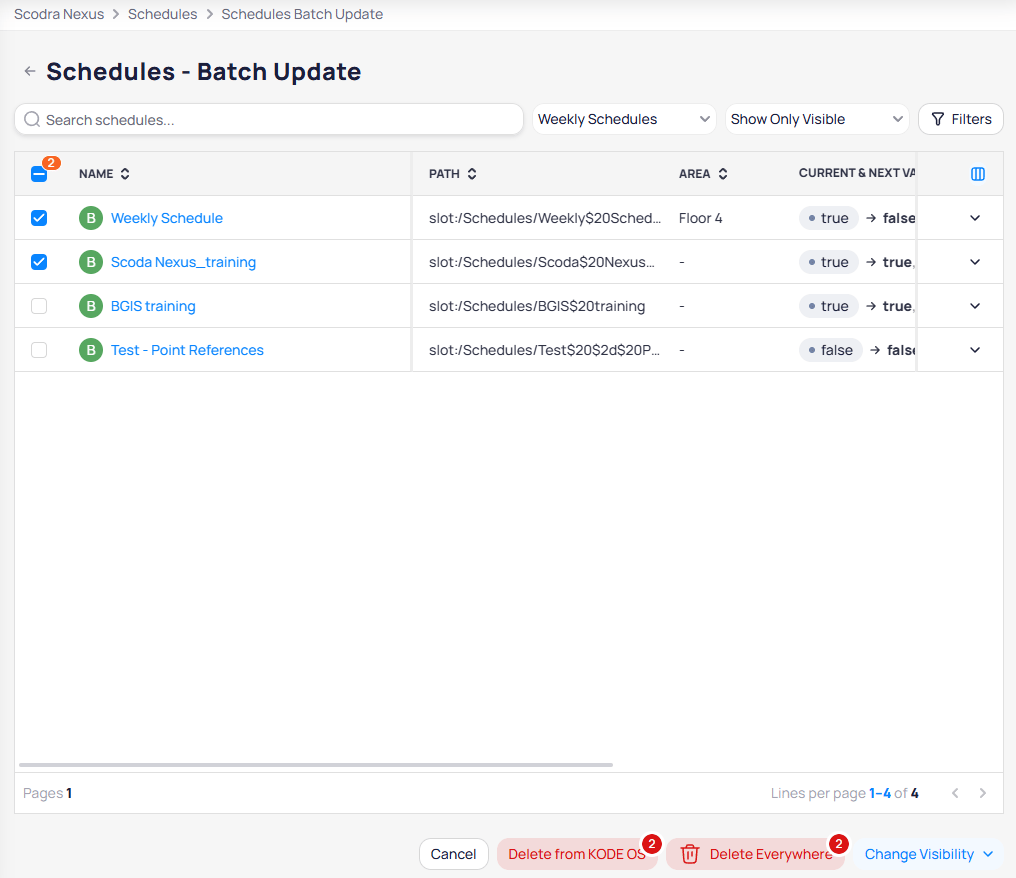
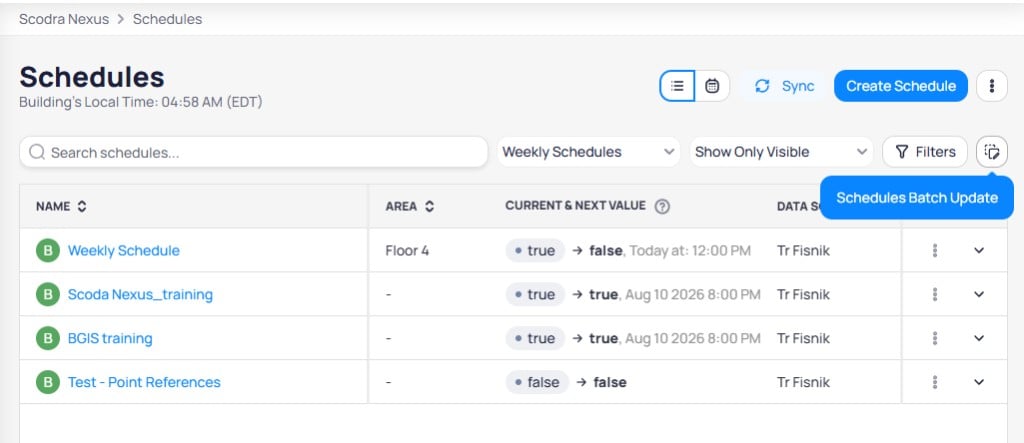 Select one or more schedules using the checkboxes to perform bulk actions. The batch update view shows the schedule path, area, and current and next values. Use the action bar at the bottom to delete selected schedules from Cloud BMS, delete them everywhere, or change their visibility.
 ### Calendar view
Switch to the calendar view using the calendar icon in the toolbar. The calendar view displays all schedules on a weekly grid, showing event blocks with their time ranges and values.
### Calendar view
Switch to the calendar view using the calendar icon in the toolbar. The calendar view displays all schedules on a weekly grid, showing event blocks with their time ranges and values.
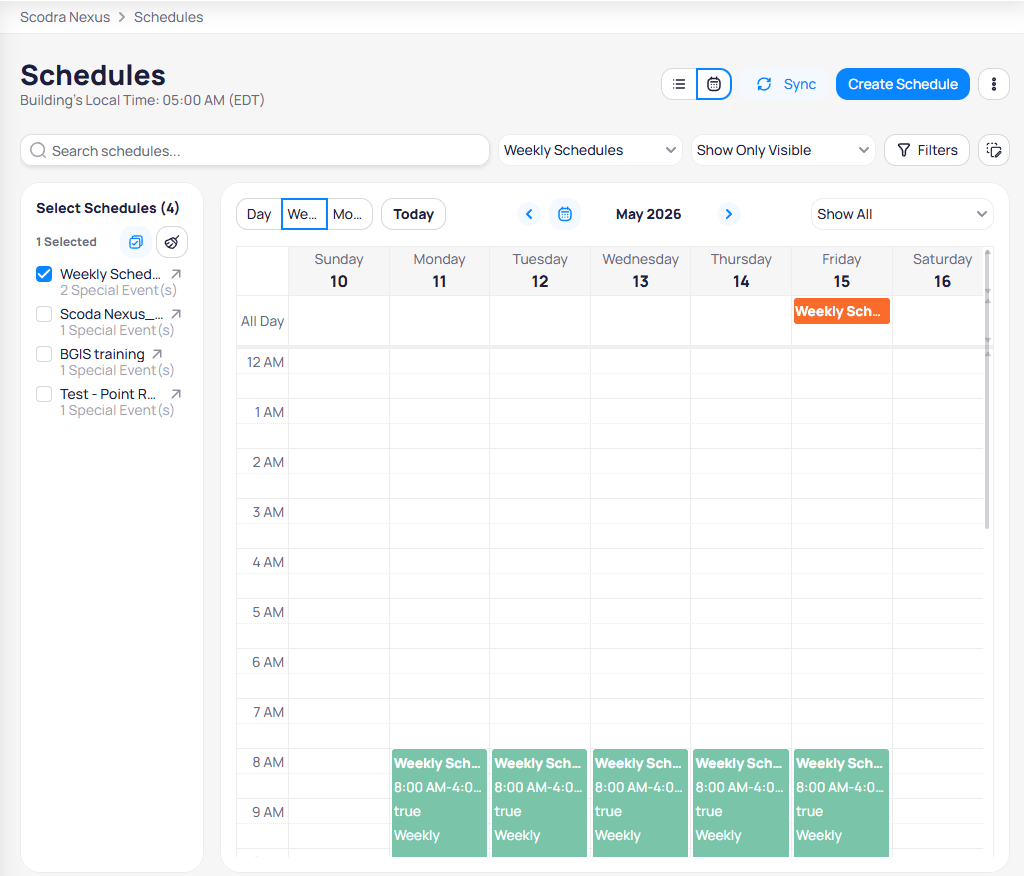 Use the sidebar on the left to select which schedules to display. Each schedule shows the number of special events configured. Toggle between `Day`, `Week`, and `Month` views using the tabs at the top, and navigate between weeks using the arrow buttons.
## Create a schedule
Click `Create Schedule` to open the creation dialog.
Use the sidebar on the left to select which schedules to display. Each schedule shows the number of special events configured. Toggle between `Day`, `Week`, and `Month` views using the tabs at the top, and navigate between weeks using the arrow buttons.
## Create a schedule
Click `Create Schedule` to open the creation dialog.
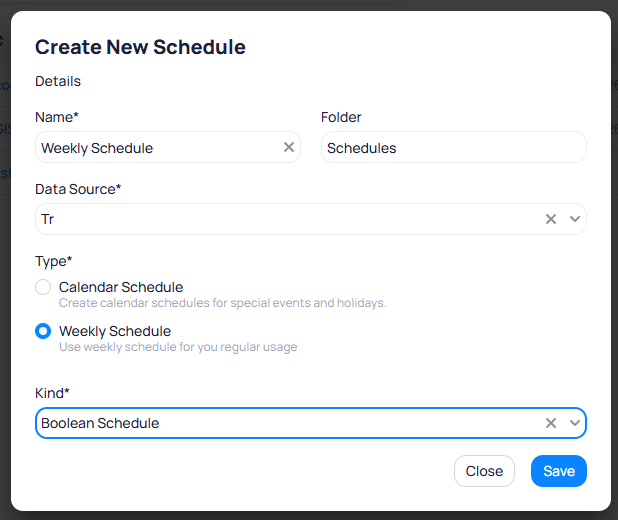 Enter a descriptive name for the schedule (for example, `Weekly Schedule`).
Specify the folder path where the schedule is stored in the data source.
Select the data source connector this schedule belongs to.
Choose the schedule type:
* **Calendar Schedule** -- for special events and holidays
* **Weekly Schedule** -- for regular recurring usage
Select the schedule kind (for example, `Boolean Schedule` for on/off control).
Click `Save` to create the schedule and open its details page.
## Configure schedule types
After you create a schedule, configure weekly recurrence or calendar exceptions.
Weekly schedules define recurring time-based events for regular building operation. Select `Weekly Schedule` as the type when creating a schedule.
### Schedule details and properties
After creating or selecting a weekly schedule, the details page displays the schedule configuration and the weekly calendar grid.
Enter a descriptive name for the schedule (for example, `Weekly Schedule`).
Specify the folder path where the schedule is stored in the data source.
Select the data source connector this schedule belongs to.
Choose the schedule type:
* **Calendar Schedule** -- for special events and holidays
* **Weekly Schedule** -- for regular recurring usage
Select the schedule kind (for example, `Boolean Schedule` for on/off control).
Click `Save` to create the schedule and open its details page.
## Configure schedule types
After you create a schedule, configure weekly recurrence or calendar exceptions.
Weekly schedules define recurring time-based events for regular building operation. Select `Weekly Schedule` as the type when creating a schedule.
### Schedule details and properties
After creating or selecting a weekly schedule, the details page displays the schedule configuration and the weekly calendar grid.
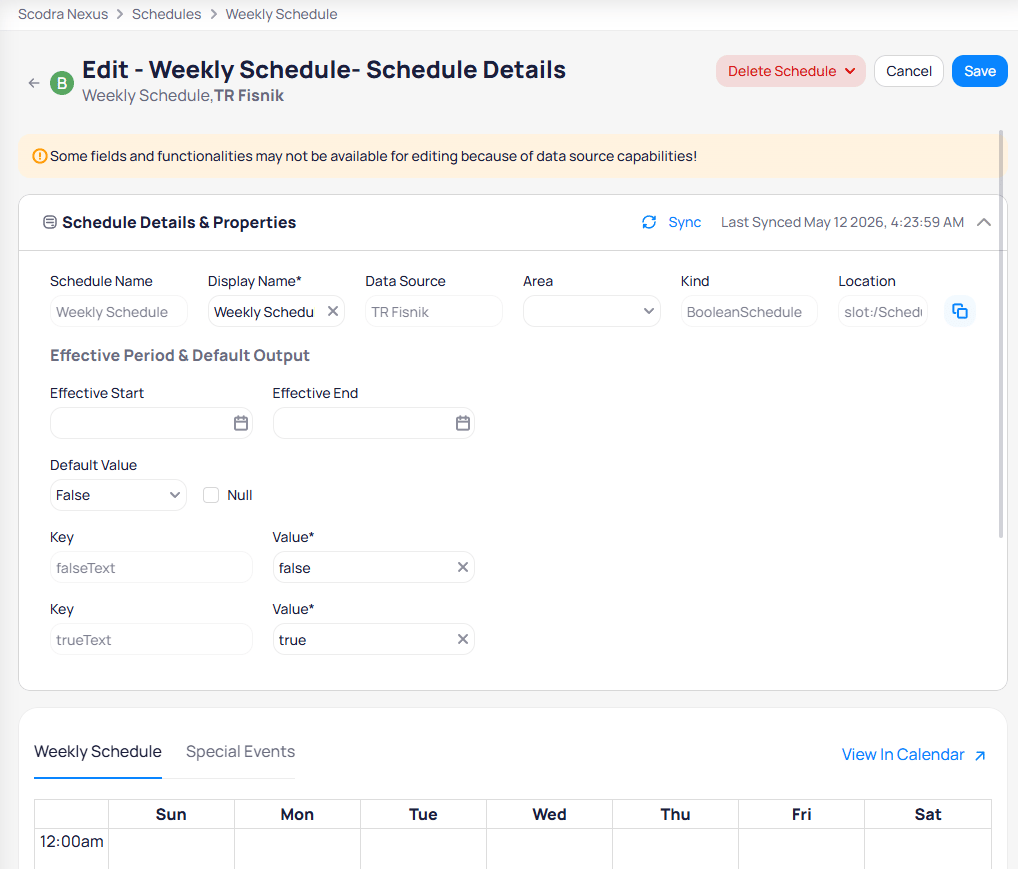 The `Schedule Details & Properties` panel includes:
* **Schedule Name** -- the internal name of the schedule
* **Display Name** -- the user-facing name shown in the schedules list
* **Data Source** -- the connected data source
* **Area** -- the area this schedule applies to (optional)
* **Kind** -- the schedule kind (for example, `BooleanSchedule`)
* **Location** -- the slot path in the data source
#### Effective period and default value
* **Effective Start / Effective End** -- define the date range during which the schedule is active
* **Default Value** -- the fallback value when no scheduled event is active (for example, `False` for a boolean schedule). Check `Null` to use no default value.
* **Key/Value pairs** -- define the display text for schedule values (for example, `falseText` = `false`, `trueText` = `true`)
Click `Sync` to synchronize the schedule with the external system. The last synced timestamp is displayed next to the sync button.
Some fields and functionalities may not be available for editing because of data source capabilities. A warning banner appears at the top of the page when this applies.
### Configure weekly events
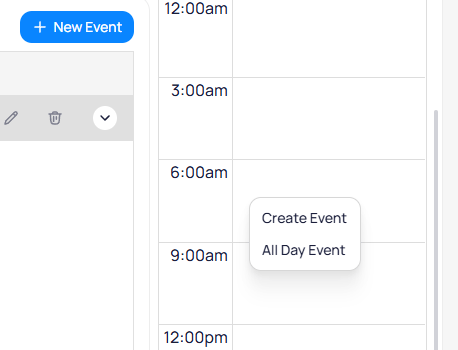
The weekly calendar grid displays the schedule's time blocks for each day of the week. Click on a time slot to access event options.
The `Schedule Details & Properties` panel includes:
* **Schedule Name** -- the internal name of the schedule
* **Display Name** -- the user-facing name shown in the schedules list
* **Data Source** -- the connected data source
* **Area** -- the area this schedule applies to (optional)
* **Kind** -- the schedule kind (for example, `BooleanSchedule`)
* **Location** -- the slot path in the data source
#### Effective period and default value
* **Effective Start / Effective End** -- define the date range during which the schedule is active
* **Default Value** -- the fallback value when no scheduled event is active (for example, `False` for a boolean schedule). Check `Null` to use no default value.
* **Key/Value pairs** -- define the display text for schedule values (for example, `falseText` = `false`, `trueText` = `true`)
Click `Sync` to synchronize the schedule with the external system. The last synced timestamp is displayed next to the sync button.
Some fields and functionalities may not be available for editing because of data source capabilities. A warning banner appears at the top of the page when this applies.
### Configure weekly events
The weekly calendar grid displays the schedule's time blocks for each day of the week. Click on a time slot to access event options.
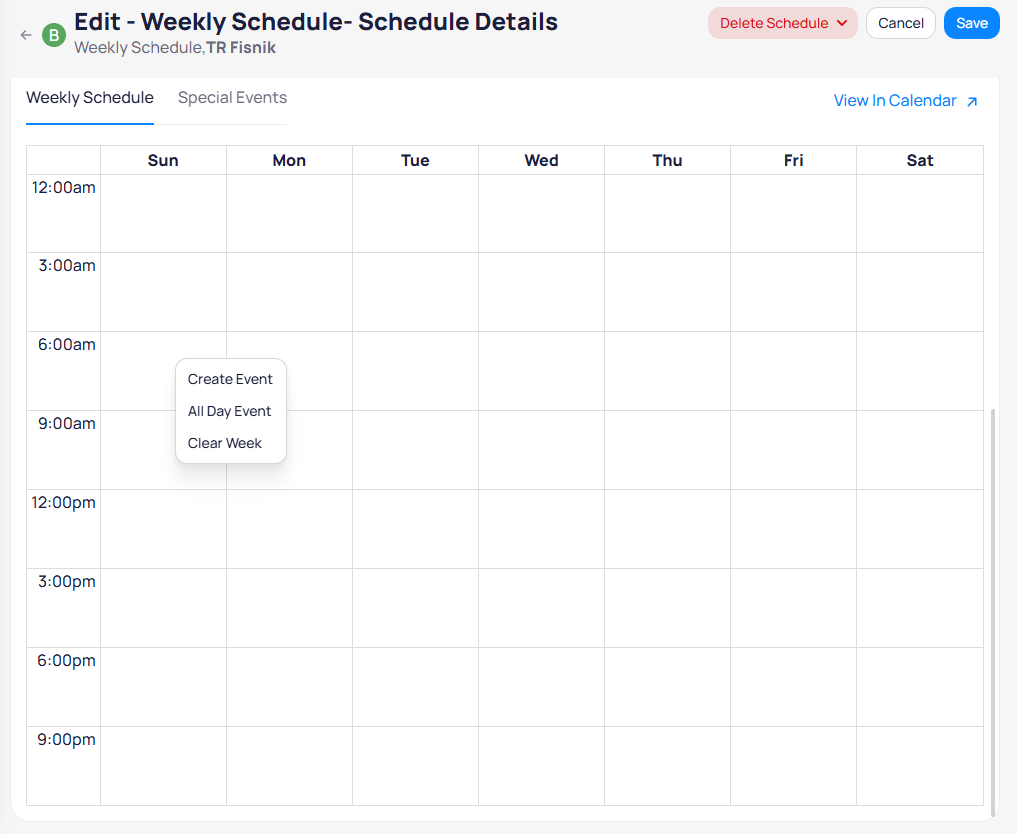 * **Create Event** -- add a time-based event for a specific day
* **All Day Event** -- create an event that spans the entire day
* **Clear Week** -- remove all events from the weekly schedule
#### Add an event
Select `Create Event` to open the Add Event dialog.
* **Create Event** -- add a time-based event for a specific day
* **All Day Event** -- create an event that spans the entire day
* **Clear Week** -- remove all events from the weekly schedule
#### Add an event
Select `Create Event` to open the Add Event dialog.
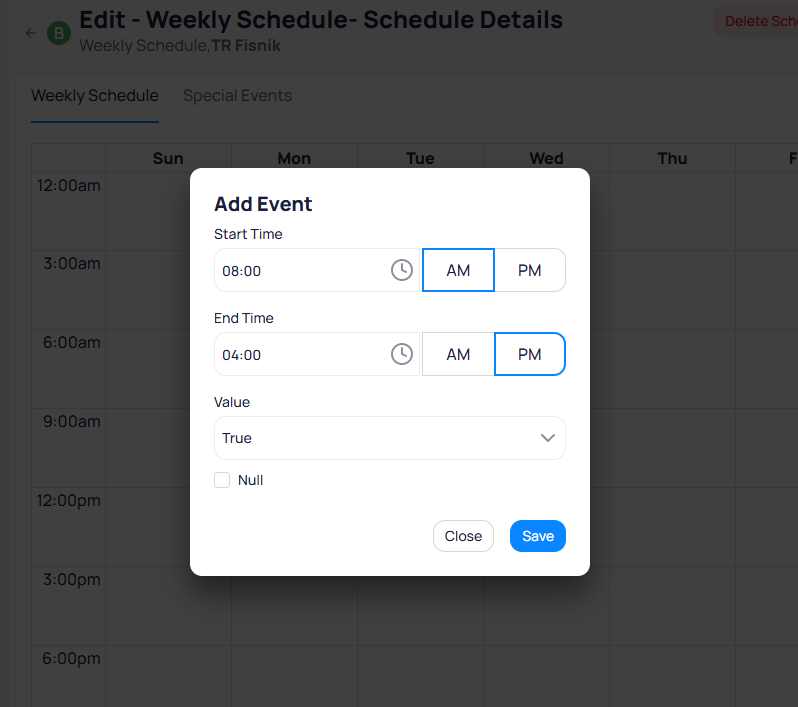 Set the event start time. Toggle between `AM` and `PM`.
Set the event end time. Toggle between `AM` and `PM`.
Select the value to write during this event (for example, `True` for on, `False` for off).
Check `Null` to clear the value during this period instead of writing a specific value. Click `Save` to add the event to the calendar.
#### Manage events
Once an event is created, it appears as a colored block on the calendar. Click a created event to access management options.
Set the event start time. Toggle between `AM` and `PM`.
Set the event end time. Toggle between `AM` and `PM`.
Select the value to write during this event (for example, `True` for on, `False` for off).
Check `Null` to clear the value during this period instead of writing a specific value. Click `Save` to add the event to the calendar.
#### Manage events
Once an event is created, it appears as a colored block on the calendar. Click a created event to access management options.
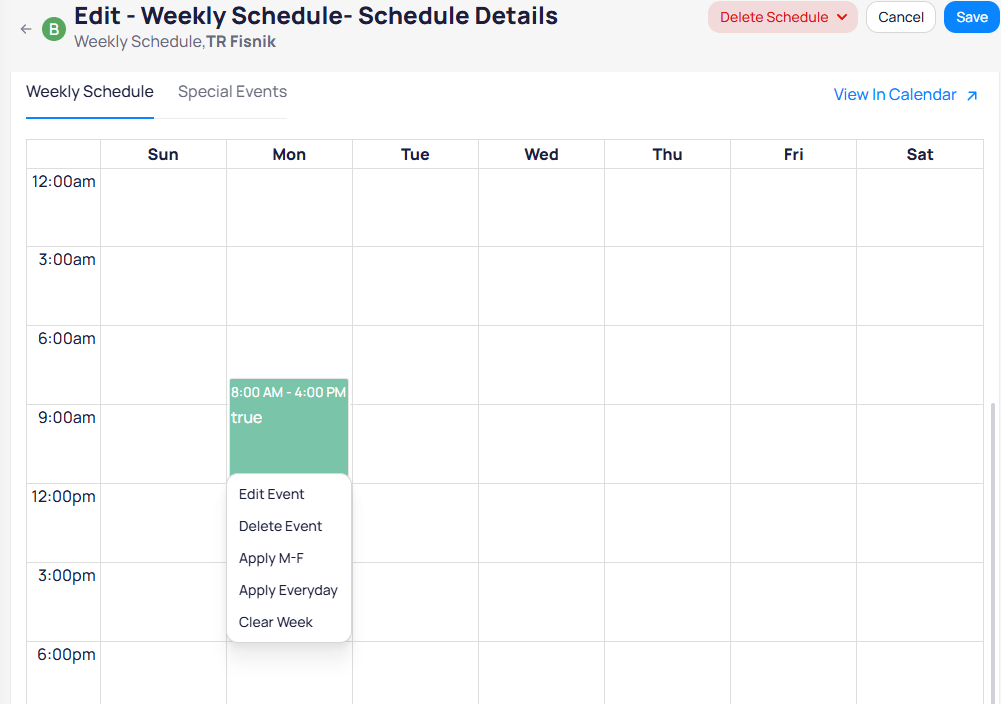 * **Edit Event** -- modify the event's time window or value
* **Delete Event** -- remove the event from the calendar
* **Apply M-F** -- copy the event to all weekdays (Monday through Friday)
* **Apply Everyday** -- copy the event to every day of the week
* **Clear Week** -- remove all events from the weekly schedule
Click `Save` at the top right to save all changes. After saving, the schedule view displays the configured weekly calendar with the activity log on the right showing the change history.
* **Edit Event** -- modify the event's time window or value
* **Delete Event** -- remove the event from the calendar
* **Apply M-F** -- copy the event to all weekdays (Monday through Friday)
* **Apply Everyday** -- copy the event to every day of the week
* **Clear Week** -- remove all events from the weekly schedule
Click `Save` at the top right to save all changes. After saving, the schedule view displays the configured weekly calendar with the activity log on the right showing the change history.
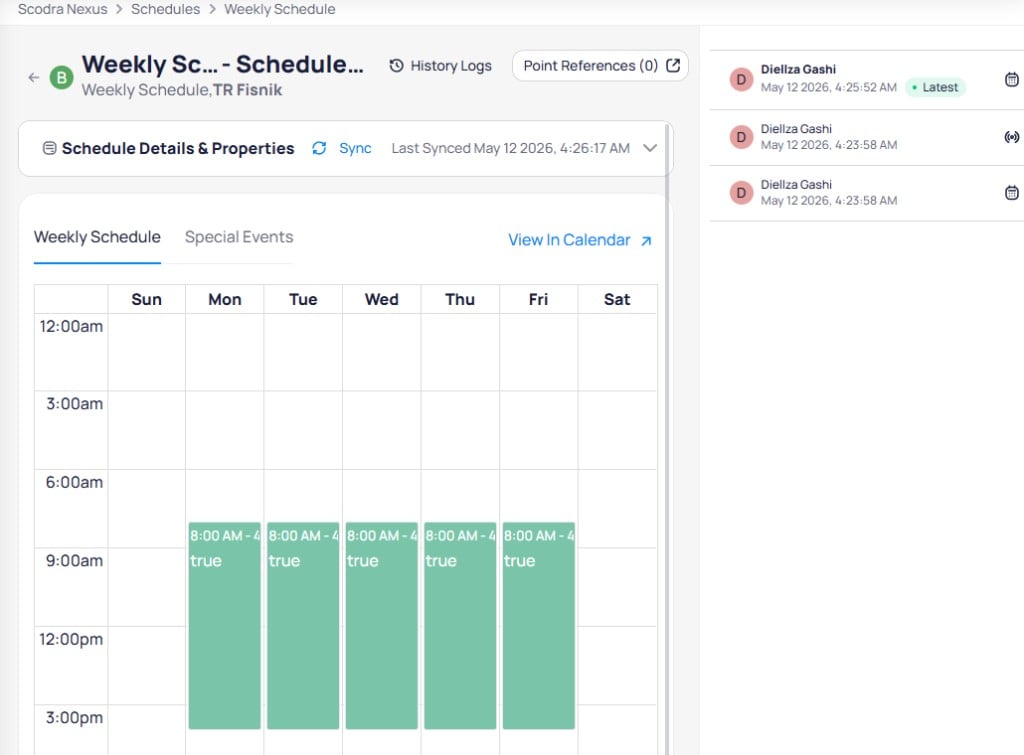 The schedule header provides access to `History Logs` and `Point References`. Click `Delete Schedule` to remove the schedule entirely.
### Schedule history and revert
Open `History Logs` (or the History tab on the schedule) to review prior versions. Select a timestamp, then click `Revert` to restore that version. When the connector supports it, Cloud BMS pushes the restored version back to the data source.
### Special events
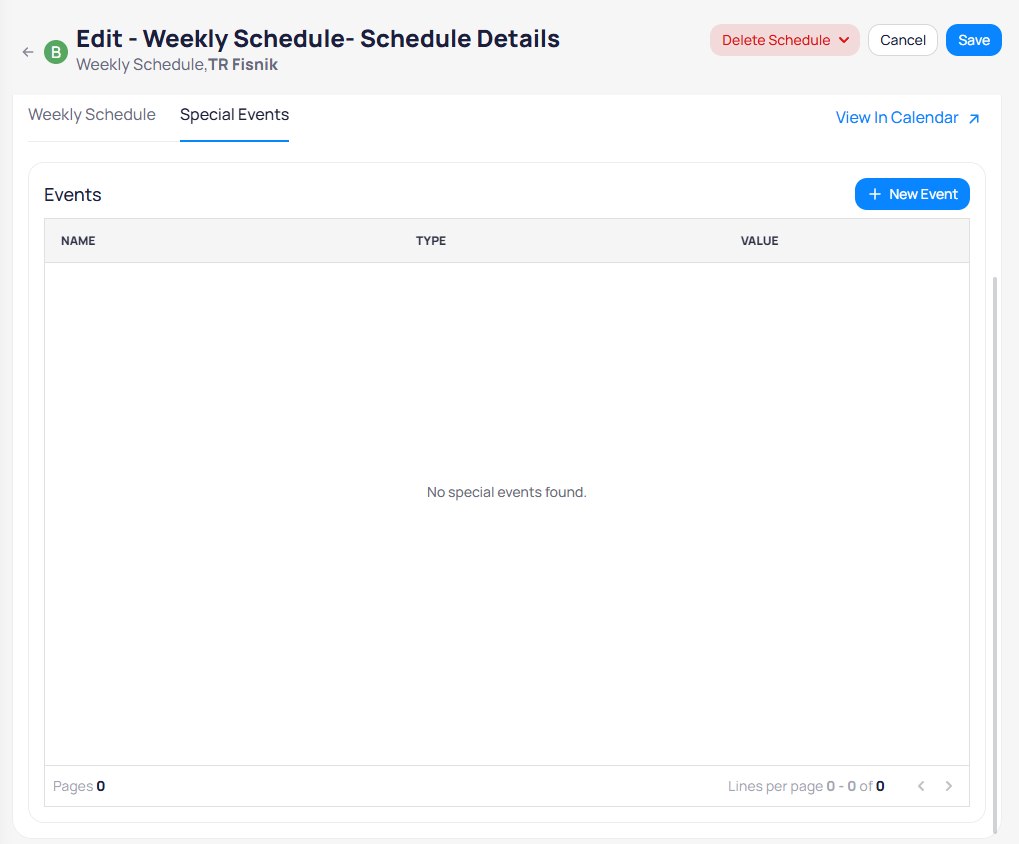
Special events override the weekly schedule on specific dates such as holidays, building closures, or maintenance windows. Switch to the `Special Events` tab to manage exception dates.
The schedule header provides access to `History Logs` and `Point References`. Click `Delete Schedule` to remove the schedule entirely.
### Schedule history and revert
Open `History Logs` (or the History tab on the schedule) to review prior versions. Select a timestamp, then click `Revert` to restore that version. When the connector supports it, Cloud BMS pushes the restored version back to the data source.
### Special events
Special events override the weekly schedule on specific dates such as holidays, building closures, or maintenance windows. Switch to the `Special Events` tab to manage exception dates.
 #### Create a special event
Click `+ New Event` to open the Add Special Event dialog.
#### Create a special event
Click `+ New Event` to open the Add Special Event dialog.
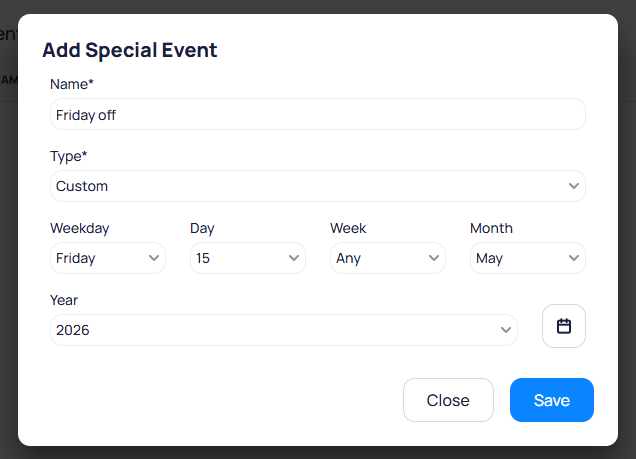 Enter a descriptive name for the special event (for example, `Friday off`).
Select the event type:
* **Custom** -- define a one-off exception date manually
* **Reference** -- link to a calendar schedule so its events are inherited automatically
Configure the date pattern for the event. Set the specific weekday, day of the month, week, and month.
Select the year for the event. Click the calendar icon to pick a date visually.
Enter a descriptive name for the special event (for example, `Friday off`).
Select the event type:
* **Custom** -- define a one-off exception date manually
* **Reference** -- link to a calendar schedule so its events are inherited automatically
Configure the date pattern for the event. Set the specific weekday, day of the month, week, and month.
Select the year for the event. Click the calendar icon to pick a date visually.
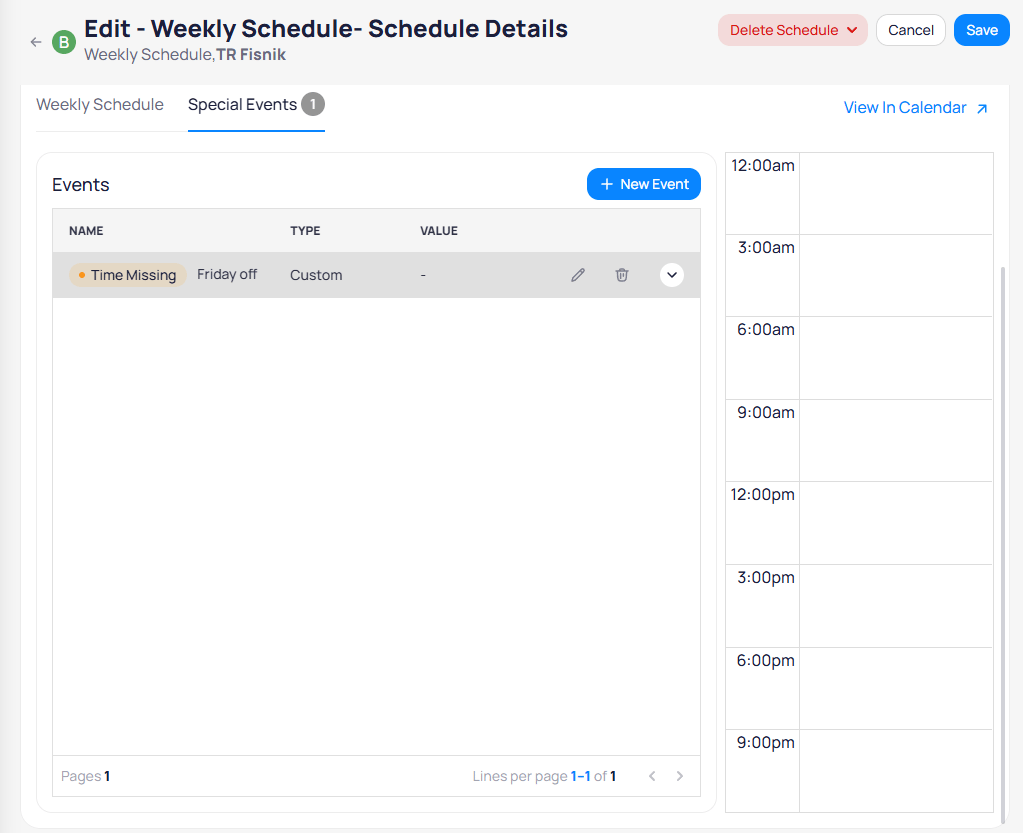
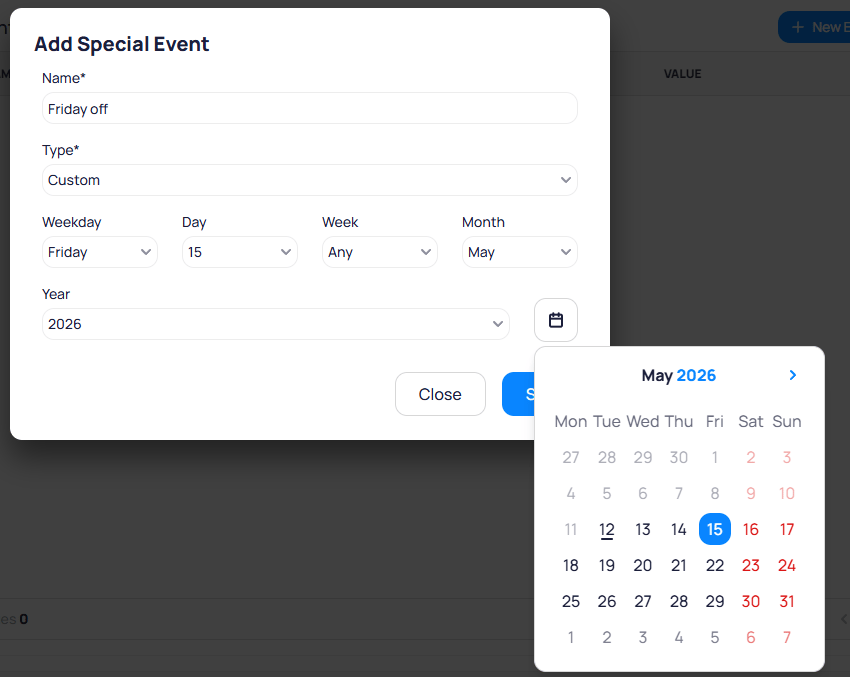 Click `Save` to create the event. The event appears in the Special Events list with a "Time Missing" indicator if no time-based event has been added to its day calendar.
 #### Add events to a special event day
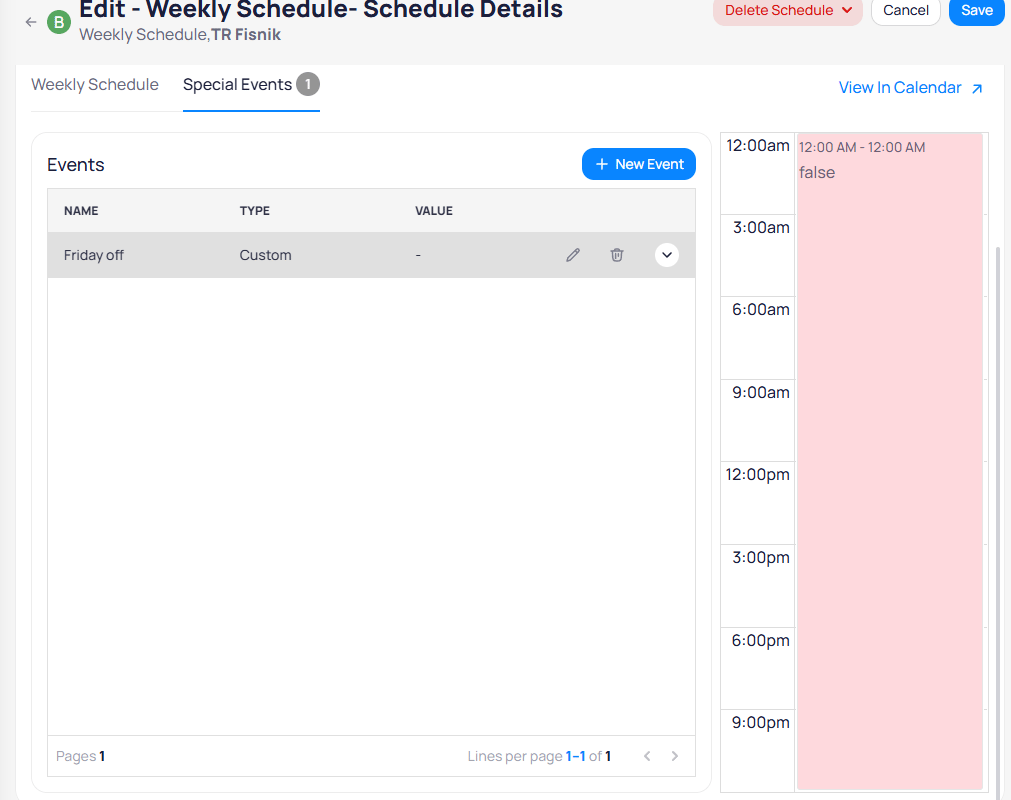
Click on the day calendar on the right to add time-based events for the special event day.
#### Add events to a special event day
Click on the day calendar on the right to add time-based events for the special event day.
 After adding an event, the day calendar shows the override value for the special event day (for example, `false` for the entire day to turn equipment off).
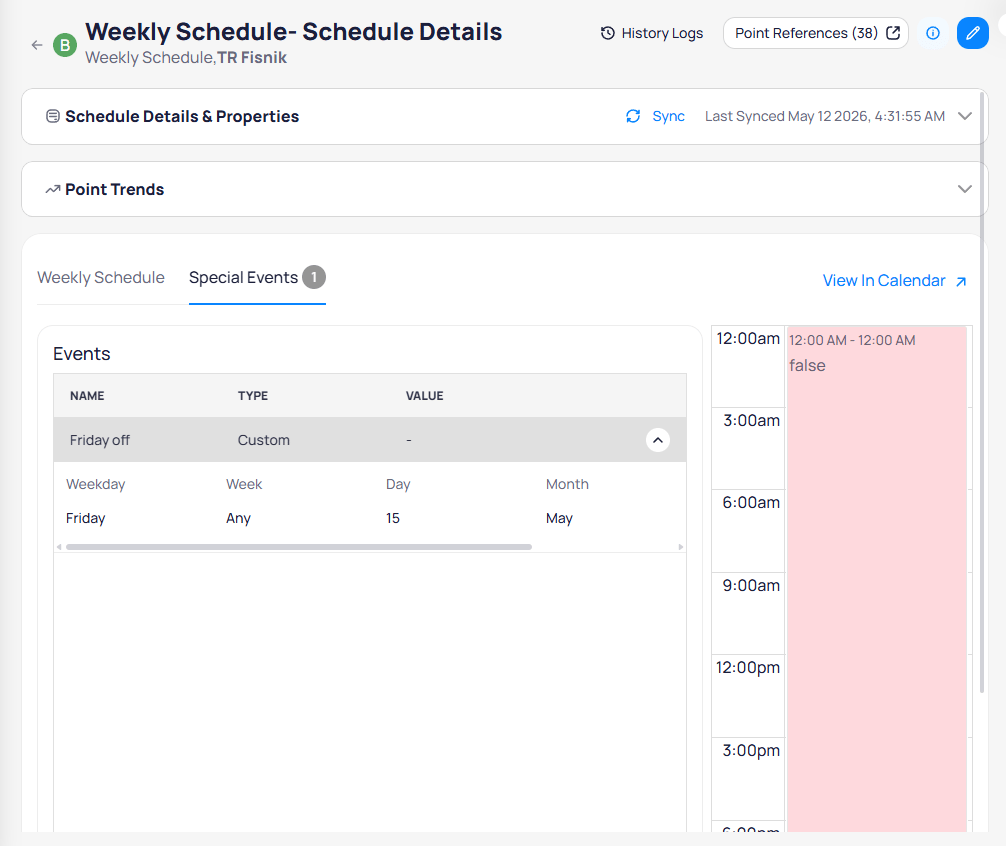
 Expand a special event row by clicking the chevron to view its date details (Weekday, Week, Day, Month).
 #### Reference events
Reference events link a [calendar schedule](#calendar-schedules) to a weekly schedule. Instead of manually recreating the same holidays across multiple weekly schedules, you reference a single calendar schedule and all its events are inherited automatically.
To add a reference event, click `+ New Event` and set the `Type` to `Reference`. Select the calendar schedule from the `Reference` dropdown.
#### Reference events
Reference events link a [calendar schedule](#calendar-schedules) to a weekly schedule. Instead of manually recreating the same holidays across multiple weekly schedules, you reference a single calendar schedule and all its events are inherited automatically.
To add a reference event, click `+ New Event` and set the `Type` to `Reference`. Select the calendar schedule from the `Reference` dropdown.
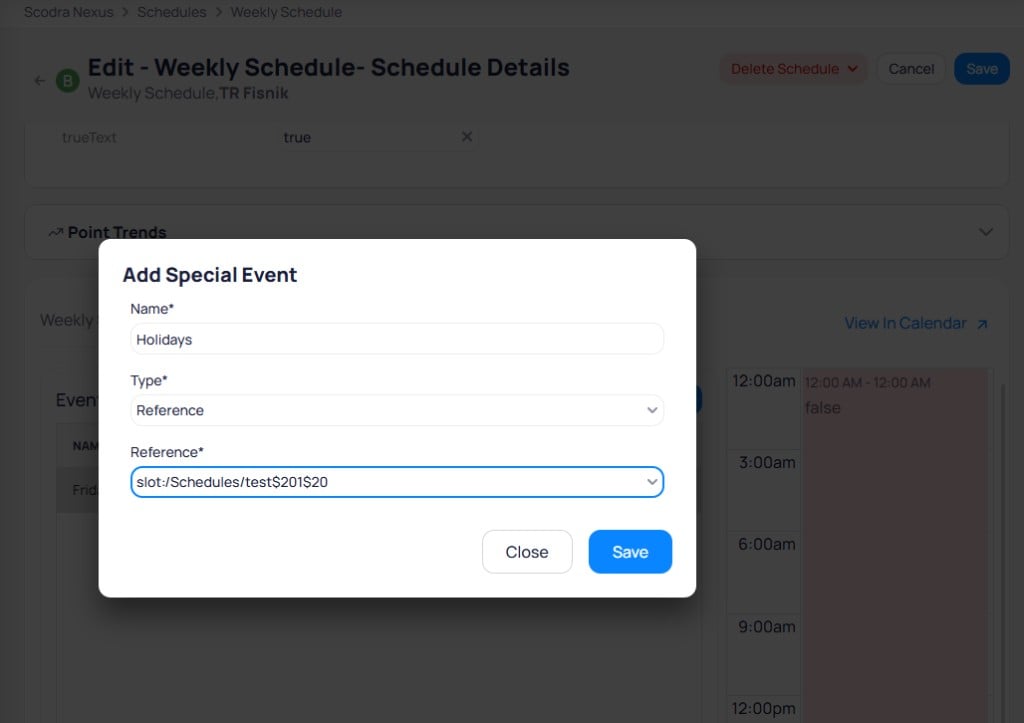 The referenced calendar schedule's events appear in the Special Events list alongside any custom events. Changes made to the source calendar schedule (adding, editing, or removing events) are automatically reflected in every weekly schedule that references it.
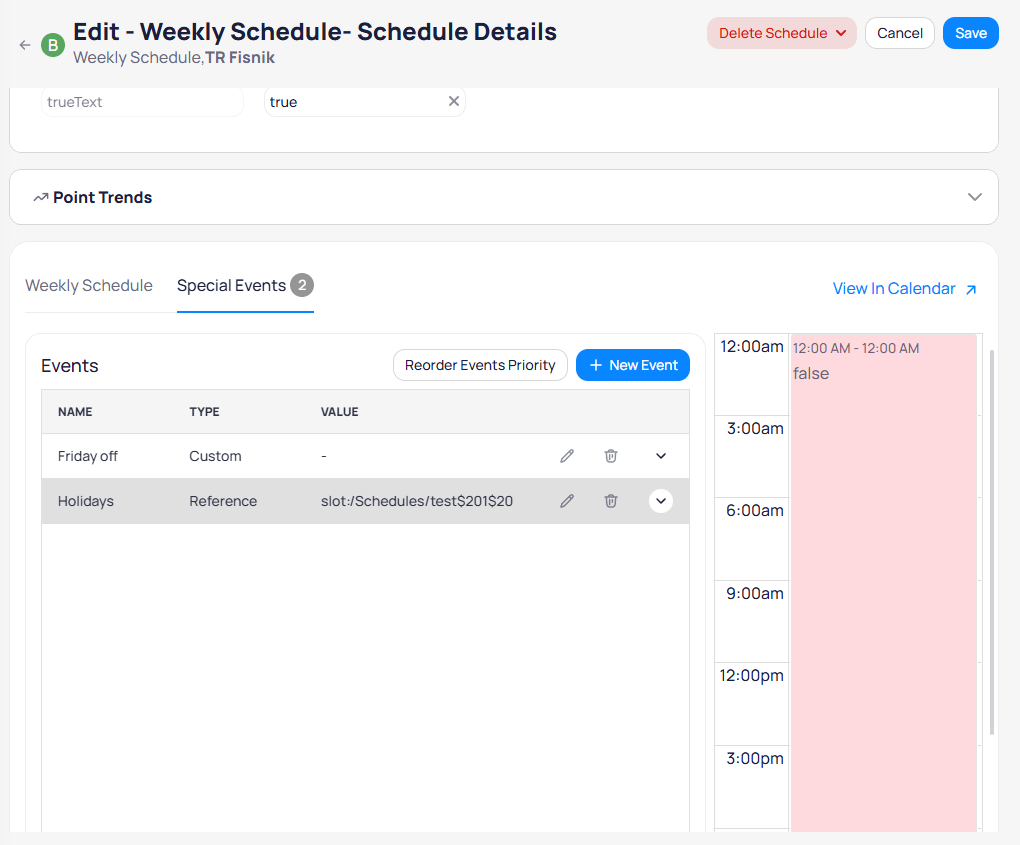 Use reference events to maintain a shared holiday calendar across multiple weekly schedules. Update the calendar schedule once and all linked weekly schedules reflect the changes automatically.
### Point references
Point references link the schedule to specific device points that the schedule controls. Click `Point References` in the schedule header to view and manage the points associated with this schedule.
Use reference events to maintain a shared holiday calendar across multiple weekly schedules. Update the calendar schedule once and all linked weekly schedules reflect the changes automatically.
### Point references
Point references link the schedule to specific device points that the schedule controls. Click `Point References` in the schedule header to view and manage the points associated with this schedule.
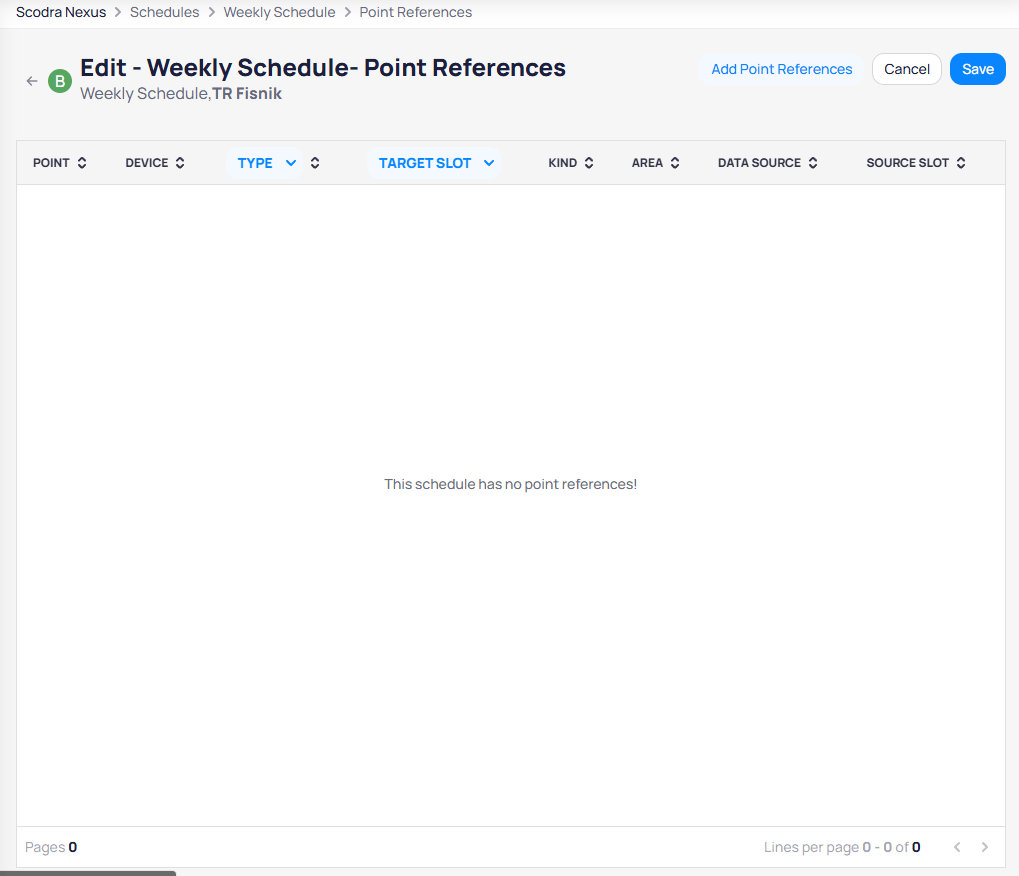
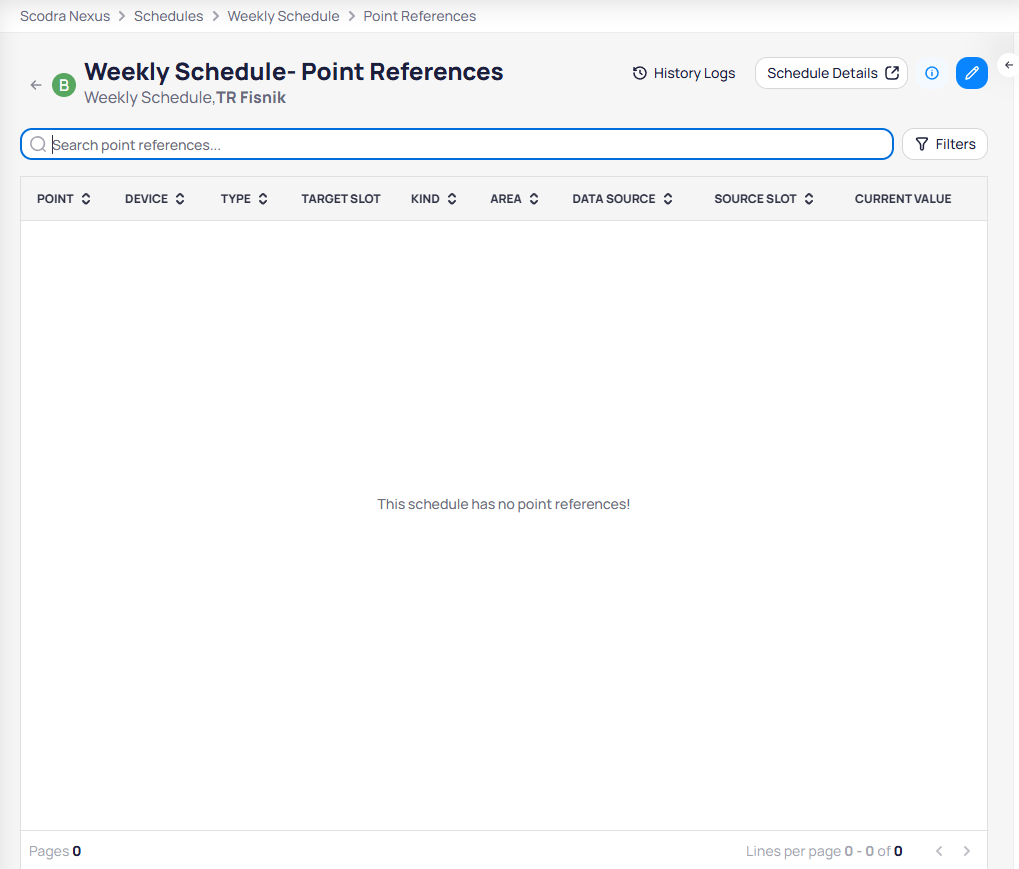 Click the edit icon to enter edit mode, then click `Add Point References` to link new points.
 #### Add point references
Click `Add Point References` to open the Apply Point References dialog. The process has two steps:
**Step 1: Choose filters** -- narrow down the available points by Data Sources, Area, Device Type, Kind, and Field.
#### Add point references
Click `Add Point References` to open the Apply Point References dialog. The process has two steps:
**Step 1: Choose filters** -- narrow down the available points by Data Sources, Area, Device Type, Kind, and Field.
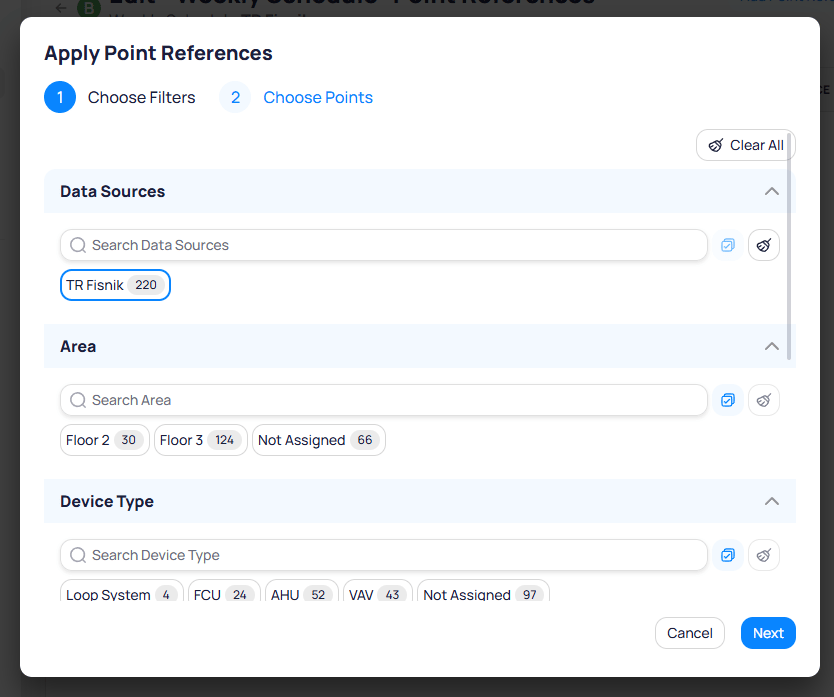
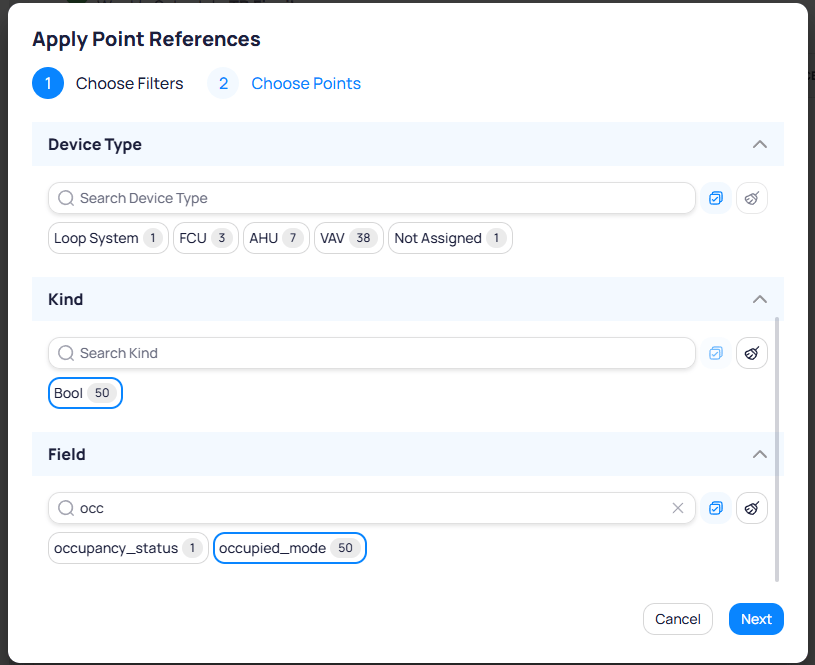 **Step 2: Choose points** -- select the individual points from the filtered list.
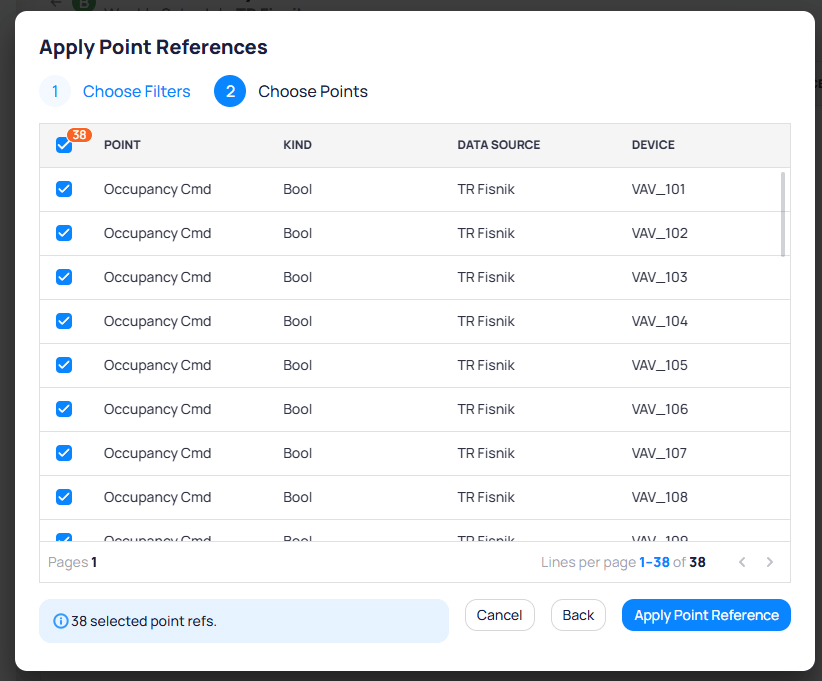 Select the points you want to link to the schedule and click `Apply Point Reference`.
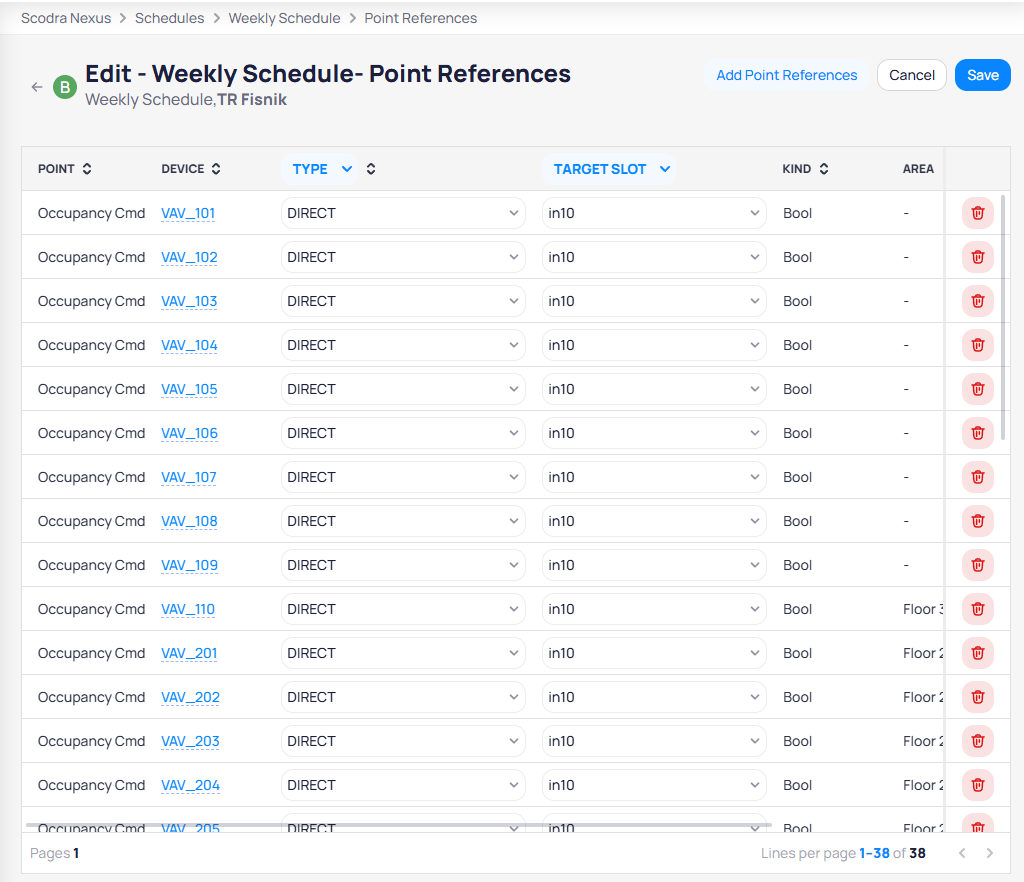
After applying, the point references list shows all linked points with their type, target slot, kind, and area.
When you schedule writable points, confirm the Target slot before you mass-apply references. The default is often `in10`, but the correct slot can vary by integration. Confirm your deployment standard first.
Importing a discovered schedule does not create missing points. If a schedule references points that do not exist in Cloud BMS, those references stay unresolved until you discover and add the points.
Select the points you want to link to the schedule and click `Apply Point Reference`.
After applying, the point references list shows all linked points with their type, target slot, kind, and area.
When you schedule writable points, confirm the Target slot before you mass-apply references. The default is often `in10`, but the correct slot can vary by integration. Confirm your deployment standard first.
Importing a discovered schedule does not create missing points. If a schedule references points that do not exist in Cloud BMS, those references stay unresolved until you discover and add the points.
 #### Reference types
Each point reference has a `Type` that determines how the schedule controls the point. Click the Type dropdown to change the reference type.
#### Reference types
Each point reference has a `Type` that determines how the schedule controls the point. Click the Type dropdown to change the reference type.
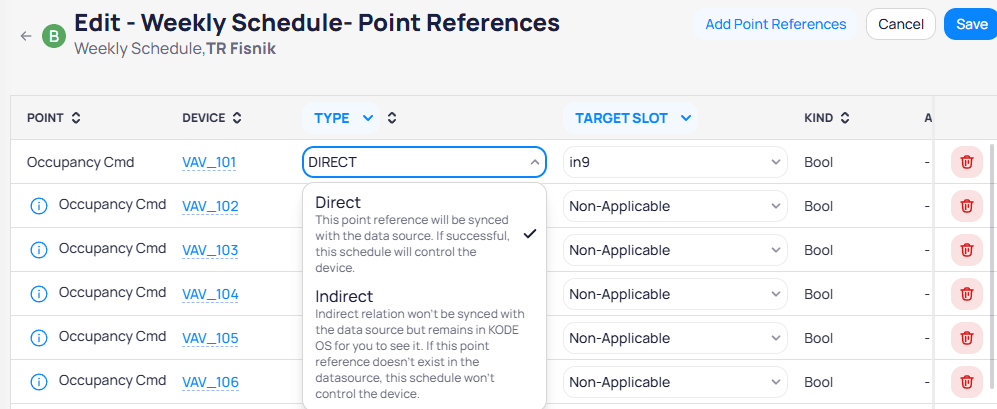 * **Direct** -- the point reference is synced with the data source. If successful, the schedule controls the device directly. Direct references are available only when the point can be controlled by Cloud BMS directly.
* **Indirect** -- the relation is stored in Cloud BMS but is not synced with the data source. Use indirect references when you want to track the relationship without actively controlling the point. If the point reference does not exist in the data source, the schedule does not control the device.
Click `Save` to confirm the changes.
### Monitor schedule performance
After saving point references, the schedule details page displays a `Point Trends` section that charts the occupancy status of all referenced points over a configurable date range. Each row shows the point name, device, current status (Occupied or UnOccupied), and a timeline bar.
* **Direct** -- the point reference is synced with the data source. If successful, the schedule controls the device directly. Direct references are available only when the point can be controlled by Cloud BMS directly.
* **Indirect** -- the relation is stored in Cloud BMS but is not synced with the data source. Use indirect references when you want to track the relationship without actively controlling the point. If the point reference does not exist in the data source, the schedule does not control the device.
Click `Save` to confirm the changes.
### Monitor schedule performance
After saving point references, the schedule details page displays a `Point Trends` section that charts the occupancy status of all referenced points over a configurable date range. Each row shows the point name, device, current status (Occupied or UnOccupied), and a timeline bar.
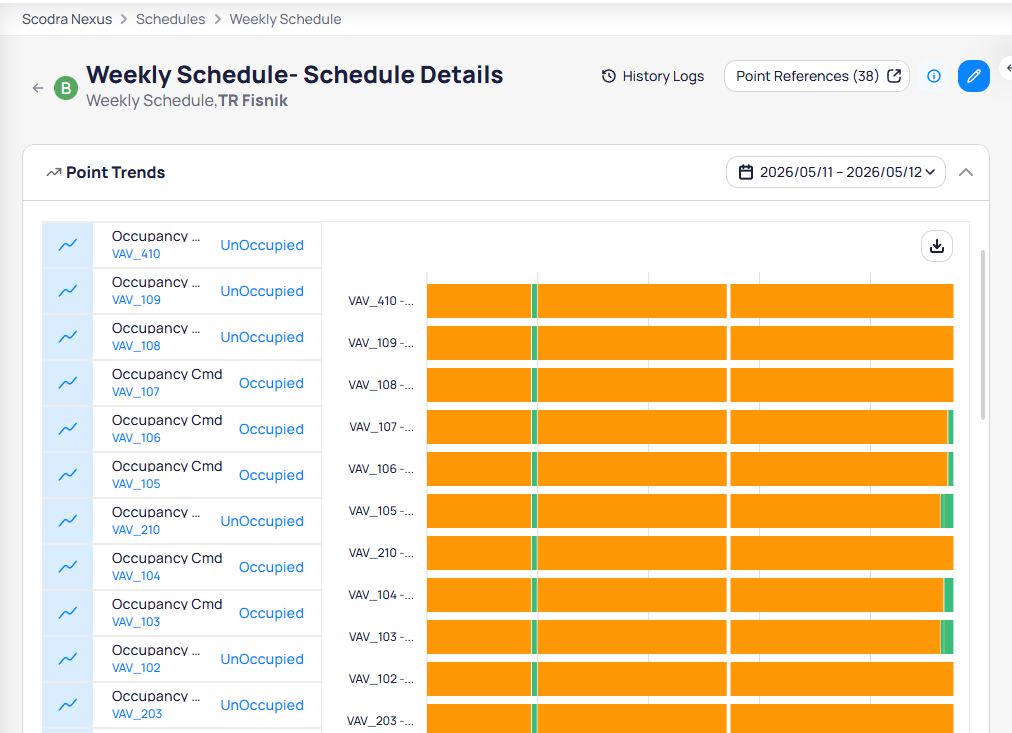 The `Point References` count in the header updates to reflect the total number of linked points (for example, `Point References (38)`). Click the download icon to export the trend data.
### Schedule command levels
When a schedule is actively commanding a point, the command panel for that point shows the exact priority level the schedule is controlling. For example, if the schedule commands a point at level 9, the command panel displays level 9 with its current value.
The `Point References` count in the header updates to reflect the total number of linked points (for example, `Point References (38)`). Click the download icon to export the trend data.
### Schedule command levels
When a schedule is actively commanding a point, the command panel for that point shows the exact priority level the schedule is controlling. For example, if the schedule commands a point at level 9, the command panel displays level 9 with its current value.
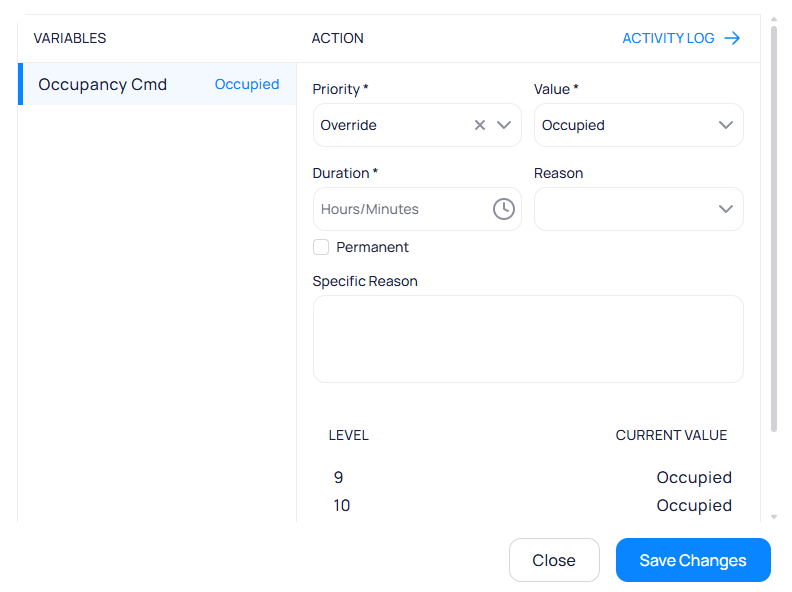 This view confirms that the schedule is actively controlling the point. You can override the schedule's command by setting a higher priority level in the Action section.
### Command actions and priority levels
Cloud BMS uses a BACnet-inspired priority model for writable points. The same command dialog appears for BACnet and non-BACnet integrations, such as REST API thermostats. How each action maps on the device depends on the connector.
BACnet points that accept commands have **16 priority levels** (1 is highest, 16 is lowest). When every level is empty (`null`), the point uses a **fallback / default** value (`Relinquish_Default` in BACnet). That fallback is **not** a 17th BACnet priority. Some interfaces label it as level 17 for display only.
`Override` and `Set` turn different knobs under the hood, even when the visible value looks the same.
| Action | What it writes\* | Description |
| ---------- | -------------------- | ------------------------------------------------------------------------------------------- |
| `Override` | Priority 8\* | Temporary exception in the priority array. Takes precedence over lower-priority automation. |
| `Set` | Fallback / default\* | Changes the fallback or default value. |
| `Auto` | — | Clears an `Override` |
| `Release` | — | Clears a `Set` |
\*Typical for most BACnet and Niagara deployments. Connectors and site standards can differ.
`Override`, `Auto`, and `Set` borrow Niagara-style action names. `Release` is a Cloud BMS action that clears a `Set`.
In Niagara-style control, `Set` keeps a non-null fallback so sequences and logic keep a reliable baseline. Use the priority array (including `Override`) for programmed automation and temporary exceptions.
To make `Set` write to priority 16 instead of the fallback or default, enable **`Set in Slot16`** (Niagara) on the point. Configure that option from [device details](/products/kode-os/devices/devices#view-and-edit-points), [device templates](/products/kode-os/devices/device-templates), or [points batch update](/products/kode-os/points/points-batch-update).
Calendar schedules define exception dates for holidays and special events. Create a calendar schedule to maintain a centralized list of holidays that can be [referenced by multiple weekly schedules](#reference-events).
When creating a schedule, select `Calendar Schedule` as the type.
This view confirms that the schedule is actively controlling the point. You can override the schedule's command by setting a higher priority level in the Action section.
### Command actions and priority levels
Cloud BMS uses a BACnet-inspired priority model for writable points. The same command dialog appears for BACnet and non-BACnet integrations, such as REST API thermostats. How each action maps on the device depends on the connector.
BACnet points that accept commands have **16 priority levels** (1 is highest, 16 is lowest). When every level is empty (`null`), the point uses a **fallback / default** value (`Relinquish_Default` in BACnet). That fallback is **not** a 17th BACnet priority. Some interfaces label it as level 17 for display only.
`Override` and `Set` turn different knobs under the hood, even when the visible value looks the same.
| Action | What it writes\* | Description |
| ---------- | -------------------- | ------------------------------------------------------------------------------------------- |
| `Override` | Priority 8\* | Temporary exception in the priority array. Takes precedence over lower-priority automation. |
| `Set` | Fallback / default\* | Changes the fallback or default value. |
| `Auto` | — | Clears an `Override` |
| `Release` | — | Clears a `Set` |
\*Typical for most BACnet and Niagara deployments. Connectors and site standards can differ.
`Override`, `Auto`, and `Set` borrow Niagara-style action names. `Release` is a Cloud BMS action that clears a `Set`.
In Niagara-style control, `Set` keeps a non-null fallback so sequences and logic keep a reliable baseline. Use the priority array (including `Override`) for programmed automation and temporary exceptions.
To make `Set` write to priority 16 instead of the fallback or default, enable **`Set in Slot16`** (Niagara) on the point. Configure that option from [device details](/products/kode-os/devices/devices#view-and-edit-points), [device templates](/products/kode-os/devices/device-templates), or [points batch update](/products/kode-os/points/points-batch-update).
Calendar schedules define exception dates for holidays and special events. Create a calendar schedule to maintain a centralized list of holidays that can be [referenced by multiple weekly schedules](#reference-events).
When creating a schedule, select `Calendar Schedule` as the type.
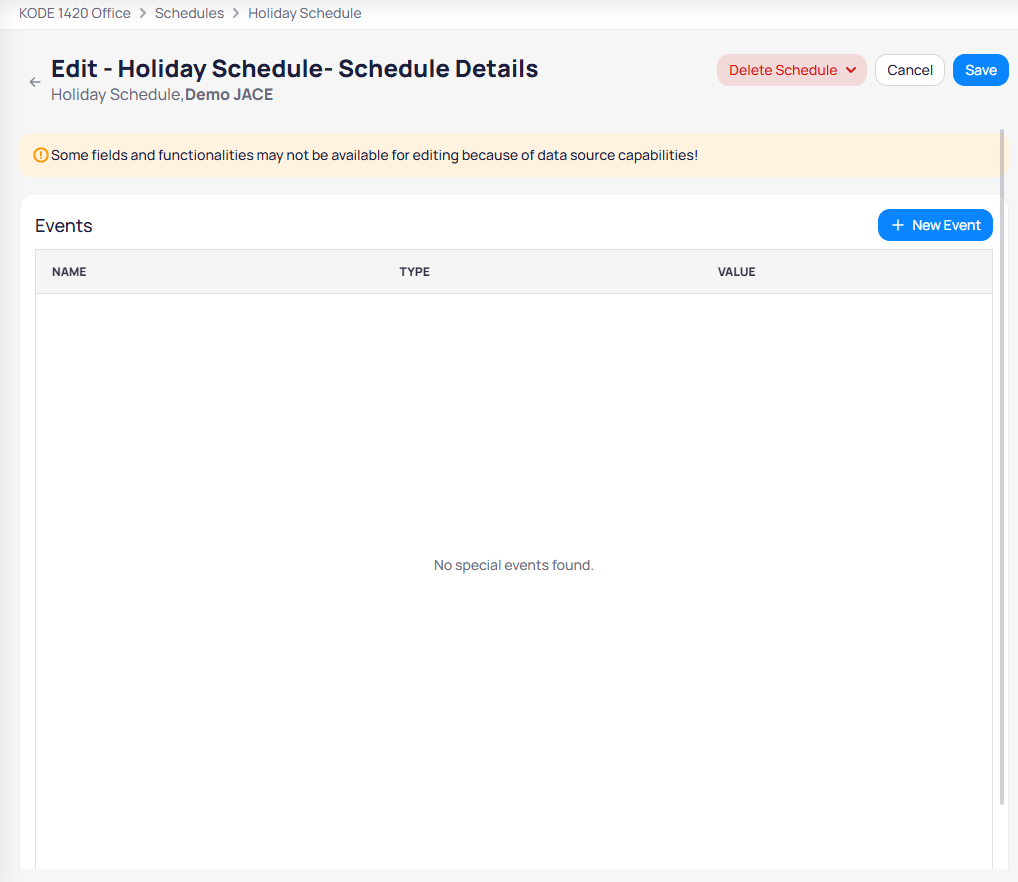
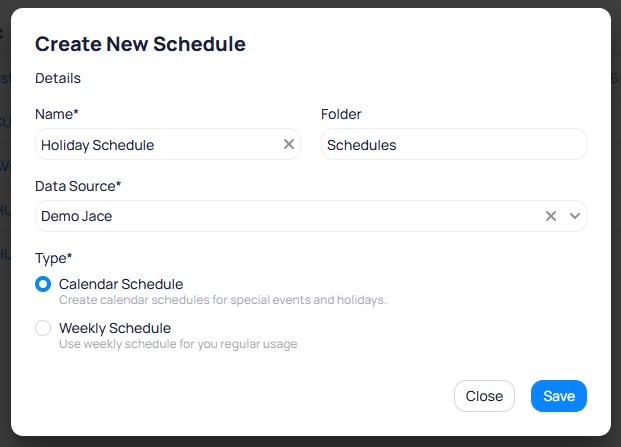 After creating a calendar schedule, the details page opens directly to the events list.
 ### Event types
Click `+ New Event` to add holiday or special event entries. The event type determines how the date is specified:
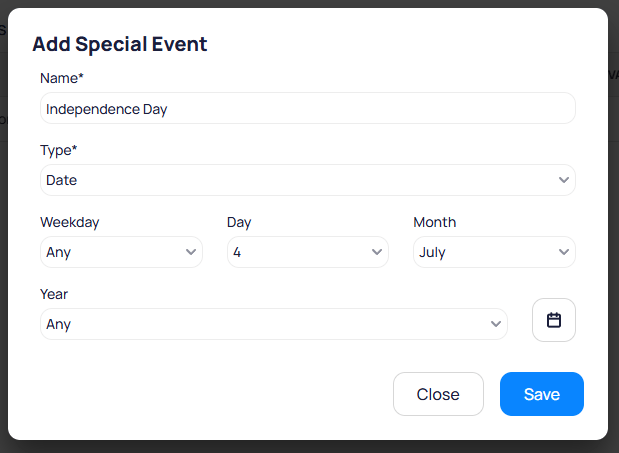
**Date** -- use for holidays that fall on the same calendar date each year (for example, Independence Day on July 4).
### Event types
Click `+ New Event` to add holiday or special event entries. The event type determines how the date is specified:
**Date** -- use for holidays that fall on the same calendar date each year (for example, Independence Day on July 4).
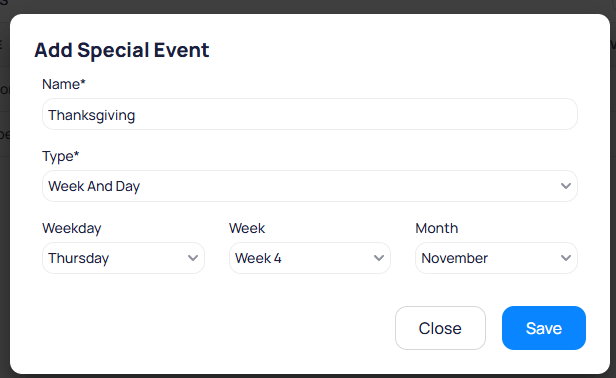
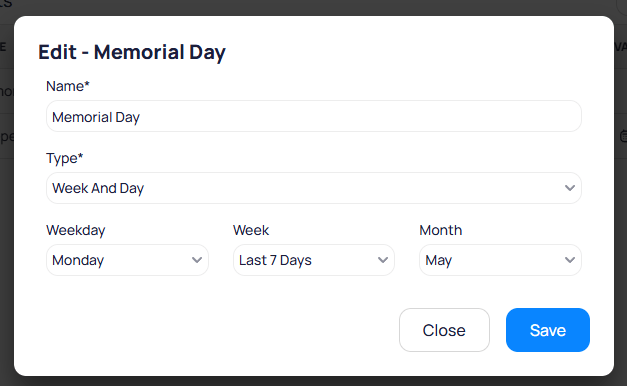
 **Week And Day** -- use for holidays that fall on a specific weekday and week of a month (for example, Thanksgiving on the fourth Thursday of November, or Memorial Day on the last Monday of May).
 ### Manage calendar events
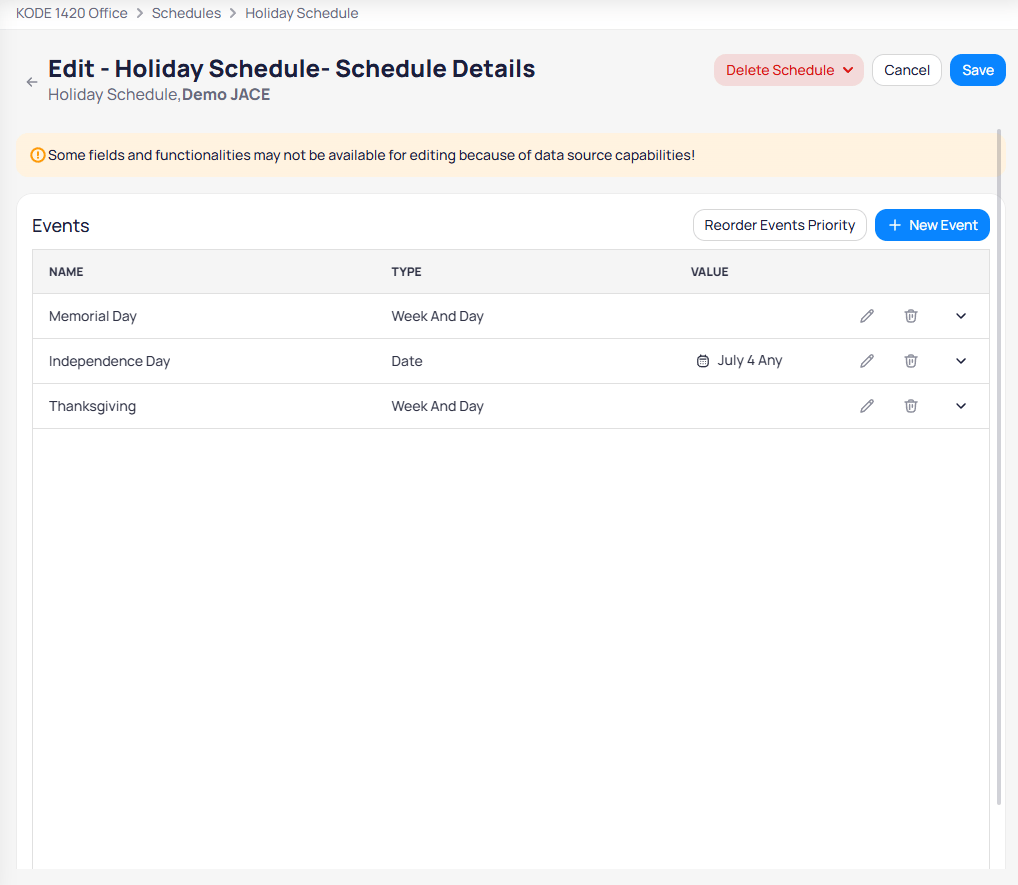
The events list shows all configured holidays with their type, value, and options to edit or delete each event. Click `Reorder Events Priority` to change the priority order when multiple events overlap.
### Manage calendar events
The events list shows all configured holidays with their type, value, and options to edit or delete each event. Click `Reorder Events Priority` to change the priority order when multiple events overlap.
 ## Discover existing schedules
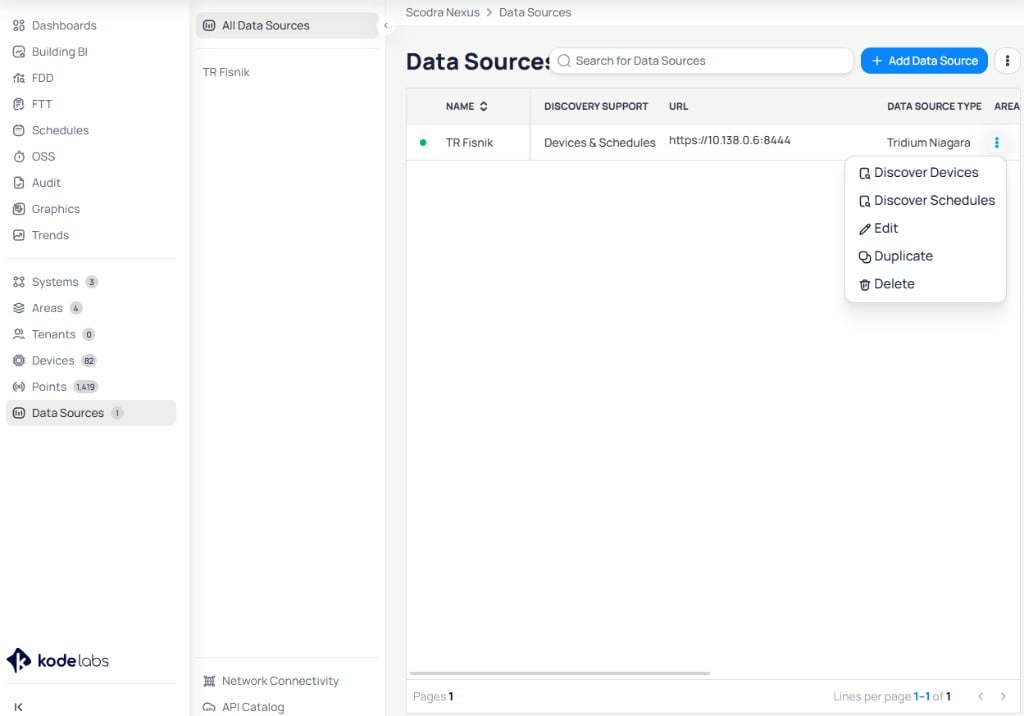
When you connect a data source that has schedules configured in the external building automation system, Cloud BMS can discover and import them. You can start discovery from the Schedules module or from the Data Sources page by clicking the three-dot menu on a data source row and selecting `Discover Schedules`.
## Discover existing schedules
When you connect a data source that has schedules configured in the external building automation system, Cloud BMS can discover and import them. You can start discovery from the Schedules module or from the Data Sources page by clicking the three-dot menu on a data source row and selecting `Discover Schedules`.
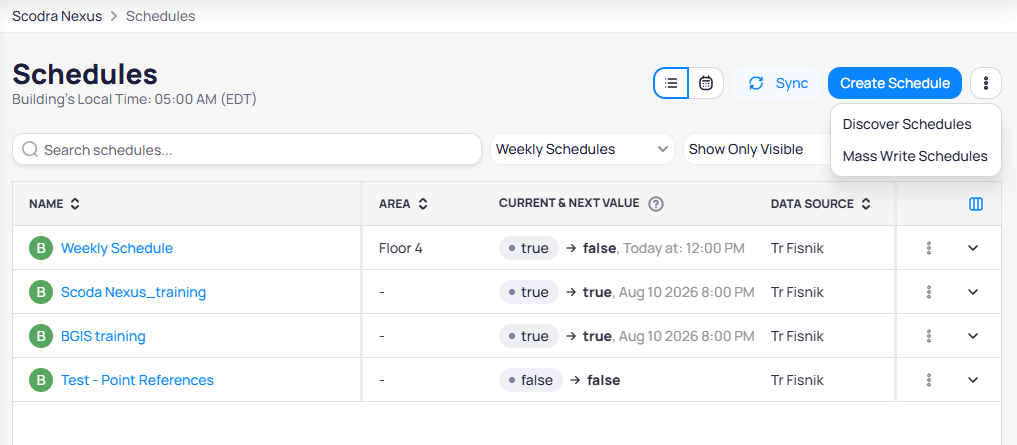
 From the Schedules module, click the three-dot menu in the upper right corner and select `Discover Schedules`.
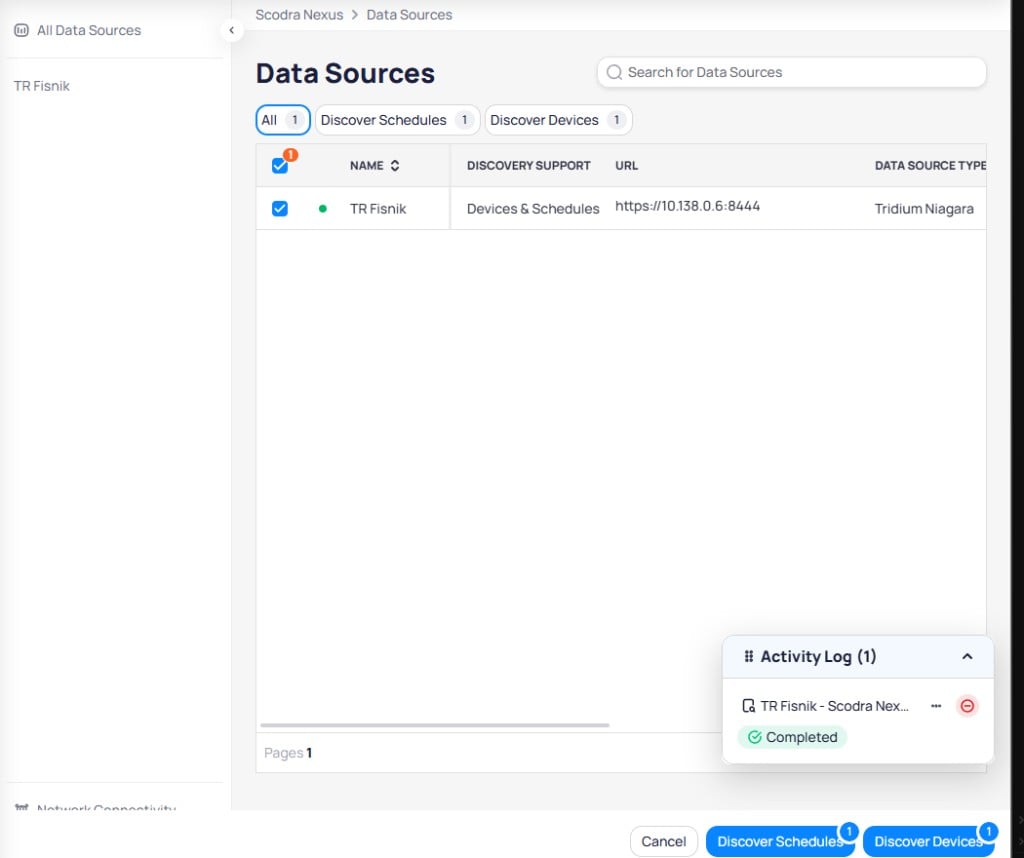
 The Data Sources page shows all connected data sources with their discovery support status. Select the data sources you want to discover schedules from and click `Discover Schedules`. The Activity Log at the bottom tracks the discovery progress.
 The Schedule Discovery page displays discovered schedules separated into `New Schedules` and `Existing Schedules` tabs. Use the filter tabs to view schedules with no time periods, no references, or duplicate references. Search and select the schedules you want to import.
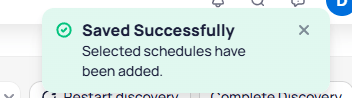
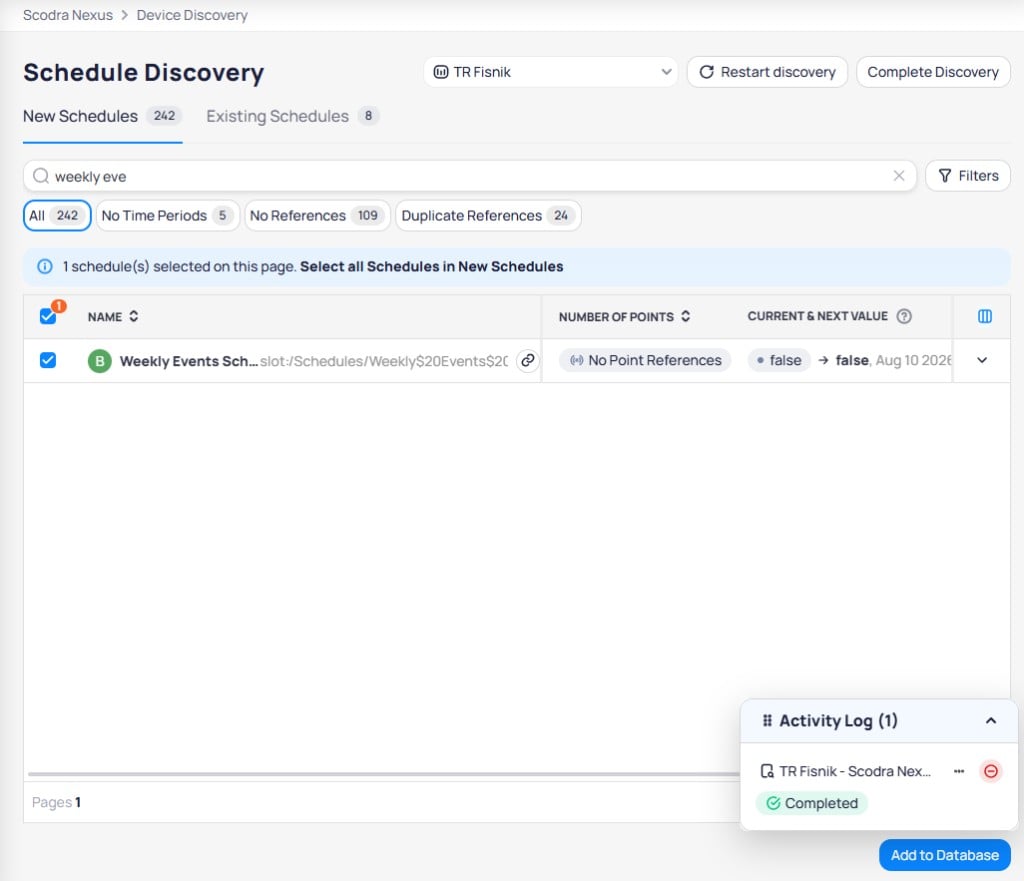 Select the schedules you want to import and click `Add to Database`. A success notification confirms the schedules have been added.
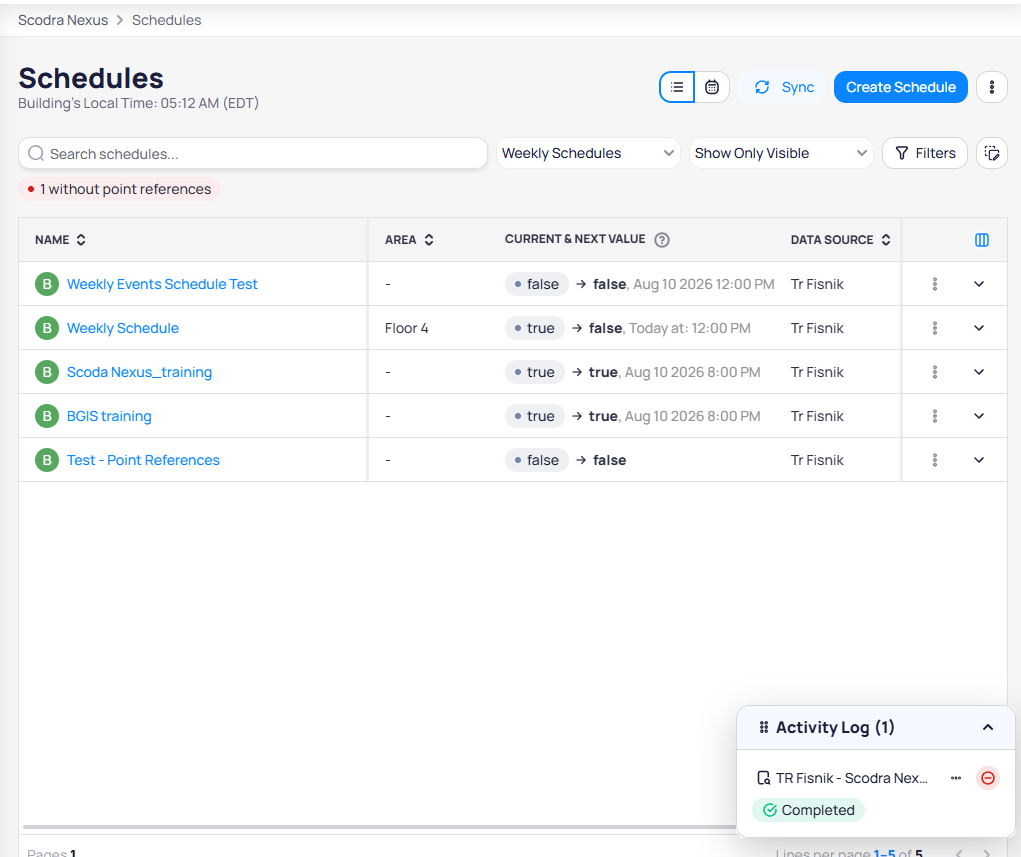
 The discovered schedules appear in the schedules list. Schedules without point references display a warning indicator.
 ## Driver capabilities
Some schedule features depend on deeper synchronization with the source system. Capabilities differ based on whether the schedule driver is installed. For Niagara stations, see [Install the Niagara driver](/products/kode-os/niagara-driver-installation).
| Capability | With driver | Without driver |
| ----------------------------------------------------------------- | ----------------- | --------------------------------------------- |
| Discover schedules and manage visibility (Hidden / Visible / All) | Yes | Discovery and list view still available |
| Create schedules in Cloud BMS and sync to the source | Yes | Limited or unavailable |
| Edit weekly time slots and properties | Yes | Partial (weekly slots and some properties) |
| Add and manage special events | Yes | Limited; may be restricted to week references |
| View Next Value Change (next change time and value) | Yes | Typically unavailable |
| Delete schedules created in Cloud BMS | Yes | Limited |
| Delete source-discovered schedules from Cloud BMS | May be restricted | May be restricted |
## Mass write schedules
Mass write is a portfolio-level feature that allows you to update schedules and points in bulk across buildings. You can access it from the portfolio view or from the three-dot menu in the Schedules module by selecting `Mass Write Schedules`.
Write multiple points and update multiple schedules simultaneously across your portfolio.
## Optimized Start/Stop (OSS)
OSS is an AI-powered module that calculates the optimal HVAC start time based on sensor data, weather conditions, and building characteristics. Instead of starting equipment at a fixed time, OSS predicts exactly when to start so the building reaches the target temperature by occupancy. OSS has its own dedicated section in the building sidebar.
Configure OSS adapters, select operation modes, and monitor optimization performance.
## Next steps
Chart historical point data to evaluate schedule effectiveness.
View and manage the equipment that schedules control.
## Driver capabilities
Some schedule features depend on deeper synchronization with the source system. Capabilities differ based on whether the schedule driver is installed. For Niagara stations, see [Install the Niagara driver](/products/kode-os/niagara-driver-installation).
| Capability | With driver | Without driver |
| ----------------------------------------------------------------- | ----------------- | --------------------------------------------- |
| Discover schedules and manage visibility (Hidden / Visible / All) | Yes | Discovery and list view still available |
| Create schedules in Cloud BMS and sync to the source | Yes | Limited or unavailable |
| Edit weekly time slots and properties | Yes | Partial (weekly slots and some properties) |
| Add and manage special events | Yes | Limited; may be restricted to week references |
| View Next Value Change (next change time and value) | Yes | Typically unavailable |
| Delete schedules created in Cloud BMS | Yes | Limited |
| Delete source-discovered schedules from Cloud BMS | May be restricted | May be restricted |
## Mass write schedules
Mass write is a portfolio-level feature that allows you to update schedules and points in bulk across buildings. You can access it from the portfolio view or from the three-dot menu in the Schedules module by selecting `Mass Write Schedules`.
Write multiple points and update multiple schedules simultaneously across your portfolio.
## Optimized Start/Stop (OSS)
OSS is an AI-powered module that calculates the optimal HVAC start time based on sensor data, weather conditions, and building characteristics. Instead of starting equipment at a fixed time, OSS predicts exactly when to start so the building reaches the target temperature by occupancy. OSS has its own dedicated section in the building sidebar.
Configure OSS adapters, select operation modes, and monitor optimization performance.
## Next steps
Chart historical point data to evaluate schedule effectiveness.
View and manage the equipment that schedules control.