> ## Documentation Index
> Fetch the complete documentation index at: https://documentation.kodelabs.com/llms.txt
> Use this file to discover all available pages before exploring further.
# Command and control points
> Send commands to writable points from device details or a floor plan to adjust setpoints and control equipment operation.
Command and control is a building-level feature. Select a building from the [sites list](/products/kode-os/sites-and-map) before you command points.
Commanding and controlling equipment lets you adjust setpoints and variables to influence how equipment operates. You can only perform these actions on **writable points**.
The command dialog is the same across integrations. BACnet devices, API thermostats, and other connectors all use this write-back flow. The underlying protocol depends on the data source, not on the dialog itself.
## Writable points
Writable points accept commands from Cloud BMS. Read-only points report measurements and status but do not accept writes. See [Points](/products/kode-os/points/points#point-types) for the difference between read-only and writable point types.
To enable or disable writability on a point, modify it from [device details](/products/kode-os/devices/devices) or use [points batch update](/products/kode-os/points/points-batch-update).
## Access command and control
You can command a point from a floor plan or from device details. Both paths open the same command dialog.
### From a floor plan
Open an [area floor plan](/products/kode-os/areas) and hover over a device marker to expand its point values. Writable points display an edit icon next to the value.
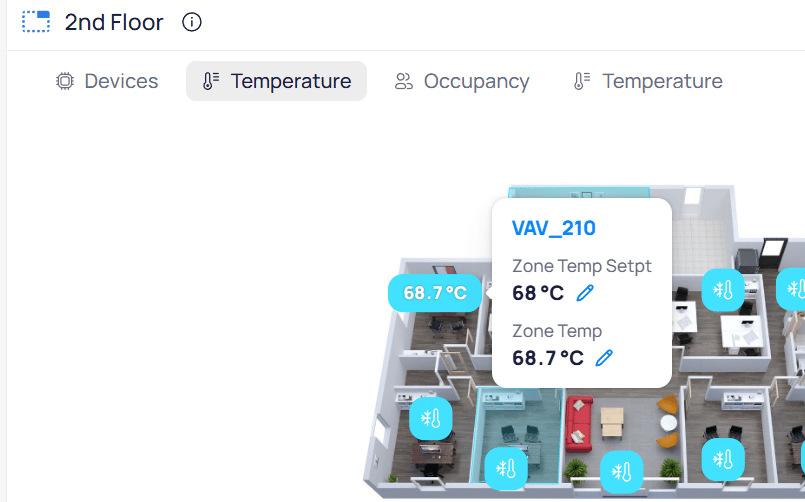 Click the edit icon to open the command dialog, or click the device name to open device details.
### Navigate to device details
Use any of these paths to open the device details page:
* Open the building dashboard, select **`Devices`**, then select the device from the list
* Search for a device using **universal search**
Click the edit icon to open the command dialog, or click the device name to open device details.
### Navigate to device details
Use any of these paths to open the device details page:
* Open the building dashboard, select **`Devices`**, then select the device from the list
* Search for a device using **universal search**
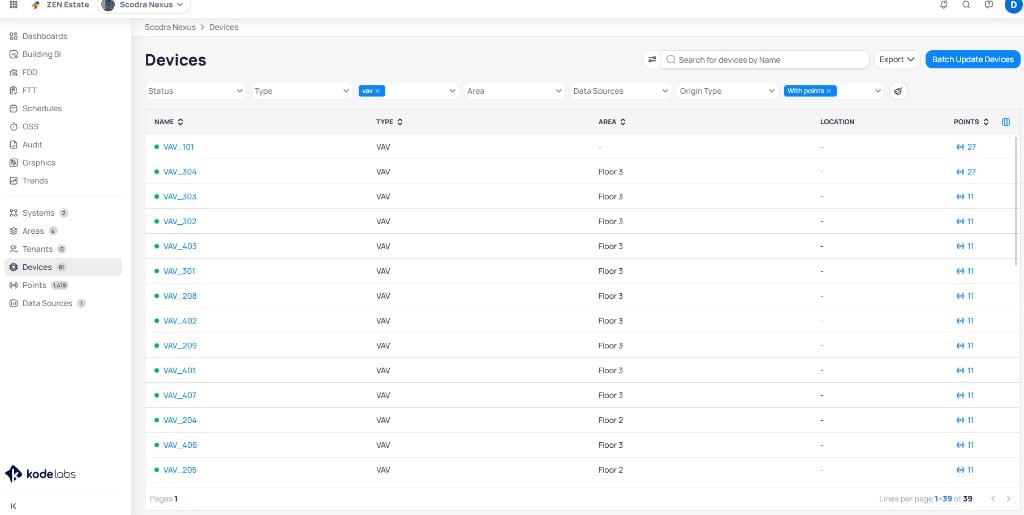 On the device details page, hover over a point value. Writable points display a blue box indicating the point accepts commands.
## Send a command
From device details, click a writable point value. From a floor plan, click the edit icon next to a writable point.
Set the command parameters in the Action section.
On the device details page, hover over a point value. Writable points display a blue box indicating the point accepts commands.
## Send a command
From device details, click a writable point value. From a floor plan, click the edit icon next to a writable point.
Set the command parameters in the Action section.
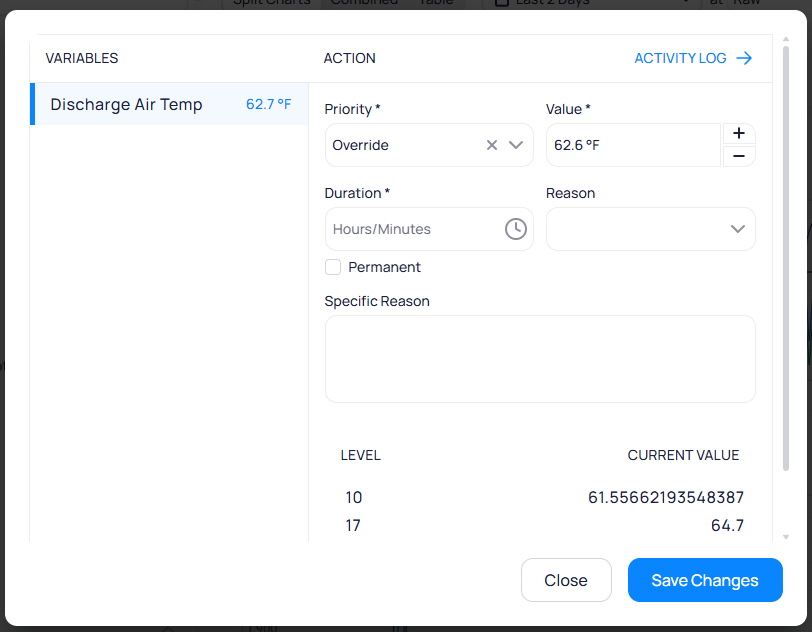 | Field | Description |
| ----------------- | -------------------------------------------------------------------------------------------------------------- |
| `Priority` | The command action to apply (`Override`, `Set`, `Auto`, or `Release`). See the action mappings below. |
| `Value` | The value to write (for example, `62.6 °F` for a temperature setpoint). Use the `+` and `-` buttons to adjust. |
| `Duration` | How long the command remains active before auto-reverting (hours and minutes) |
| `Reason` | A predefined reason from the dropdown |
| `Permanent` | Check this to make the command persist without auto-reverting |
| `Specific Reason` | A free-text note explaining why you made the change |
The bottom of the dialog displays the current levels and their values. Click `Activity Log` in the upper-right corner to view the full command history for this point.
Click `Save Changes` to send the command to the device.
### Command actions and priority levels
Cloud BMS uses a BACnet-inspired priority model for writable points. The same command dialog appears for BACnet and non-BACnet integrations, such as REST API thermostats. How each action maps on the device depends on the connector.
BACnet points that accept commands have **16 priority levels** (1 is highest, 16 is lowest). When every level is empty (`null`), the point uses a **fallback / default** value (`Relinquish_Default` in BACnet). That fallback is **not** a 17th BACnet priority. Some interfaces label it as level 17 for display only.
`Override` and `Set` turn different knobs under the hood, even when the visible value looks the same.
| Action | What it writes\* | Description |
| ---------- | -------------------- | ------------------------------------------------------------------------------------------- |
| `Override` | Priority 8\* | Temporary exception in the priority array. Takes precedence over lower-priority automation. |
| `Set` | Fallback / default\* | Changes the fallback or default value. |
| `Auto` | — | Clears an `Override` |
| `Release` | — | Clears a `Set` |
\*Typical for most BACnet and Niagara deployments. Connectors and site standards can differ.
`Override`, `Auto`, and `Set` borrow Niagara-style action names. `Release` is a Cloud BMS action that clears a `Set`.
In Niagara-style control, `Set` keeps a non-null fallback so sequences and logic keep a reliable baseline. Use the priority array (including `Override`) for programmed automation and temporary exceptions.
To make `Set` write to priority 16 instead of the fallback or default, enable **`Set in Slot16`** (Niagara) on the point. Configure that option from [device details](/products/kode-os/devices/devices#view-and-edit-points), [device templates](/products/kode-os/devices/device-templates), or [points batch update](/products/kode-os/points/points-batch-update).
Schedules, OSS, and FTT can also write to points at specific priority levels. When a schedule is actively commanding a point, the command dialog shows the schedule's priority level. See [schedule command levels](/products/kode-os/schedules#schedule-command-levels) for details.
## Command from other views
The same command dialog is available when you click writable points on [system graphics](/products/kode-os/systems), [device graphics](/products/kode-os/graphics/device-graphics), and [area floor plans](/products/kode-os/areas).
To write values to many points at once, use [mass write](/products/kode-os/mass-write) from the portfolio view.
## Next steps
View device details, trends, and point lists for individual equipment.
Command writable points from interactive floor plans.
Write multiple points across buildings in a single tracked job.
Enable or disable writability across many points at once.
| Field | Description |
| ----------------- | -------------------------------------------------------------------------------------------------------------- |
| `Priority` | The command action to apply (`Override`, `Set`, `Auto`, or `Release`). See the action mappings below. |
| `Value` | The value to write (for example, `62.6 °F` for a temperature setpoint). Use the `+` and `-` buttons to adjust. |
| `Duration` | How long the command remains active before auto-reverting (hours and minutes) |
| `Reason` | A predefined reason from the dropdown |
| `Permanent` | Check this to make the command persist without auto-reverting |
| `Specific Reason` | A free-text note explaining why you made the change |
The bottom of the dialog displays the current levels and their values. Click `Activity Log` in the upper-right corner to view the full command history for this point.
Click `Save Changes` to send the command to the device.
### Command actions and priority levels
Cloud BMS uses a BACnet-inspired priority model for writable points. The same command dialog appears for BACnet and non-BACnet integrations, such as REST API thermostats. How each action maps on the device depends on the connector.
BACnet points that accept commands have **16 priority levels** (1 is highest, 16 is lowest). When every level is empty (`null`), the point uses a **fallback / default** value (`Relinquish_Default` in BACnet). That fallback is **not** a 17th BACnet priority. Some interfaces label it as level 17 for display only.
`Override` and `Set` turn different knobs under the hood, even when the visible value looks the same.
| Action | What it writes\* | Description |
| ---------- | -------------------- | ------------------------------------------------------------------------------------------- |
| `Override` | Priority 8\* | Temporary exception in the priority array. Takes precedence over lower-priority automation. |
| `Set` | Fallback / default\* | Changes the fallback or default value. |
| `Auto` | — | Clears an `Override` |
| `Release` | — | Clears a `Set` |
\*Typical for most BACnet and Niagara deployments. Connectors and site standards can differ.
`Override`, `Auto`, and `Set` borrow Niagara-style action names. `Release` is a Cloud BMS action that clears a `Set`.
In Niagara-style control, `Set` keeps a non-null fallback so sequences and logic keep a reliable baseline. Use the priority array (including `Override`) for programmed automation and temporary exceptions.
To make `Set` write to priority 16 instead of the fallback or default, enable **`Set in Slot16`** (Niagara) on the point. Configure that option from [device details](/products/kode-os/devices/devices#view-and-edit-points), [device templates](/products/kode-os/devices/device-templates), or [points batch update](/products/kode-os/points/points-batch-update).
Schedules, OSS, and FTT can also write to points at specific priority levels. When a schedule is actively commanding a point, the command dialog shows the schedule's priority level. See [schedule command levels](/products/kode-os/schedules#schedule-command-levels) for details.
## Command from other views
The same command dialog is available when you click writable points on [system graphics](/products/kode-os/systems), [device graphics](/products/kode-os/graphics/device-graphics), and [area floor plans](/products/kode-os/areas).
To write values to many points at once, use [mass write](/products/kode-os/mass-write) from the portfolio view.
## Next steps
View device details, trends, and point lists for individual equipment.
Command writable points from interactive floor plans.
Write multiple points across buildings in a single tracked job.
Enable or disable writability across many points at once.