> ## Documentation Index
> Fetch the complete documentation index at: https://documentation.kodelabs.com/llms.txt
> Use this file to discover all available pages before exploring further.
# Device templates and modeling
> Create reusable device configurations with point mappings, tags, and normalization rules to standardize equipment across your portfolio.
Device templates are reusable configurations that define the standard point structure, normalization rules, and tags for a specific type of equipment. Instead of manually configuring each device, you create a template once and apply it to all similar devices across your building or portfolio.
## How templates work
A device template defines:
* **Point mappings** that associate raw point names from the data source with standardized names in the Cloud BMS ontology
* **Normalization rules** that standardize units, naming conventions, and data types
* **Tags and classifications** based on the Brick Schema or Haystack ontology
* **Entity type definitions** that categorize the device (for example, AHU, VAV, FCU)
When you apply a template to a device, Cloud BMS maps the device's discovered points to the template's standardized definitions. This ensures consistent naming and classification across devices from different manufacturers.
## Point modeling
Point modeling is the process of mapping raw point names to standardized ontology fields. You access Point Modeling from a device's detail page. The interface displays each point group with its raw name, mapped ontology field, point count, and template status.
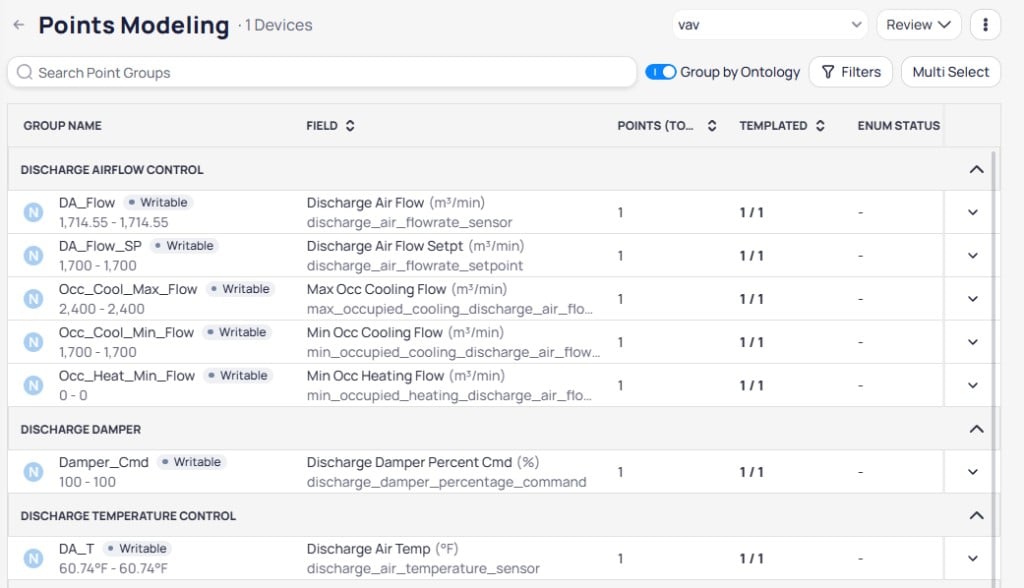
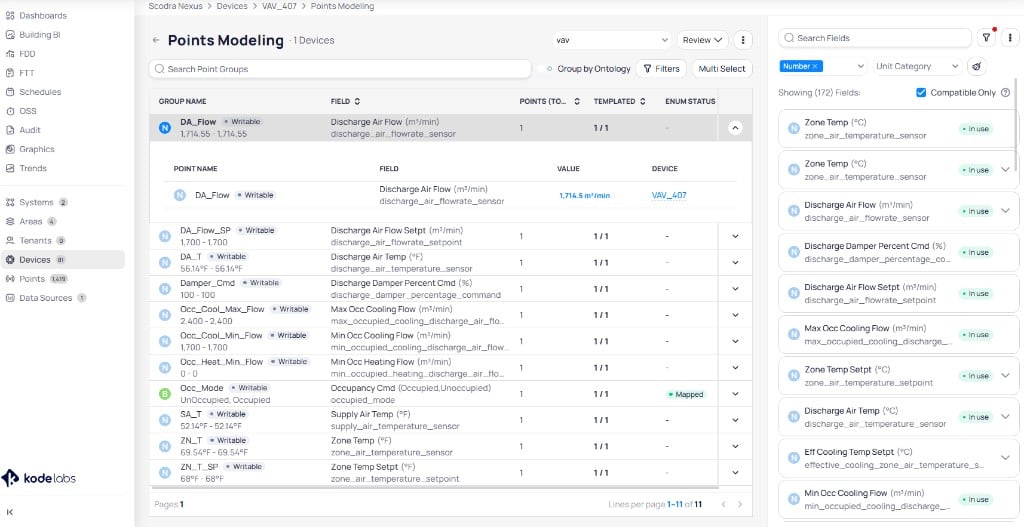 Toggle **Group by Ontology** to organize point groups by their ontology categories (such as Discharge Airflow Control, Discharge Damper, or Discharge Temperature Control) instead of a flat list.
 The standardized field format follows this structure:
`[aggregator]_[descriptor]_[component]_[measurement descriptor]_[measurement]_[point type]`
For example, a raw point named `SA-T` might map to `supply_air_temperature_sensor`.
### Entity types
The Cloud BMS ontology defines four entity types:
* **Canonical** entities are equipment templates (the primary device definitions) that contain mandatory field groups
* **Abstract** entities compose canonical types and define reusable field groups
* **General** entities apply to all canonical types and define common fields like running status and operation commands
* **Virtual** entities represent calculated fields that do not correspond to physical sensors
## Create a device template
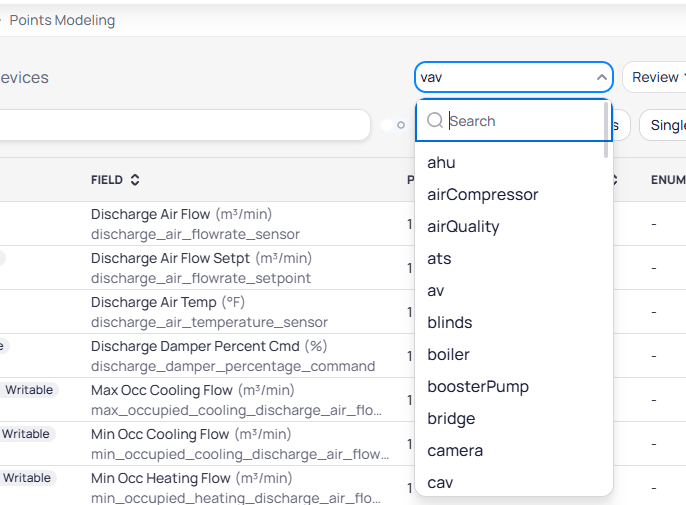
From the building view, go to **Devices** and select a device. Open the **Points Modeling** tab to see all discovered point groups. Use the **device type** dropdown at the top of the page to select the ontology device type (for example, `vav`, `ahu`, `boiler`). This determines which ontology fields are available for mapping.
The standardized field format follows this structure:
`[aggregator]_[descriptor]_[component]_[measurement descriptor]_[measurement]_[point type]`
For example, a raw point named `SA-T` might map to `supply_air_temperature_sensor`.
### Entity types
The Cloud BMS ontology defines four entity types:
* **Canonical** entities are equipment templates (the primary device definitions) that contain mandatory field groups
* **Abstract** entities compose canonical types and define reusable field groups
* **General** entities apply to all canonical types and define common fields like running status and operation commands
* **Virtual** entities represent calculated fields that do not correspond to physical sensors
## Create a device template
From the building view, go to **Devices** and select a device. Open the **Points Modeling** tab to see all discovered point groups. Use the **device type** dropdown at the top of the page to select the ontology device type (for example, `vav`, `ahu`, `boiler`). This determines which ontology fields are available for mapping.
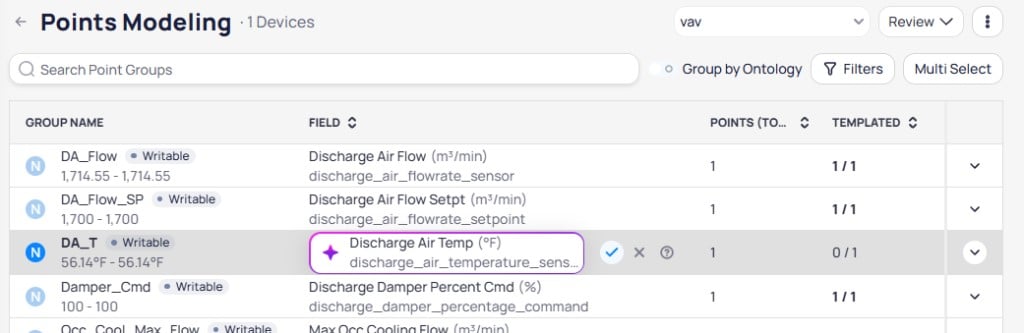
 Select an unmapped point group to expand it. Cloud BMS shows the inline field selector where you can accept a suggested mapping or choose a different one.
 When selecting a point group, fields will be filtered based on:
* **Point Kind**
* **Unit Category** (Number Points)
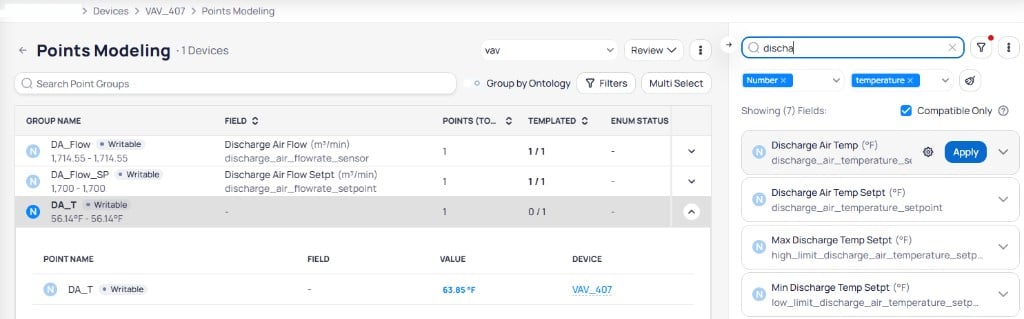
You can also use the **field panel** on the right side of the page to search and filter for ontology fields. Use the search bar, unit category tags, and the **Compatible Only** checkbox to narrow results, then click **Apply** to assign a field.
When selecting a point group, fields will be filtered based on:
* **Point Kind**
* **Unit Category** (Number Points)
You can also use the **field panel** on the right side of the page to search and filter for ontology fields. Use the search bar, unit category tags, and the **Compatible Only** checkbox to narrow results, then click **Apply** to assign a field.
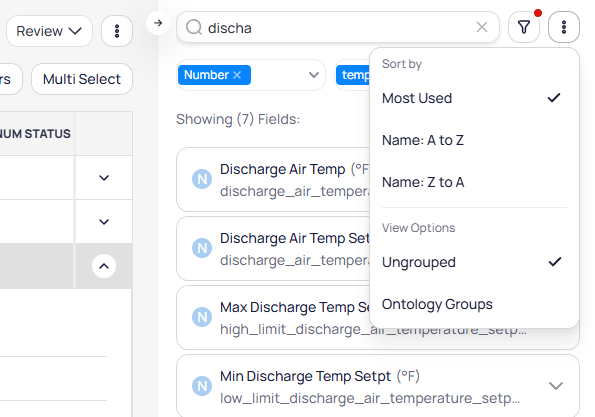
 Use the **sort and view** menu in the field panel to control how fields are listed. Sort by **Most Used**, **Name: A to Z**, or **Name: Z to A**, and toggle between **Ungrouped** and **Ontology Groups** views.
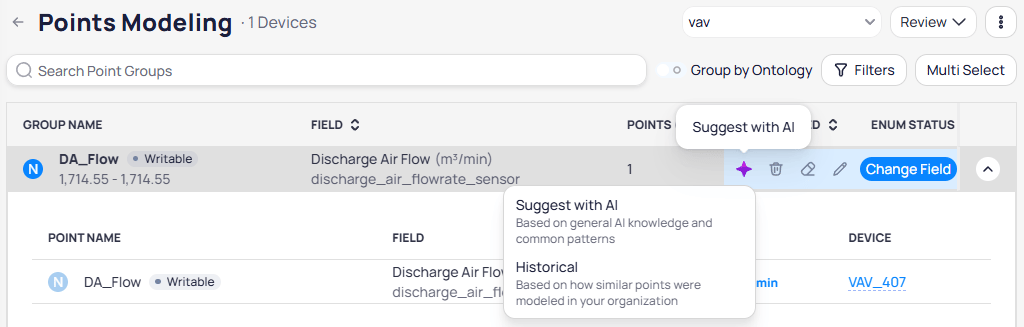
 Hover over a mapped point group to reveal the action toolbar. Click the **Suggest with AI** icon to get mapping recommendations. Cloud BMS offers two suggestion modes:
* **Suggest with AI** recommends fields based on general AI knowledge and common naming patterns
* **Historical** recommends fields based on how similar points were modeled in your organization
Hover over a mapped point group to reveal the action toolbar. Click the **Suggest with AI** icon to get mapping recommendations. Cloud BMS offers two suggestion modes:
* **Suggest with AI** recommends fields based on general AI knowledge and common naming patterns
* **Historical** recommends fields based on how similar points were modeled in your organization
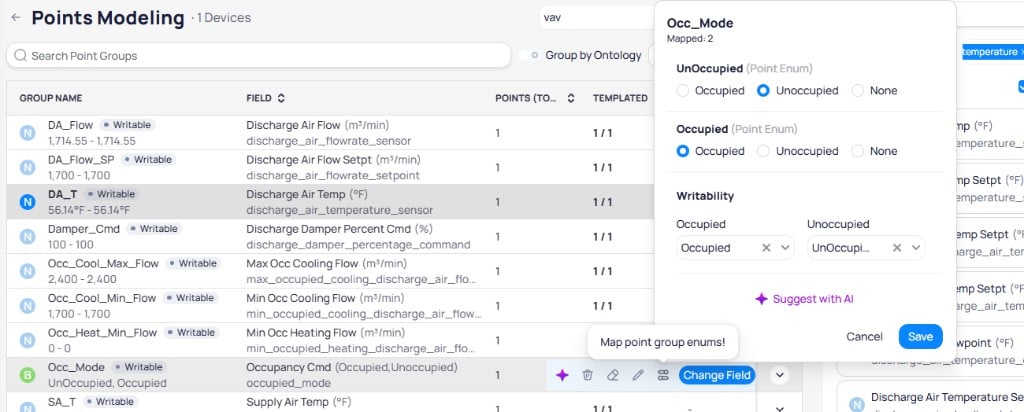
 For points with enum values (such as occupancy mode), Cloud BMS displays a mapping panel where you configure each enum state. Select the correct value for each state (for example, **Occupied**, **Unoccupied**, or **None**) and set writability per occupancy mode.
Map enum values for Boolean and string points before you use devices in FDD or FTT. Unmapped enum values can block compatibility and command logic.
For points with enum values (such as occupancy mode), Cloud BMS displays a mapping panel where you configure each enum state. Select the correct value for each state (for example, **Occupied**, **Unoccupied**, or **None**) and set writability per occupancy mode.
Map enum values for Boolean and string points before you use devices in FDD or FTT. Unmapped enum values can block compatibility and command logic.
 Before you save, review issue indicators on point groups:
| Indicator | Meaning |
| --------------------------- | -------------------------------------------------------------------------------------------- |
| **Duplicate Points** | Two or more points on a device share the same name |
| **Multiple-Fields Applied** | Field, unit, display name, or precision differs within the group. Hover the `?` for details. |
| `Missing Enums` | Boolean or string points are missing enum values |
| `Not Mapped` | Enum values are not mapped to ontology fields |
| `Partially Mapped` | Some enum values are mapped, but not all |
| `Mapped` | All enum values are mapped |
Resolve duplicates and complete enum mapping when devices must work with FDD or FTT.
After mapping all points, save the configuration as a reusable template. Name the template to reflect the equipment type and configuration (for example, `AHU-Standard-4Pipe`).
## Edit field configurations
When a point group is mapped, you can fine-tune its field settings. Hover over the point group and click the **edit** icon to open the field configuration panel.
Before you save, review issue indicators on point groups:
| Indicator | Meaning |
| --------------------------- | -------------------------------------------------------------------------------------------- |
| **Duplicate Points** | Two or more points on a device share the same name |
| **Multiple-Fields Applied** | Field, unit, display name, or precision differs within the group. Hover the `?` for details. |
| `Missing Enums` | Boolean or string points are missing enum values |
| `Not Mapped` | Enum values are not mapped to ontology fields |
| `Partially Mapped` | Some enum values are mapped, but not all |
| `Mapped` | All enum values are mapped |
Resolve duplicates and complete enum mapping when devices must work with FDD or FTT.
After mapping all points, save the configuration as a reusable template. Name the template to reflect the equipment type and configuration (for example, `AHU-Standard-4Pipe`).
## Edit field configurations
When a point group is mapped, you can fine-tune its field settings. Hover over the point group and click the **edit** icon to open the field configuration panel.
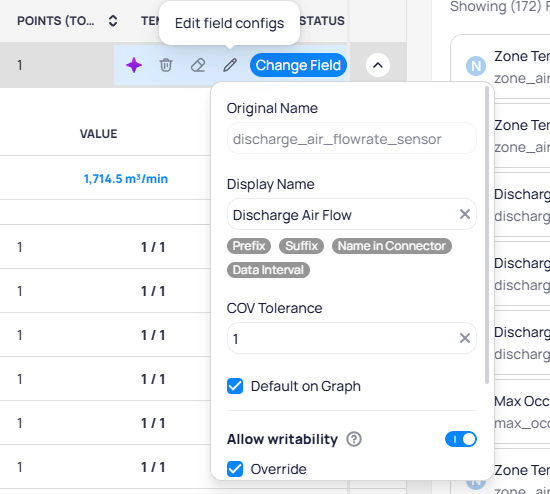 The configuration panel includes:
| Setting | Description |
| --------------------- | ---------------------------------------------------------------------------------------------------------------------------------------------------------------------------------------------------------------------------------- |
| **Original Name** | The raw point name from the data source |
| **Display Name** | A human-readable label shown across the platform, with optional Prefix, Suffix, Name in Connector, and Data Interval tags |
| **COV Tolerance** | The change-of-value threshold that controls when new data is recorded |
| **Default on Graph** | Whether this point appears on trend graphs by default |
| **Allow writability** | Whether the point accepts write commands from users. When enabled, choose which actions the point accepts: `Override`, `Set`, and optionally `Set in Slot16`. Enable writability for command points that FTT workflows must write. |
| **Override** | Whether the point accepts `Override` commands (typically priority 8) |
| **Set** | Whether the point accepts `Set` commands (fallback or default value by default) |
| **Set in Slot16** | Whether `Set` writes to priority 16 instead of the fallback or default (Niagara only) |
## Manage point groups
The action toolbar on each point group provides controls for managing mappings.
### Multi select
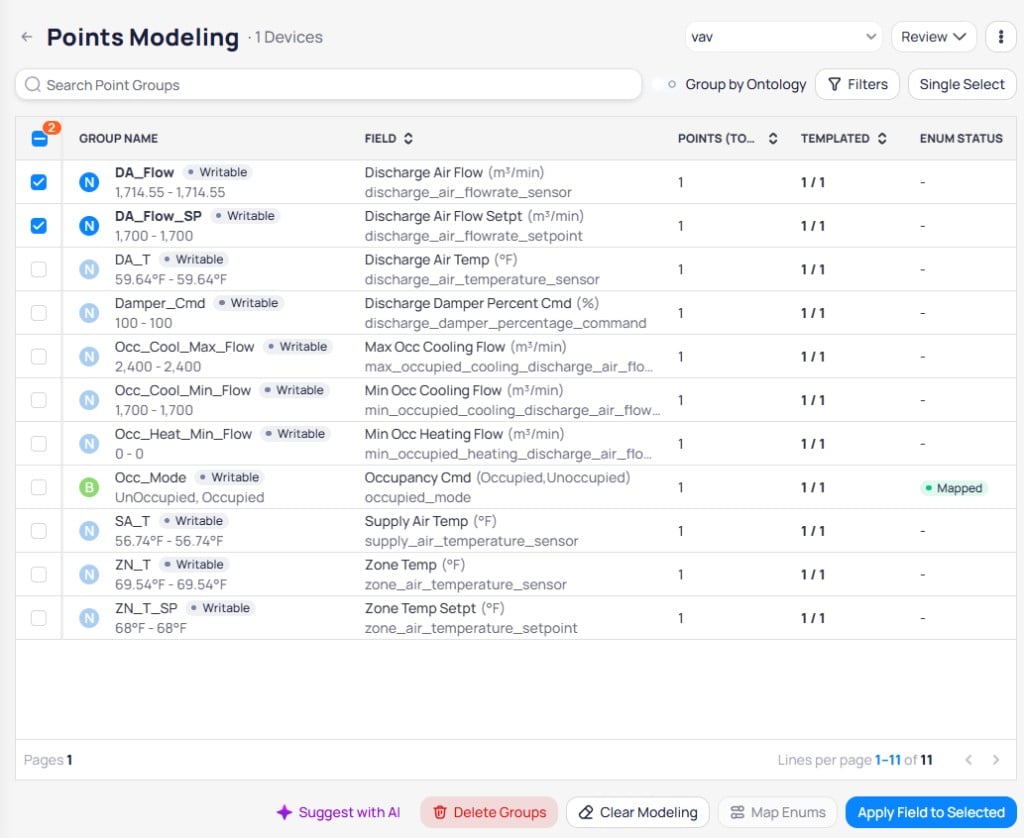
Click **Multi Select** to select multiple point groups at once. A bulk action toolbar appears at the bottom of the page with options to **Suggest with AI**, **Delete Groups**, **Clear Modeling**, **Map Enums**, or **Apply Field to Selected**.
The configuration panel includes:
| Setting | Description |
| --------------------- | ---------------------------------------------------------------------------------------------------------------------------------------------------------------------------------------------------------------------------------- |
| **Original Name** | The raw point name from the data source |
| **Display Name** | A human-readable label shown across the platform, with optional Prefix, Suffix, Name in Connector, and Data Interval tags |
| **COV Tolerance** | The change-of-value threshold that controls when new data is recorded |
| **Default on Graph** | Whether this point appears on trend graphs by default |
| **Allow writability** | Whether the point accepts write commands from users. When enabled, choose which actions the point accepts: `Override`, `Set`, and optionally `Set in Slot16`. Enable writability for command points that FTT workflows must write. |
| **Override** | Whether the point accepts `Override` commands (typically priority 8) |
| **Set** | Whether the point accepts `Set` commands (fallback or default value by default) |
| **Set in Slot16** | Whether `Set` writes to priority 16 instead of the fallback or default (Niagara only) |
## Manage point groups
The action toolbar on each point group provides controls for managing mappings.
### Multi select
Click **Multi Select** to select multiple point groups at once. A bulk action toolbar appears at the bottom of the page with options to **Suggest with AI**, **Delete Groups**, **Clear Modeling**, **Map Enums**, or **Apply Field to Selected**.
 ### Individual actions
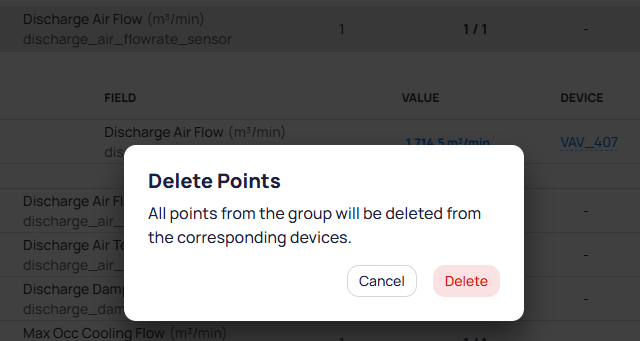
Click the **delete** icon to remove all points in the group from their corresponding devices.
### Individual actions
Click the **delete** icon to remove all points in the group from their corresponding devices.
 Click the **clear** icon to remove the ontology field mapping from the point group. Use this when a mapping is incorrect and needs to be reassigned.
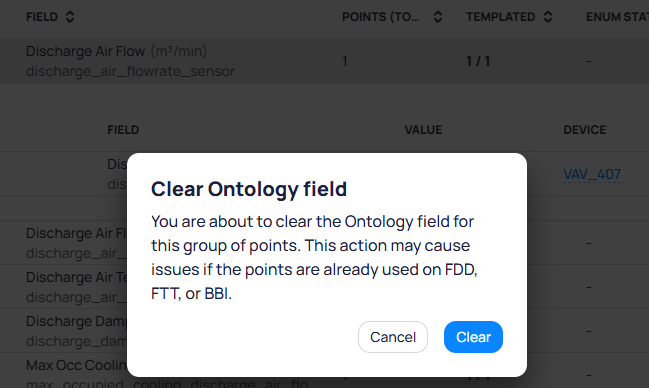 Clearing an ontology field may cause issues if the points are already used in FDD, FTT, or BBI applications.
## Apply a template to devices
You can apply a template to one or multiple devices at a time.
Go to **Devices** and click **Batch Update Devices** in the upper right corner.
Filter and select the devices that match the template's equipment type.
Choose the template from the available list and apply it to the selected devices. Cloud BMS maps each device's discovered points to the template definitions.
Verify that points were mapped correctly. Devices with unmatched points are flagged for manual review.
## Review modeling
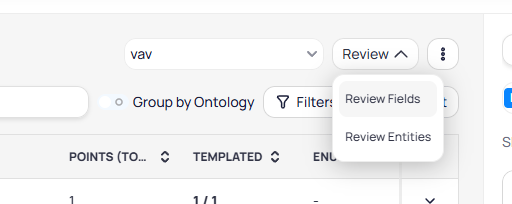
After mapping points, use the **Review** menu to validate your modeling work. Click **Review** in the top toolbar to choose between two review modes.
Clearing an ontology field may cause issues if the points are already used in FDD, FTT, or BBI applications.
## Apply a template to devices
You can apply a template to one or multiple devices at a time.
Go to **Devices** and click **Batch Update Devices** in the upper right corner.
Filter and select the devices that match the template's equipment type.
Choose the template from the available list and apply it to the selected devices. Cloud BMS maps each device's discovered points to the template definitions.
Verify that points were mapped correctly. Devices with unmatched points are flagged for manual review.
## Review modeling
After mapping points, use the **Review** menu to validate your modeling work. Click **Review** in the top toolbar to choose between two review modes.
 ### Review fields
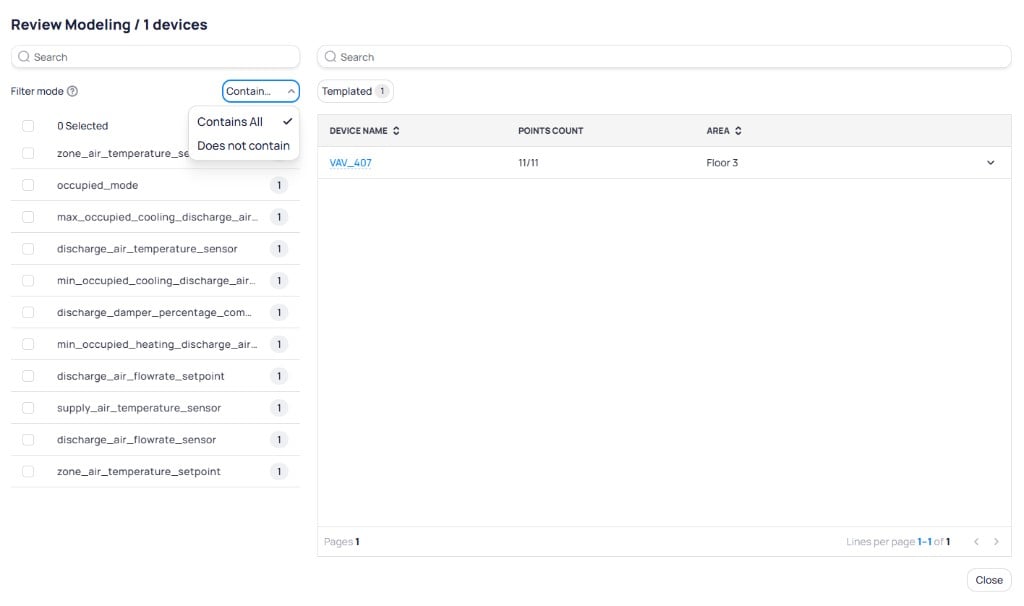
Select **Review Fields** to open the Review Modeling dialog. The left panel lists all mapped ontology fields with their point counts. Use the **Filter mode** dropdown to find devices that either contain all selected fields or are missing specific fields.
### Review fields
Select **Review Fields** to open the Review Modeling dialog. The left panel lists all mapped ontology fields with their point counts. Use the **Filter mode** dropdown to find devices that either contain all selected fields or are missing specific fields.
 ### Run an ontology report
Select **Review Entities** to run an ontology report that validates whether the mapped points correctly match entity definitions.
### Run an ontology report
Select **Review Entities** to run an ontology report that validates whether the mapped points correctly match entity definitions.
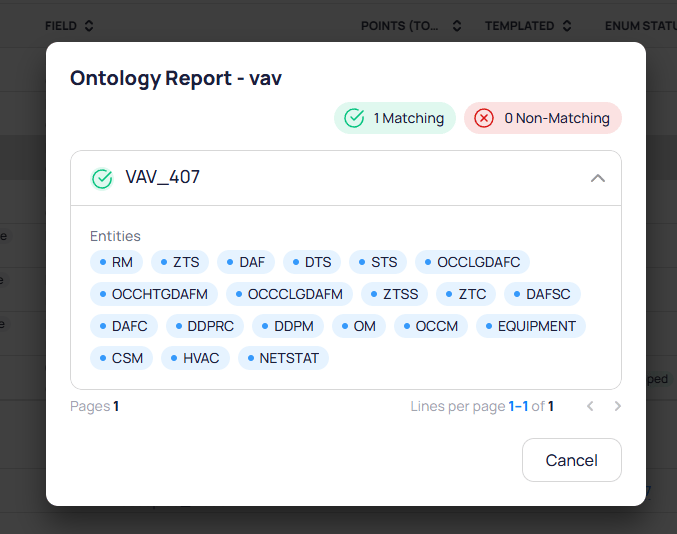 The report displays a count of **Matching** and **Non-Matching** devices. Expand a device entry to see all associated entities. Each entity tag represents a recognized classification based on the mapped points.
The ontology report validates that templates correctly describe device behavior. It verifies whether a point is a command or status, a number or enum, and whether the template is the right fit for the device's actual point structure.
## Import and export modeling
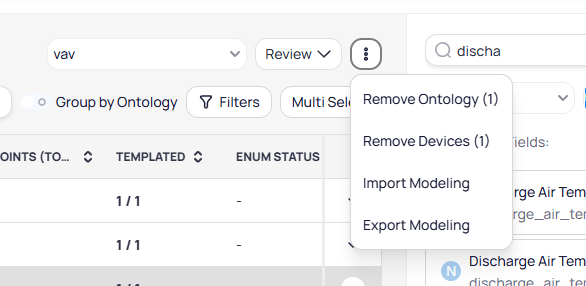
The **more actions** menu (vertical three-dot icon) provides bulk operations for managing modeling data across devices.
The report displays a count of **Matching** and **Non-Matching** devices. Expand a device entry to see all associated entities. Each entity tag represents a recognized classification based on the mapped points.
The ontology report validates that templates correctly describe device behavior. It verifies whether a point is a command or status, a number or enum, and whether the template is the right fit for the device's actual point structure.
## Import and export modeling
The **more actions** menu (vertical three-dot icon) provides bulk operations for managing modeling data across devices.
 | Action | Description |
| ------------------- | -------------------------------------------------------- |
| **Remove Ontology** | Clears ontology field mappings from the selected devices |
| **Remove Devices** | Removes the selected devices from the modeling view |
| **Import Modeling** | Imports point mappings from a template file |
| **Export Modeling** | Exports current point mappings to a template file |
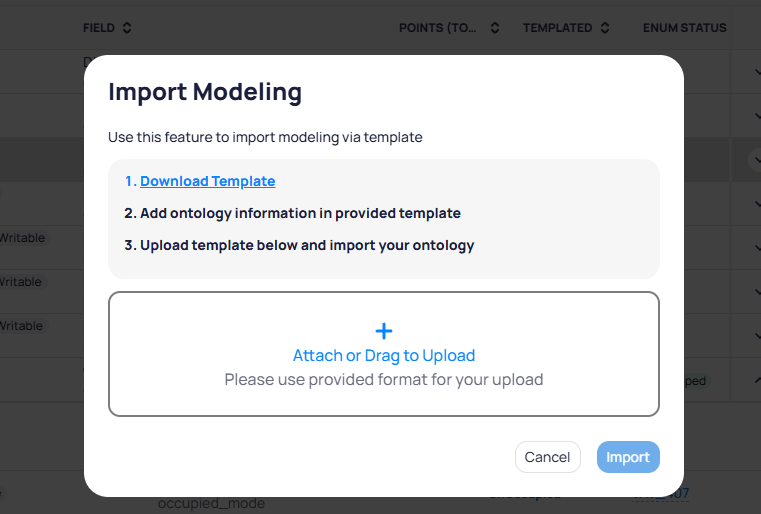
To import modeling, click **Import Modeling** to open the import dialog. Download the template file, fill in the ontology information, then upload it to apply the mappings.
| Action | Description |
| ------------------- | -------------------------------------------------------- |
| **Remove Ontology** | Clears ontology field mappings from the selected devices |
| **Remove Devices** | Removes the selected devices from the modeling view |
| **Import Modeling** | Imports point mappings from a template file |
| **Export Modeling** | Exports current point mappings to a template file |
To import modeling, click **Import Modeling** to open the import dialog. Download the template file, fill in the ontology information, then upload it to apply the mappings.
 The downloaded template file contains one row per point with the following columns:
| Column | Description |
| ----------------------------- | ----------------------------------------------------------- |
| **Point Name** | The raw point name from the data source |
| **Point Kind** | The data type of the point (for example, Number, Boolean) |
| **Point Writable** | Whether the point accepts write commands |
| **Point Unit** | The unit of measurement |
| **Point Enum** | Enum values for the point, if applicable |
| **Canonical Type** | The device's canonical entity type |
| **Ontology Field** | The standardized ontology field name to map to |
| **Ontology Display Name** | The human-readable display name |
| **Ontology Precision** | The number of decimal places for display |
| **Cov Ign Unit** | Whether to ignore the unit for change-of-value calculations |
| **Ontology Cov Tolerance** | The change-of-value threshold |
| **Ontology Default In Graph** | Whether the point appears on trend graphs by default |
| **Ontology Prefix** | A prefix added to the display name |
| **Ontology Suffix** | A suffix added to the display name |
| **Ontology Write Map** | The write value mapping for enum points |
| **Ontology Read Map** | The read value mapping for enum points |
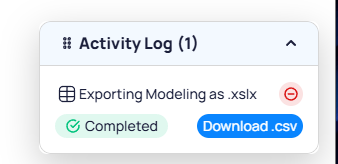
When you export modeling, the **Activity Log** in the bottom-right corner tracks the export progress. Once complete, click **Download .csv** to save the file.
The downloaded template file contains one row per point with the following columns:
| Column | Description |
| ----------------------------- | ----------------------------------------------------------- |
| **Point Name** | The raw point name from the data source |
| **Point Kind** | The data type of the point (for example, Number, Boolean) |
| **Point Writable** | Whether the point accepts write commands |
| **Point Unit** | The unit of measurement |
| **Point Enum** | Enum values for the point, if applicable |
| **Canonical Type** | The device's canonical entity type |
| **Ontology Field** | The standardized ontology field name to map to |
| **Ontology Display Name** | The human-readable display name |
| **Ontology Precision** | The number of decimal places for display |
| **Cov Ign Unit** | Whether to ignore the unit for change-of-value calculations |
| **Ontology Cov Tolerance** | The change-of-value threshold |
| **Ontology Default In Graph** | Whether the point appears on trend graphs by default |
| **Ontology Prefix** | A prefix added to the display name |
| **Ontology Suffix** | A suffix added to the display name |
| **Ontology Write Map** | The write value mapping for enum points |
| **Ontology Read Map** | The read value mapping for enum points |
When you export modeling, the **Activity Log** in the bottom-right corner tracks the export progress. Once complete, click **Download .csv** to save the file.
 ## Update a template
When you modify a template, you can propagate changes to all devices that use it. Update the point mappings, save the template, and reapply it to the affected devices through batch update.
## Next steps
Apply templates and make mass edits across multiple devices.
Understand the data values that templates organize and standardize.
## Update a template
When you modify a template, you can propagate changes to all devices that use it. Update the point mappings, save the template, and reapply it to the affected devices through batch update.
## Next steps
Apply templates and make mass edits across multiple devices.
Understand the data values that templates organize and standardize.