> ## Documentation Index
> Fetch the complete documentation index at: https://documentation.kodelabs.com/llms.txt
> Use this file to discover all available pages before exploring further.
# Workflows
> View, create, and manage FTT testing workflows using the logic builder and debugger in Cloud BMS.
FTT workflows define the testing logic for your building equipment. Each workflow specifies the sequences of commands, sensor readings, success criteria, and report output for a specific test type. Cloud BMS provides a pre-configured library of workflows and a logic builder for creating custom tests.
Navigate to `FTT` from the left sidebar, select the three-dot menu at the top right, and choose `Workflows`.
Most sites start with the library. Run a library workflow on one device before you edit logic. See [What is Functional Testing?](/products/ftt/overview) for how a heating workflow decides pass or fail, and [What is Functional Testing?](/products/ftt/overview) for an on-demand run.
Custom authoring is covered in the [Workflow creator guide](/products/ftt/workflow-creator-guide).
## Workflows list
The workflows list displays all available workflows with key details. Use the search bar and `Canonical Type` filter to find specific workflows.
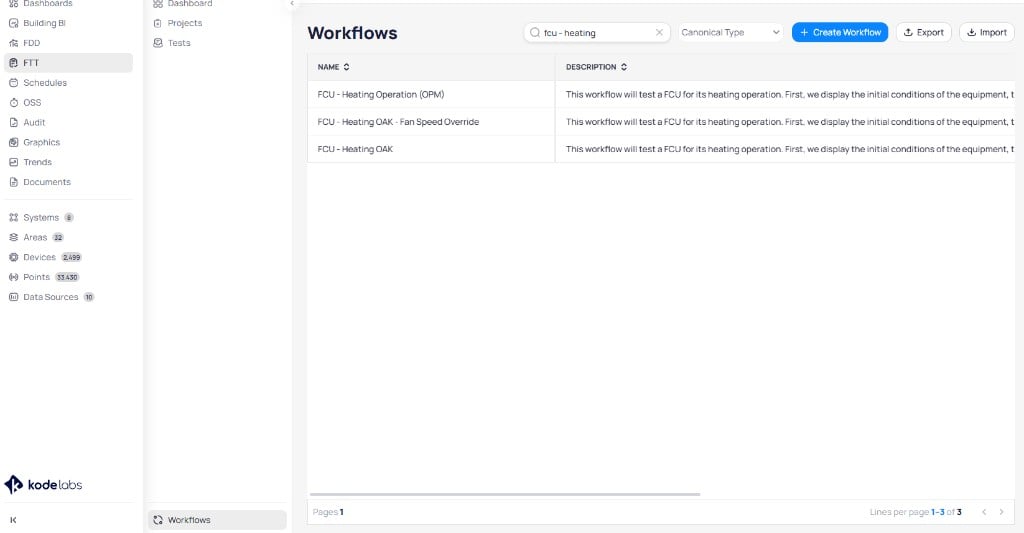 | Column | Description |
| ------------------- | ----------------------------------------------------------------- |
| `Name` | Workflow name |
| `Description` | Summary of what the workflow tests |
| `Device Types` | Equipment types compatible with the workflow |
| `Device References` | Reference devices required by the workflow (such as a parent AHU) |
### Row actions
Select the three-dot menu on any workflow row to access available actions:
| Column | Description |
| ------------------- | ----------------------------------------------------------------- |
| `Name` | Workflow name |
| `Description` | Summary of what the workflow tests |
| `Device Types` | Equipment types compatible with the workflow |
| `Device References` | Reference devices required by the workflow (such as a parent AHU) |
### Row actions
Select the three-dot menu on any workflow row to access available actions:
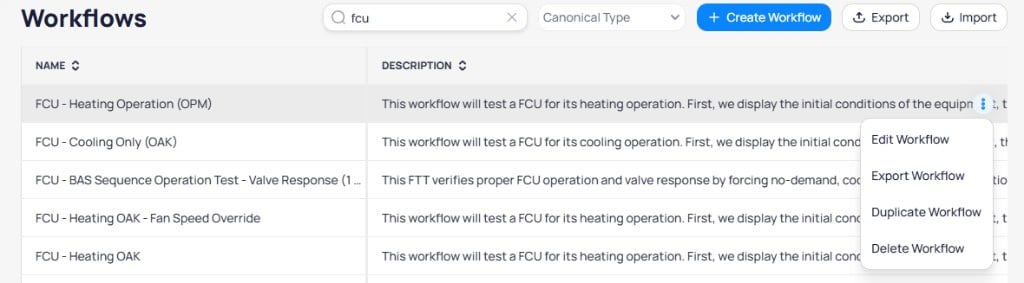 * **Edit Workflow**: open the workflow in the logic builder
* **Export Workflow**: export the selected workflow as a JSON file
* **Duplicate Workflow**: create a copy of the workflow
* **Delete Workflow**: permanently remove the workflow
## Export workflows
Export workflows to share them across sites or create backups.
1. Select `Export` from the top toolbar.
2. Select the checkboxes next to the workflows you want to export.
3. Select `Export`. The workflows download as an `FTT Export.json` file.
* **Edit Workflow**: open the workflow in the logic builder
* **Export Workflow**: export the selected workflow as a JSON file
* **Duplicate Workflow**: create a copy of the workflow
* **Delete Workflow**: permanently remove the workflow
## Export workflows
Export workflows to share them across sites or create backups.
1. Select `Export` from the top toolbar.
2. Select the checkboxes next to the workflows you want to export.
3. Select `Export`. The workflows download as an `FTT Export.json` file.
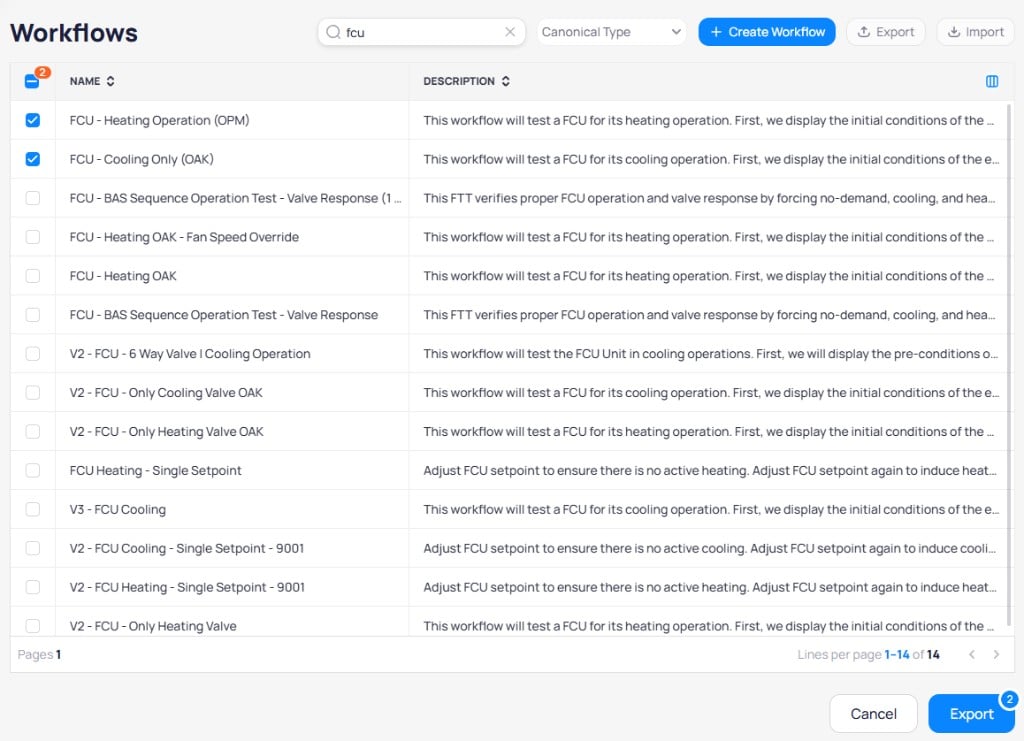 You can also export a single workflow directly from the row actions three-dot menu by selecting `Export Workflow`.
## Import workflows
Import workflows from a previously exported JSON file.
1. Select `Import` from the top toolbar.
2. Choose a file or drag and drop the JSON export file into the upload area.
You can also export a single workflow directly from the row actions three-dot menu by selecting `Export Workflow`.
## Import workflows
Import workflows from a previously exported JSON file.
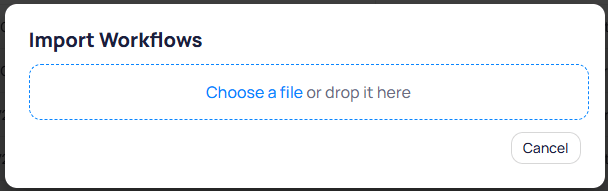
1. Select `Import` from the top toolbar.
2. Choose a file or drag and drop the JSON export file into the upload area.
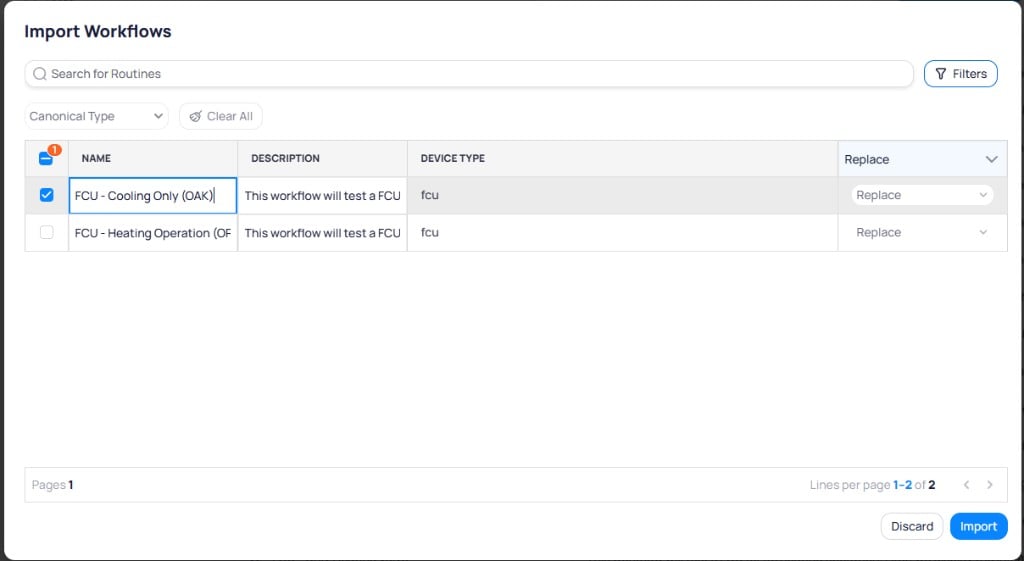
 3. Review the imported workflows. Use the search bar and `Canonical Type` filter to find specific workflows.
4. Select the workflows you want to import. For each workflow, choose whether to **Replace** an existing workflow or create a new one.
5. Select `Import` to complete the process, or `Discard` to cancel.
3. Review the imported workflows. Use the search bar and `Canonical Type` filter to find specific workflows.
4. Select the workflows you want to import. For each workflow, choose whether to **Replace** an existing workflow or create a new one.
5. Select `Import` to complete the process, or `Discard` to cancel.
 ## Create a workflow
Select `+ Create Workflow`. Complete the required fields on the `Workflow Details` tab:
## Create a workflow
Select `+ Create Workflow`. Complete the required fields on the `Workflow Details` tab:
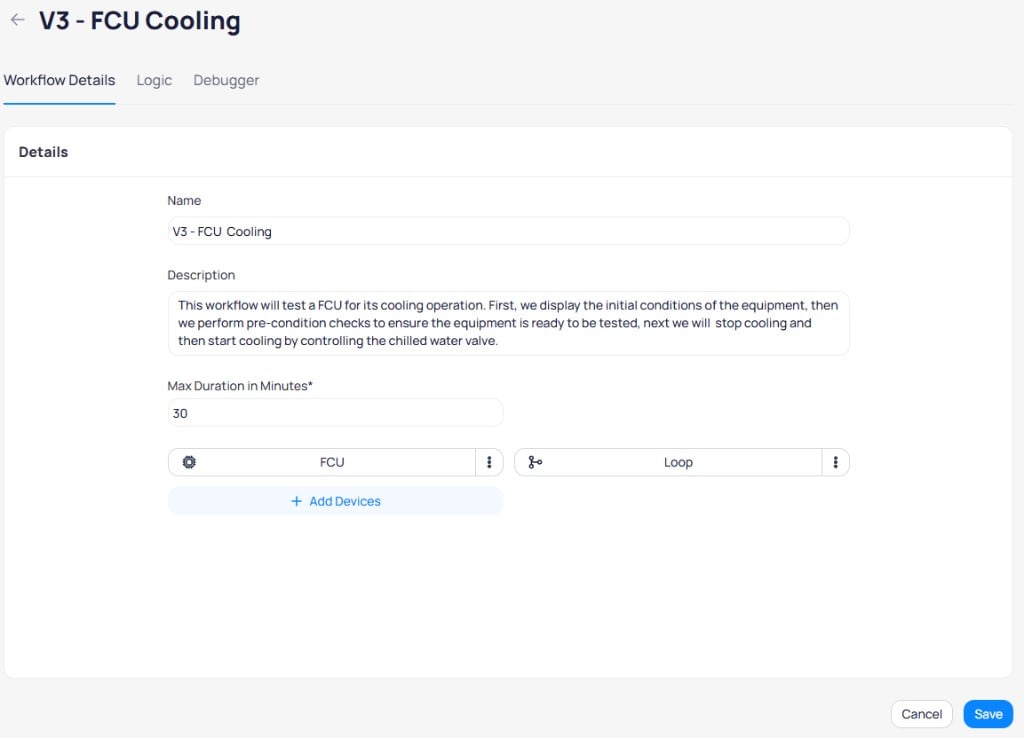 | Field | Description |
| ------------------------- | ----------------------------------------------------------- |
| `Name` | A descriptive name for the test, such as "V3 - FCU Cooling" |
| `Description` | Explanation of what the workflow tests |
| `Max Duration in Minutes` | Maximum time the workflow is allowed to run |
Select `+ Add Devices` to configure the base and reference devices for the workflow. Set the device name, select canonical types, and choose the required entities.
| Field | Description |
| ------------------------- | ----------------------------------------------------------- |
| `Name` | A descriptive name for the test, such as "V3 - FCU Cooling" |
| `Description` | Explanation of what the workflow tests |
| `Max Duration in Minutes` | Maximum time the workflow is allowed to run |
Select `+ Add Devices` to configure the base and reference devices for the workflow. Set the device name, select canonical types, and choose the required entities.
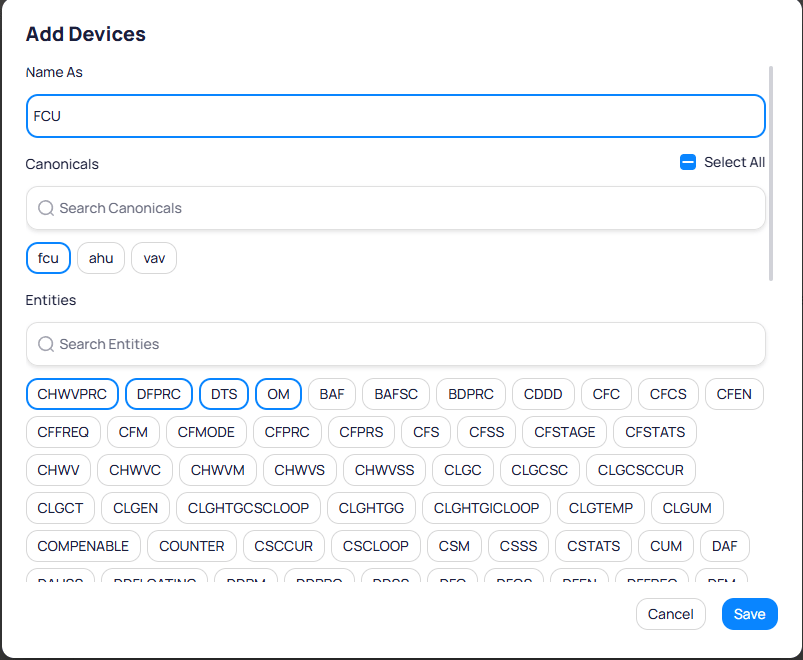 | Field | Description |
| ------------ | ------------------------------------------------ |
| `Name As` | Device reference name used in the workflow logic |
| `Canonicals` | Equipment canonical types for the device |
| `Entities` | Entity definitions required by the workflow |
Open the `Logic` tab. Drag and drop logic blocks from the left panel onto the canvas to build the testing sequence.
| Field | Description |
| ------------ | ------------------------------------------------ |
| `Name As` | Device reference name used in the workflow logic |
| `Canonicals` | Equipment canonical types for the device |
| `Entities` | Entity definitions required by the workflow |
Open the `Logic` tab. Drag and drop logic blocks from the left panel onto the canvas to build the testing sequence.
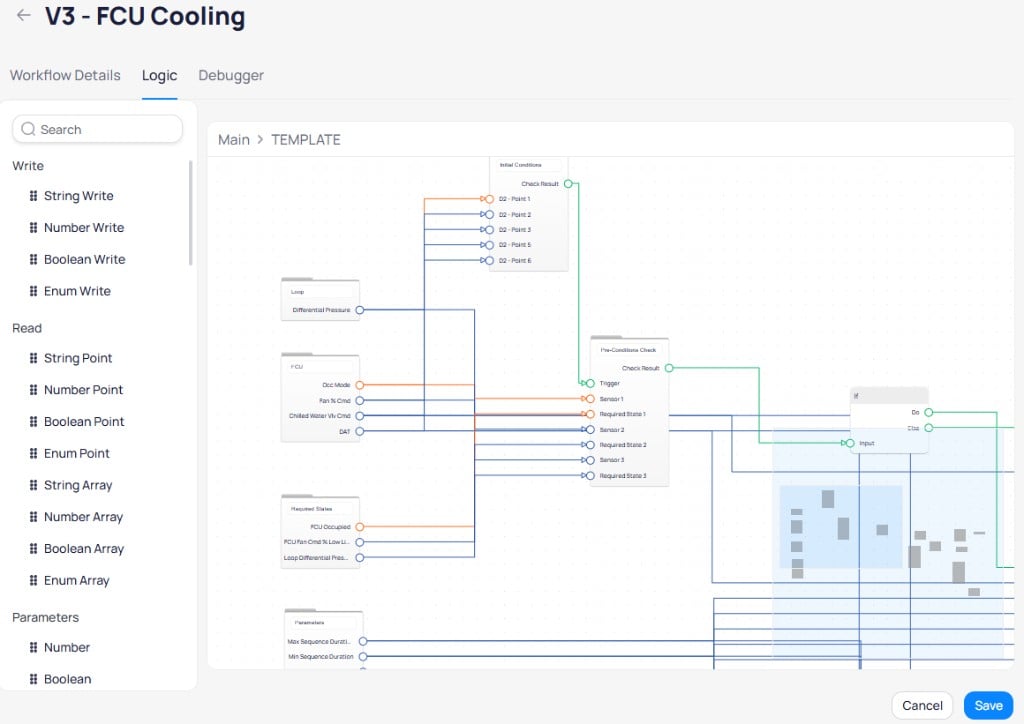 A standard workflow follows this structure:
1. **Initial conditions**: print the starting state of the equipment
2. **Pre-condition checks**: verify the equipment is ready for testing
3. **Control sequences**: command the equipment and evaluate responses
4. **Release**: end the test and release all overrides
See [Workflow logic blocks](/products/ftt/workflow-logic-blocks) for a complete reference of available block types.
Open the `Debugger` tab. The left sidebar displays parameters and inputs. The main screen shows the simulator output.
A standard workflow follows this structure:
1. **Initial conditions**: print the starting state of the equipment
2. **Pre-condition checks**: verify the equipment is ready for testing
3. **Control sequences**: command the equipment and evaluate responses
4. **Release**: end the test and release all overrides
See [Workflow logic blocks](/products/ftt/workflow-logic-blocks) for a complete reference of available block types.
Open the `Debugger` tab. The left sidebar displays parameters and inputs. The main screen shows the simulator output.
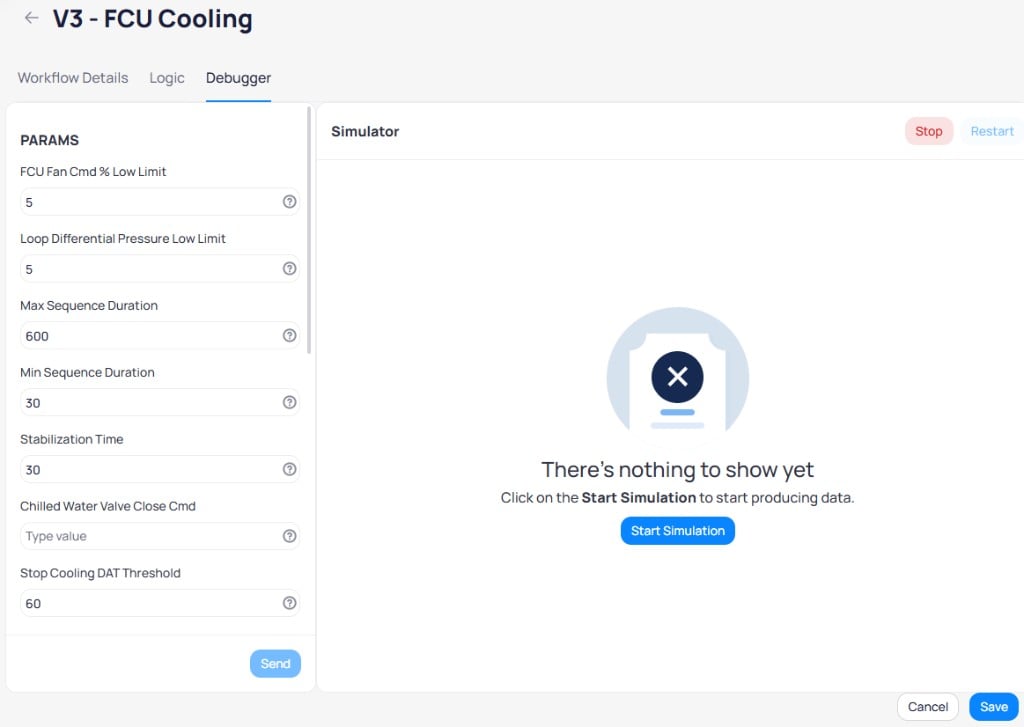 1. Review the `PARAMS` section and adjust parameter values for testing.
2. Select `Start Simulation` to begin.
1. Review the `PARAMS` section and adjust parameter values for testing.
2. Select `Start Simulation` to begin.
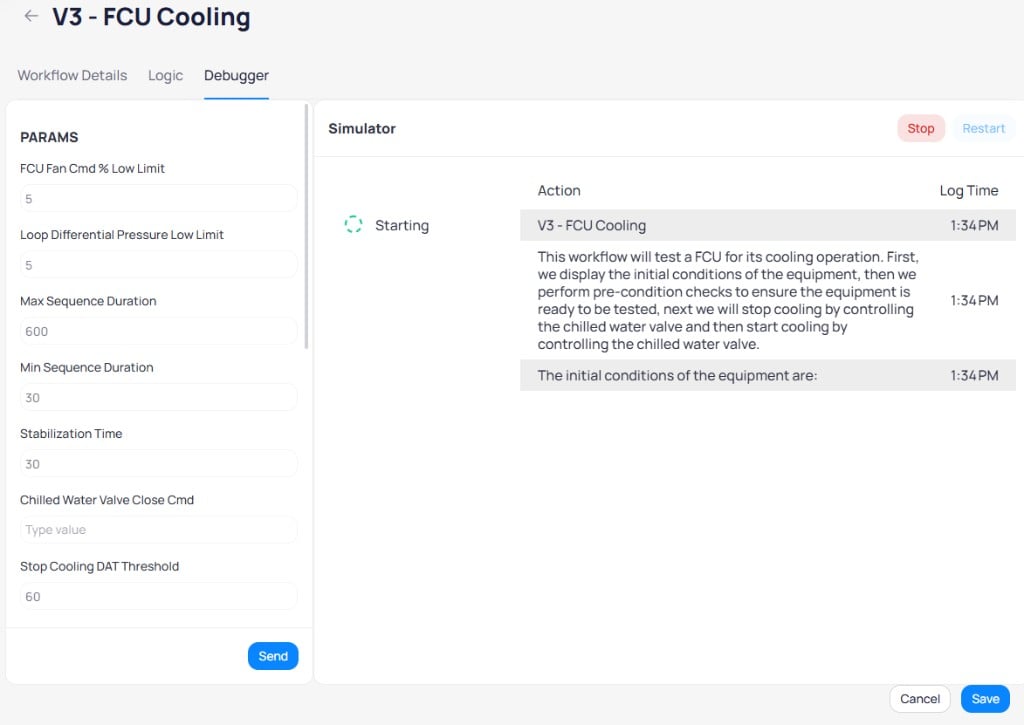 3. Update `INPUT` values to simulate different equipment conditions, then select `Send`.
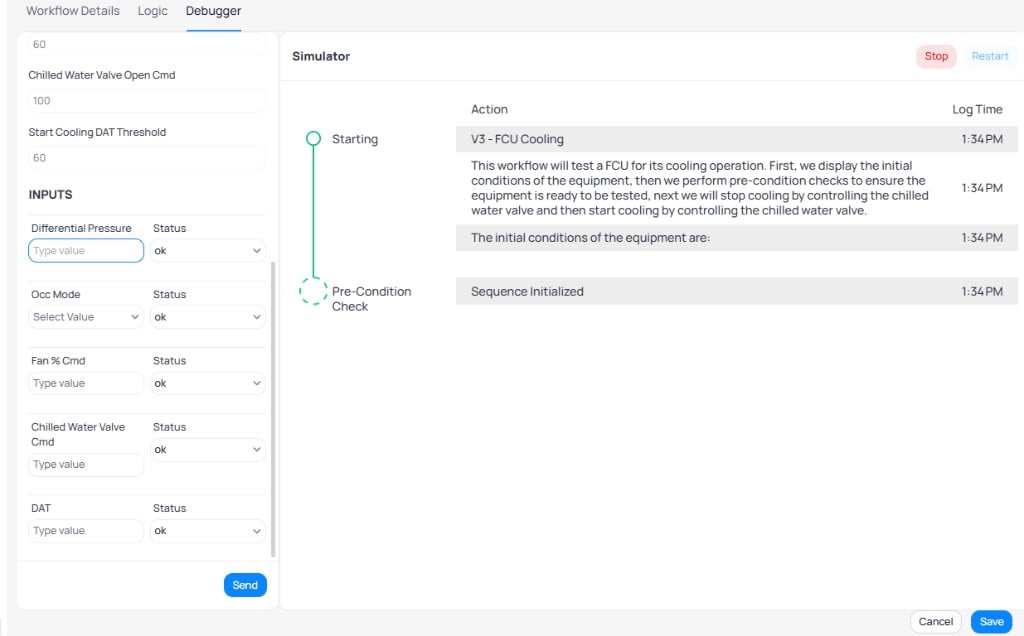 4. Verify the workflow produces the expected response for each scenario.
Delay times run in real time during simulation. Temporarily change time units to seconds on timer blocks to speed up testing. Return to the correct units before deploying.
Test boundary values thoroughly. Verify conditions that should pass and conditions that should fail. This catches threshold errors before deployment.
Select `Save`. The workflow appears in the workflows list and becomes available for use in FTT projects.
## Next steps
Review heating and cooling library workflows and parameters.
Explore the available block types for building workflow logic.
Design and build custom workflows after you know the library.
Assign workflows to devices and schedule automated testing.
4. Verify the workflow produces the expected response for each scenario.
Delay times run in real time during simulation. Temporarily change time units to seconds on timer blocks to speed up testing. Return to the correct units before deploying.
Test boundary values thoroughly. Verify conditions that should pass and conditions that should fail. This catches threshold errors before deployment.
Select `Save`. The workflow appears in the workflows list and becomes available for use in FTT projects.
## Next steps
Review heating and cooling library workflows and parameters.
Explore the available block types for building workflow logic.
Design and build custom workflows after you know the library.
Assign workflows to devices and schedule automated testing.