> ## Documentation Index
> Fetch the complete documentation index at: https://documentation.kodelabs.com/llms.txt
> Use this file to discover all available pages before exploring further.

# Build your first FDD routine

> Learn how FDD alarms and events work, then build a flexible sensor-to-setpoint routine, test it, and enable it on a device.

export const TutorialSubStep = ({tutorialId, id, parentId, siblingIds = "", stepIds = "", number, title, mediaLabel, children}) => {
  const progressEvent = "kode-tutorial-progress";
  const brandBlues = ["#015BFA", "#3A9AFF", "#7BB3FF", "#C5DBFF", "#E8F1FF"];
  const [complete, setComplete] = useState(false);
  const parseIds = value => {
    if (Array.isArray(value)) return value;
    if (typeof value === "string" && value.length > 0) {
      return value.split(",").map(stepId => stepId.trim()).filter(Boolean);
    }
    return [];
  };
  const readProgress = () => {
    if (typeof window === "undefined") return {};
    try {
      return JSON.parse(localStorage.getItem(`kode-tutorial:${tutorialId}`) || "{}");
    } catch {
      return {};
    }
  };
  const writeProgress = next => {
    if (typeof window === "undefined") return;
    localStorage.setItem(`kode-tutorial:${tutorialId}`, JSON.stringify(next));
    window.dispatchEvent(new CustomEvent(progressEvent, {
      detail: {
        tutorialId,
        progress: next
      }
    }));
  };
  const playConfetti = () => {
    if (typeof window === "undefined" || typeof document === "undefined") return;
    const canvas = document.createElement("canvas");
    canvas.className = "tutorial-confetti-canvas";
    canvas.width = window.innerWidth;
    canvas.height = window.innerHeight;
    document.body.appendChild(canvas);
    const ctx = canvas.getContext("2d");
    const pieces = Array.from({
      length: 80
    }, () => ({
      x: Math.random() * canvas.width,
      y: -20 - Math.random() * canvas.height * 0.35,
      w: 4 + Math.random() * 5,
      h: 6 + Math.random() * 8,
      color: brandBlues[Math.floor(Math.random() * brandBlues.length)],
      vy: 2.2 + Math.random() * 3.2,
      vx: -1.5 + Math.random() * 3,
      rot: Math.random() * Math.PI,
      vr: -0.12 + Math.random() * 0.24,
      alpha: 0.55 + Math.random() * 0.35
    }));
    let frame = 0;
    const maxFrames = 110;
    const draw = () => {
      frame += 1;
      ctx.clearRect(0, 0, canvas.width, canvas.height);
      pieces.forEach(piece => {
        piece.x += piece.vx;
        piece.y += piece.vy;
        piece.rot += piece.vr;
        piece.vy += 0.045;
        const fade = Math.max(0, 1 - frame / maxFrames);
        ctx.save();
        ctx.translate(piece.x, piece.y);
        ctx.rotate(piece.rot);
        ctx.globalAlpha = piece.alpha * fade;
        ctx.fillStyle = piece.color;
        ctx.fillRect(-piece.w / 2, -piece.h / 2, piece.w, piece.h);
        ctx.restore();
      });
      if (frame < maxFrames) {
        requestAnimationFrame(draw);
      } else {
        canvas.remove();
      }
    };
    requestAnimationFrame(draw);
  };
  useEffect(() => {
    const current = readProgress();
    setComplete(current[id] === true);
    const onProgress = event => {
      if (event.detail?.tutorialId === tutorialId) {
        setComplete(event.detail.progress?.[id] === true);
      }
    };
    window.addEventListener(progressEvent, onProgress);
    return () => window.removeEventListener(progressEvent, onProgress);
  }, [tutorialId, id]);
  const toggleComplete = () => {
    const current = readProgress();
    const nextValue = !current[id];
    const next = {
      ...current,
      [id]: nextValue
    };
    const siblings = parseIds(siblingIds);
    const parentDone = siblings.length > 0 && siblings.every(siblingId => siblingId === id ? nextValue : next[siblingId] === true);
    if (parentId) {
      next[parentId] = parentDone;
    }
    writeProgress(next);
    setComplete(nextValue);
    const topLevel = parseIds(stepIds);
    if (nextValue && parentDone && topLevel.length > 0 && topLevel.every(stepId => next[stepId] === true)) {
      playConfetti();
    }
  };
  return <div id={`tutorial-substep-${id}`} className={`tutorial-substep${complete ? " is-complete" : ""}`}>
      <div className="tutorial-substep-header">
        <div>
          {number ? <p className="tutorial-substep-number">Substep {number}</p> : null}
          <h4 className="tutorial-substep-title">{title}</h4>
        </div>
        <button type="button" className={`tutorial-complete-btn tutorial-complete-btn--sub${complete ? " is-complete" : ""}`} onClick={toggleComplete} aria-pressed={complete} aria-label={complete ? "Mark substep incomplete" : "Mark substep complete"} title={complete ? "Mark incomplete" : "Mark complete"}>
          {complete ? "✓" : ""}
        </button>
      </div>

      {mediaLabel ? <div className="tutorial-media-slot" aria-label="Media placeholder">
          <div className="tutorial-media-placeholder">
            <span>{mediaLabel}</span>
            <span className="tutorial-media-hint">
              Replace this block with a Frame, image, or video when ready
            </span>
          </div>
        </div> : null}

      <div className="tutorial-substep-body">{children}</div>

      <button type="button" className={`tutorial-mark-complete tutorial-mark-complete--sub${complete ? " is-complete" : ""}`} onClick={toggleComplete}>
        {complete ? "Substep completed" : "Mark substep complete"}
      </button>
    </div>;
};

export const TutorialStep = ({tutorialId, id, number, title, stepIds = "", subStepIds = "", mediaLabel, children}) => {
  const progressEvent = "kode-tutorial-progress";
  const brandBlues = ["#015BFA", "#3A9AFF", "#7BB3FF", "#C5DBFF", "#E8F1FF"];
  const [complete, setComplete] = useState(false);
  const parseIds = value => {
    if (Array.isArray(value)) return value;
    if (typeof value === "string" && value.length > 0) {
      return value.split(",").map(stepId => stepId.trim()).filter(Boolean);
    }
    return [];
  };
  const hasSubsteps = parseIds(subStepIds).length > 0;
  const readProgress = () => {
    if (typeof window === "undefined") return {};
    try {
      return JSON.parse(localStorage.getItem(`kode-tutorial:${tutorialId}`) || "{}");
    } catch {
      return {};
    }
  };
  const writeProgress = next => {
    if (typeof window === "undefined") return;
    localStorage.setItem(`kode-tutorial:${tutorialId}`, JSON.stringify(next));
    window.dispatchEvent(new CustomEvent(progressEvent, {
      detail: {
        tutorialId,
        progress: next
      }
    }));
  };
  const computeComplete = current => {
    const subs = parseIds(subStepIds);
    if (subs.length > 0) {
      return subs.every(stepId => current[stepId] === true);
    }
    return current[id] === true;
  };
  const playConfetti = () => {
    if (typeof window === "undefined" || typeof document === "undefined") return;
    const canvas = document.createElement("canvas");
    canvas.className = "tutorial-confetti-canvas";
    canvas.width = window.innerWidth;
    canvas.height = window.innerHeight;
    document.body.appendChild(canvas);
    const ctx = canvas.getContext("2d");
    const pieces = Array.from({
      length: 80
    }, () => ({
      x: Math.random() * canvas.width,
      y: -20 - Math.random() * canvas.height * 0.35,
      w: 4 + Math.random() * 5,
      h: 6 + Math.random() * 8,
      color: brandBlues[Math.floor(Math.random() * brandBlues.length)],
      vy: 2.2 + Math.random() * 3.2,
      vx: -1.5 + Math.random() * 3,
      rot: Math.random() * Math.PI,
      vr: -0.12 + Math.random() * 0.24,
      alpha: 0.55 + Math.random() * 0.35
    }));
    let frame = 0;
    const maxFrames = 110;
    const draw = () => {
      frame += 1;
      ctx.clearRect(0, 0, canvas.width, canvas.height);
      pieces.forEach(piece => {
        piece.x += piece.vx;
        piece.y += piece.vy;
        piece.rot += piece.vr;
        piece.vy += 0.045;
        const fade = Math.max(0, 1 - frame / maxFrames);
        ctx.save();
        ctx.translate(piece.x, piece.y);
        ctx.rotate(piece.rot);
        ctx.globalAlpha = piece.alpha * fade;
        ctx.fillStyle = piece.color;
        ctx.fillRect(-piece.w / 2, -piece.h / 2, piece.w, piece.h);
        ctx.restore();
      });
      if (frame < maxFrames) {
        requestAnimationFrame(draw);
      } else {
        canvas.remove();
      }
    };
    requestAnimationFrame(draw);
  };
  useEffect(() => {
    const current = readProgress();
    setComplete(computeComplete(current));
    const onProgress = event => {
      if (event.detail?.tutorialId === tutorialId) {
        setComplete(computeComplete(event.detail.progress || ({})));
      }
    };
    window.addEventListener(progressEvent, onProgress);
    return () => window.removeEventListener(progressEvent, onProgress);
  }, [tutorialId, id, subStepIds]);
  const toggleComplete = () => {
    if (hasSubsteps) return;
    const current = readProgress();
    const nextValue = !current[id];
    const next = {
      ...current,
      [id]: nextValue
    };
    writeProgress(next);
    setComplete(nextValue);
    const topLevel = parseIds(stepIds);
    if (nextValue && topLevel.length > 0 && topLevel.every(stepId => next[stepId] === true)) {
      playConfetti();
    }
  };
  return <section id={`tutorial-step-${id}`} className={`tutorial-step-card${complete ? " is-complete" : ""}`}>
      <div className="tutorial-step-header">
        <div>
          <p className="tutorial-step-number">Step {number}</p>
          <h3 className="tutorial-step-title">{title}</h3>
        </div>
        <button type="button" className={`tutorial-complete-btn${complete ? " is-complete" : ""}${hasSubsteps ? " is-locked" : ""}`} onClick={toggleComplete} aria-pressed={complete} aria-label={hasSubsteps ? complete ? "All substeps complete" : "Complete all substeps first" : complete ? "Mark step incomplete" : "Mark step complete"} title={hasSubsteps ? complete ? "All substeps complete" : "Complete all substeps first" : complete ? "Mark incomplete" : "Mark complete"} disabled={hasSubsteps}>
          {complete ? "✓" : ""}
        </button>
      </div>

      {mediaLabel ? <div className="tutorial-media-slot" aria-label="Media placeholder">
          <div className="tutorial-media-placeholder">
            <span>{mediaLabel}</span>
            <span className="tutorial-media-hint">
              Replace this block with a Frame, image, or video when ready
            </span>
          </div>
        </div> : null}

      <div className="tutorial-step-body">{children}</div>

      <div className="tutorial-step-footer">
        {hasSubsteps ? <p className="tutorial-step-gate">
            {complete ? "All substeps complete" : "Mark each substep complete to finish this step"}
          </p> : <button type="button" className={`tutorial-mark-complete${complete ? " is-complete" : ""}`} onClick={toggleComplete}>
            {complete ? "Completed" : "Mark step complete"}
          </button>}
      </div>
    </section>;
};

export const TutorialProgress = ({tutorialId, steps = []}) => {
  const progressEvent = "kode-tutorial-progress";
  const [progress, setProgress] = useState({});
  const [activeId, setActiveId] = useState(steps[0]?.id || "");
  const parseSubsteps = step => {
    if (!step?.substeps) return [];
    if (Array.isArray(step.substeps)) return step.substeps;
    if (typeof step.substeps !== "string") return [];
    return step.substeps.split(";").map(entry => entry.trim()).filter(Boolean).map(entry => {
      const sep = entry.indexOf(":");
      if (sep === -1) return {
        id: entry,
        title: entry
      };
      return {
        id: entry.slice(0, sep).trim(),
        title: entry.slice(sep + 1).trim()
      };
    });
  };
  const isStepComplete = (step, current) => {
    const subs = parseSubsteps(step);
    if (subs.length > 0) {
      return subs.every(sub => current[sub.id] === true);
    }
    return current[step.id] === true;
  };
  const readProgress = () => {
    if (typeof window === "undefined") return {};
    try {
      return JSON.parse(localStorage.getItem(`kode-tutorial:${tutorialId}`) || "{}");
    } catch {
      return {};
    }
  };
  const resetProgress = () => {
    if (typeof window === "undefined") return;
    localStorage.removeItem(`kode-tutorial:${tutorialId}`);
    window.dispatchEvent(new CustomEvent(progressEvent, {
      detail: {
        tutorialId,
        progress: {}
      }
    }));
  };
  useEffect(() => {
    setProgress(readProgress());
    const onProgress = event => {
      if (event.detail?.tutorialId === tutorialId) {
        setProgress(event.detail.progress || ({}));
      }
    };
    window.addEventListener(progressEvent, onProgress);
    return () => window.removeEventListener(progressEvent, onProgress);
  }, [tutorialId]);
  useEffect(() => {
    const ids = [];
    steps.forEach(step => {
      ids.push(step.id);
      parseSubsteps(step).forEach(sub => ids.push(sub.id));
    });
    const nodes = ids.map(stepId => {
      return document.getElementById(`tutorial-step-${stepId}`) || document.getElementById(`tutorial-substep-${stepId}`);
    }).filter(Boolean);
    if (nodes.length === 0) return undefined;
    const observer = new IntersectionObserver(entries => {
      const visible = entries.filter(entry => entry.isIntersecting).sort((a, b) => b.intersectionRatio - a.intersectionRatio);
      if (visible[0]?.target?.id) {
        const raw = visible[0].target.id.replace("tutorial-substep-", "").replace("tutorial-step-", "");
        setActiveId(raw);
      }
    }, {
      rootMargin: "-20% 0px -55% 0px",
      threshold: [0.15, 0.4, 0.7]
    });
    nodes.forEach(node => observer.observe(node));
    return () => observer.disconnect();
  }, [tutorialId, steps.length]);
  const completedCount = steps.filter(step => isStepComplete(step, progress)).length;
  const done = steps.length > 0 && steps.every(step => isStepComplete(step, progress));
  const pct = steps.length ? Math.round(completedCount / steps.length * 100) : 0;
  return <aside className="tutorial-progress" aria-label="Tutorial progress">
      <div className="tutorial-progress-header">
        <p className="tutorial-progress-label">Progress</p>
        <p className="tutorial-progress-count">
          {completedCount} / {steps.length}
        </p>
      </div>

      <div className="tutorial-progress-bar" role="progressbar" aria-valuemin={0} aria-valuemax={steps.length} aria-valuenow={completedCount}>
        <div className="tutorial-progress-bar-fill" style={{
    width: `${pct}%`
  }} />
      </div>

      <ol className="tutorial-progress-list">
        {steps.map((step, index) => {
    const subs = parseSubsteps(step);
    const isComplete = isStepComplete(step, progress);
    const isActive = activeId === step.id || subs.some(sub => sub.id === activeId);
    return <li key={step.id} className="tutorial-progress-group">
              <a href={`#tutorial-step-${step.id}`} className={["tutorial-progress-item", isActive ? "is-active" : "", isComplete ? "is-complete" : ""].filter(Boolean).join(" ")}>
                <span className="tutorial-progress-marker" aria-hidden="true">
                  {isComplete ? "✓" : index}
                </span>
                <span className="tutorial-progress-title">{step.title}</span>
              </a>

              {subs.length > 0 ? <ol className="tutorial-progress-sublist">
                  {subs.map((sub, subIndex) => {
      const subComplete = progress[sub.id] === true;
      const subActive = activeId === sub.id;
      return <li key={sub.id}>
                        <a href={`#tutorial-substep-${sub.id}`} className={["tutorial-progress-item tutorial-progress-item--sub", subActive ? "is-active" : "", subComplete ? "is-complete" : ""].filter(Boolean).join(" ")}>
                              <span className="tutorial-progress-marker tutorial-progress-marker--sub" aria-hidden="true">
                            {subComplete ? "✓" : ""}
                          </span>
                          <span className="tutorial-progress-title">
                            {sub.title}
                          </span>
                        </a>
                      </li>;
    })}
                </ol> : null}
            </li>;
  })}
      </ol>

      <div className="tutorial-progress-footer">
        {done ? <p className="tutorial-progress-done">Tutorial complete</p> : null}

        {completedCount > 0 || Object.keys(progress).length > 0 ? <button type="button" className="tutorial-reset" onClick={resetProgress}>
            Reset progress
          </button> : null}
      </div>
    </aside>;
};

export const TutorialHero = ({eyebrow = "Tutorial", title, summary, time, level, imageSrc, imageAlt = "Tutorial preview"}) => {
  useEffect(() => {
    if (typeof document === "undefined") return undefined;
    document.documentElement.setAttribute("data-tutorial-layout", "true");
    const page = document.querySelector(".tutorial-page");
    if (page) {
      let sibling = page.previousElementSibling;
      while (sibling) {
        sibling.setAttribute("data-tutorial-hidden-header", "true");
        sibling = sibling.previousElementSibling;
      }
    }
    document.querySelectorAll("h1").forEach(heading => {
      if (heading.textContent.trim() !== title) return;
      heading.setAttribute("data-tutorial-hidden-header", "true");
      const prev = heading.previousElementSibling;
      if (prev) prev.setAttribute("data-tutorial-hidden-header", "true");
      const next = heading.nextElementSibling;
      if (next && next.tagName === "P") {
        next.setAttribute("data-tutorial-hidden-header", "true");
      }
    });
    return () => {
      document.documentElement.removeAttribute("data-tutorial-layout");
      document.querySelectorAll("[data-tutorial-hidden-header]").forEach(node => node.removeAttribute("data-tutorial-hidden-header"));
    };
  }, [title]);
  return <header className="tutorial-hero">
      <div className="tutorial-hero-glow" aria-hidden="true" />
      <div className="tutorial-hero-copy">
        <p className="tutorial-hero-eyebrow">{eyebrow}</p>
        <h2 className="tutorial-hero-title">{title}</h2>
        {summary ? <p className="tutorial-hero-summary">{summary}</p> : null}
        <div className="tutorial-hero-meta">
          {level ? <span className="tutorial-pill">{level}</span> : null}
          {time ? <span className="tutorial-pill">{time}</span> : null}
        </div>
      </div>
      <div className="tutorial-hero-media">
        {imageSrc ? <img src={imageSrc} alt={imageAlt} className="tutorial-hero-image" /> : <div className="tutorial-media-placeholder tutorial-media-placeholder--hero">
            <span>Add hero image</span>
            <span className="tutorial-media-hint">
              Drop a screenshot or still here
            </span>
          </div>}
      </div>
    </header>;
};

<div className="tutorial-page">
  <TutorialHero eyebrow="FDD" title="Build your first FDD routine" summary="Learn what FDD watches for, then build a simple sensor-over-threshold rule you can reuse on almost any equipment." level="Beginner" time="About 30 min" imageSrc="/images/kode-os/fdd/tutorials/fdd-tutorial-completed-canvas.png" imageAlt="Completed VAV Over Setpoint logic canvas with sensor, setpoint, deadband, sum, greater than, debounce, and alarm trigger blocks" />

  <div className="tutorial-body">
    <TutorialProgress
      tutorialId="fdd-first-routine"
      steps={[
    { id: "FDD-overview", title: "FDD Overview" },
    { id: "before-you-begin", title: "Before you begin" },
    { id: "create-routine", title: "Create the routine" },
    {
      id: "build-logic",
      title: "Build the logic",
      substeps:
        "add-reads:Add read points;compare-threshold:Compare to threshold;delay-alarm:Delay and alarm",
    },
    { id: "test-debugger", title: "Test in the debugger" },
    { id: "configure-enable", title: "Configure and enable" },
    { id: "confirm-event", title: "Confirm the event" },
  ]}
    />

    <div className="tutorial-steps">
      <TutorialStep tutorialId="fdd-first-routine" id="alarms-and-events" number="0" title="What does FDD do?" stepIds="alarms-and-events,before-you-begin,create-routine,build-logic,test-debugger,configure-enable,confirm-event">
        <Tooltip tip="Fault Detection and Diagnostics monitors equipment and surfaces operational issues in real time.">FDD</Tooltip> watches building equipment for conditions that need attention. You define the rule once as a routine. KODE then evaluates live point data and opens an event when the rule holds true.

        A useful fault always answers four questions:

        <Frame caption="Every fault combines a start time, device, condition, and duration">
          <img src="https://mintcdn.com/kodelabs/SxbaONoYYoMWCQfA/images/kode-os/fdd/kode-os-fdd-fault-definition.png?fit=max&auto=format&n=SxbaONoYYoMWCQfA&q=85&s=c4df71c12274395be68d37e59423f26c" alt="Example fault text broken into Start Time, Device, Condition, and Duration" width="1024" height="74" data-path="images/kode-os/fdd/kode-os-fdd-fault-definition.png" />
        </Frame>

        **Alarms** are the simplest checks. They usually watch one or two points and fire as soon as the condition is true. Think zone temperature over a max, or a fan failure status.

        **Events** are richer. A routine can combine sensors, setpoints, parameters, and timing blocks. When the Alarm Trigger receives `true`, FDD opens an event you can triage on the Events page.
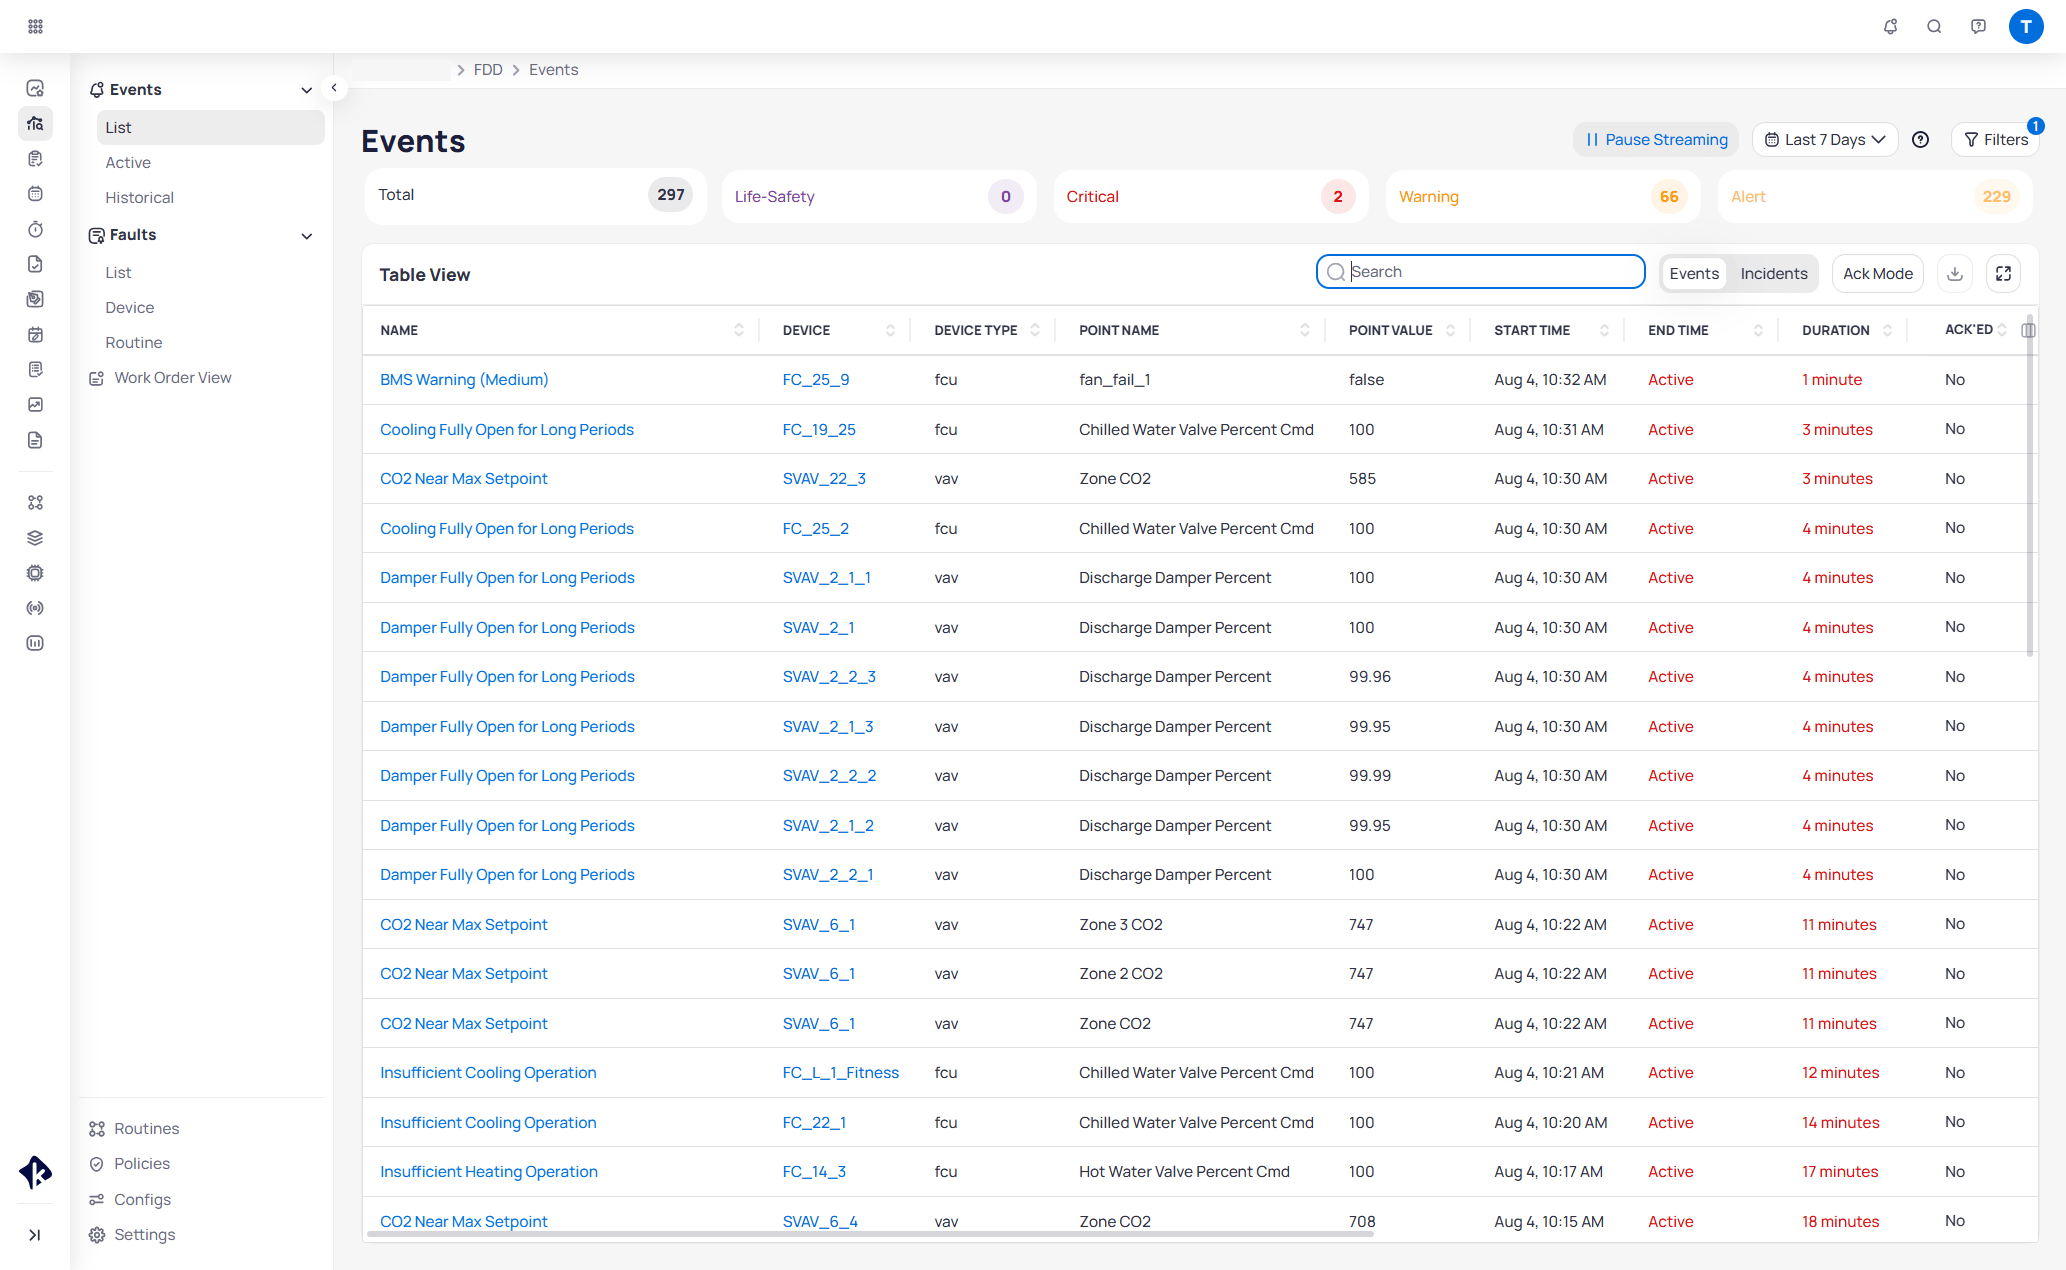
        <Frame caption="Events list with priorities, filters, and active fault events">
          <img src="https://mintcdn.com/kodelabs/SxbaONoYYoMWCQfA/images/kode-os/fdd/kode-os-fdd-events-list.png?fit=max&auto=format&n=SxbaONoYYoMWCQfA&q=85&s=f2464097b2f7a916f2bd137070d7718b" alt="Events page showing Pause Streaming, Last 7 Days date range, Filters, priority cards for Total 297, Life-Safety 0, Critical 2, Warning 66, and Alert 229, and a Table View of active events with Name, Device, Device Type, Point Name, Point Value, Start Time, End Time, Duration, and Ack'ed columns" width="2066" height="1270" data-path="images/kode-os/fdd/kode-os-fdd-events-list.png" />
        </Frame>

        This walkthrough builds one event routine end to end: create the rule, test it, enable it on a device, then confirm the event. For the full concept map, see [What is Fault Detection and Diagnostics?](/products/fdd/overview).
      </TutorialStep>

      <TutorialStep tutorialId="fdd-first-routine" id="before-you-begin" number="1" title="Before you begin" stepIds="alarms-and-events,before-you-begin,create-routine,build-logic,test-debugger,configure-enable,confirm-event">
        You will build a VAV zone air temperature greater-than-setpoint rule. Treat that as a starting pattern, not a one-off recipe.

        The same shape works for:

        * Sensor **greater than** setpoint (this walkthrough)
        * Sensor **less than** setpoint (swap Greater Than for Less Than)
        * Sensor versus a **Number parameter** when the device has no setpoint point

        You only need a readable sensor value and a threshold to compare against. The threshold can come from another point or from a parameter you set yourself.

        Confirm the following before you build:

        * Access to `FDD` on a building where you can create and enable routines
        * At least one online VAV with zone air temperature sensor and setpoint points templated (or a sensor plus a parameter threshold)
        * Prefer a non-production building or a device you can safely monitor while you learn

        <Info>
          Compatible devices appear in Configs only when they carry the canonical types and entities you select on the routine. Missing templating means an empty device list later.
        </Info>
      </TutorialStep>

      <TutorialStep tutorialId="fdd-first-routine" id="create-routine" number="2" title="Create the routine" stepIds="alarms-and-events,before-you-begin,create-routine,build-logic,test-debugger,configure-enable,confirm-event">
        <Frame caption="Open FDD, select Routines, then Create Routine">
          <img src="https://mintcdn.com/kodelabs/i9tCc_I6OZNqDXAw/images/kode-os/fdd/tutorials/fdd-tutorial-create-routine-nav.png?fit=max&auto=format&n=i9tCc_I6OZNqDXAw&q=85&s=2a1711e9beecd92b1d5119f984ee8147" alt="Routines page with callouts for FDD in the sidebar, Routines in the secondary menu, and the Create Routine button" width="2066" height="1270" data-path="images/kode-os/fdd/tutorials/fdd-tutorial-create-routine-nav.png" />
        </Frame>

        Create a local routine and tell FDD which VAV points it may read.

        <Steps>
          <Step title="Open Create Routine">
            In Cloud BMS, open `FDD`, select `Routines`, then select `+ Create Routine`.
          </Step>

          <Step title="Fill Workflow Details">
            On the `Workflow Details` tab, enter:

            | Field              | Value                                                               |
            | ------------------ | ------------------------------------------------------------------- |
            | `Name`             | `VAV Over Setpoint`                                                 |
            | `Description`      | Alarms when zone air temperature stays above setpoint plus deadband |
            | `Recommended Type` | `Event`                                                             |
            | `Domains`          | `Heating Issue` (or the domain your site uses)                      |
            | `Events Grouping`  | `None`                                                              |
            | `Priority`         | `Alert`                                                             |

            <Frame caption="Workflow Details for VAV Over Setpoint">
              <img src="https://mintcdn.com/kodelabs/i9tCc_I6OZNqDXAw/images/kode-os/fdd/tutorials/fdd-tutorial-workflow-details.png?fit=max&auto=format&n=i9tCc_I6OZNqDXAw&q=85&s=346554b77ed5ff5f9fc1e8a4cc6e439a" alt="Workflow Details tab with Name VAV Over Setpoint, Recommended Type Event, Domains Heating Issue, Events Grouping None, Priority Alert, and a Vavs device group" width="2066" height="1270" data-path="images/kode-os/fdd/tutorials/fdd-tutorial-workflow-details.png" />
            </Frame>
          </Step>

          <Step title="Add VAV devices and ZTSS">
            Select `+ Add Devices`. Set `Name As` to `Vavs`, select the `vav` canonical, and select the `ZTSS` entity (Zone Temperature Control).

            `ZTSS` brings in `zone_air_temperature_sensor` and `zone_air_temperature_setpoint` so those fields appear in the Logic builder.

            First click includes an entity. Second click excludes it (shown in red). Include only what this routine needs.

            <Frame caption="Add Devices with vav and ZTSS selected">
              <img src="https://mintcdn.com/kodelabs/i9tCc_I6OZNqDXAw/images/kode-os/fdd/tutorials/fdd-tutorial-add-devices-ztss.png?fit=max&auto=format&n=i9tCc_I6OZNqDXAw&q=85&s=25b68295b919a709450400827a5ae72d" alt="Add Devices dialog with Name As Vavs, vav canonical selected, ZTSS entity selected with Zone Temperature Control tooltip, and zone air temperature points listed on the right" width="2066" height="1270" data-path="images/kode-os/fdd/tutorials/fdd-tutorial-add-devices-ztss.png" />
            </Frame>

            Select `Save` in the dialog to return to Workflow Details.
          </Step>
        </Steps>
      </TutorialStep>

      <TutorialStep tutorialId="fdd-first-routine" id="build-logic" number="3" title="Build the detection logic" stepIds="alarms-and-events,before-you-begin,create-routine,build-logic,test-debugger,configure-enable,confirm-event" subStepIds="add-reads,compare-threshold,delay-alarm">
        Open the `Logic` tab. Drag blocks from the left panel onto the canvas and connect outputs to inputs.

        You build three layers: read the points, compare the sensor to a threshold, then delay and trigger the alarm.

        <TutorialSubStep tutorialId="fdd-first-routine" id="add-reads" parentId="build-logic" siblingIds="add-reads,compare-threshold,delay-alarm" stepIds="alarms-and-events,before-you-begin,create-routine,build-logic,test-debugger,configure-enable,confirm-event" number="3.1" title="Add the read points">
          <Frame>
            <img src="https://mintcdn.com/kodelabs/i9tCc_I6OZNqDXAw/images/kode-os/fdd/tutorials/fdd-tutorial-add-number-points.gif?s=bb523a7706d84dfdeeee591e91d48e49" alt="Dragging two Number Point blocks onto the Logic canvas and setting Main sensor and Secondary setpoint fields" width="2066" height="1270" data-path="images/kode-os/fdd/tutorials/fdd-tutorial-add-number-points.gif" />
          </Frame>

          Drag two `Number Point` blocks from Read onto the canvas.

          | Block    | Name           | Role        | Field                           |
          | -------- | -------------- | ----------- | ------------------------------- |
          | Sensor   | `ZAT Sensor`   | `Main`      | `zone_air_temperature_sensor`   |
          | Setpoint | `ZAT Setpoint` | `Secondary` | `zone_air_temperature_setpoint` |

          Every routine needs exactly one `Main` read block. The system uses that point as the reference when an event links to other Cloud BMS modules. Set all other reads to `Secondary`.

          <Tip>
            No setpoint on the device? Skip the setpoint Number Point. In the next substep, compare the sensor to a Number parameter instead.
          </Tip>
        </TutorialSubStep>

        <TutorialSubStep tutorialId="fdd-first-routine" id="compare-threshold" parentId="build-logic" siblingIds="add-reads,compare-threshold,delay-alarm" stepIds="alarms-and-events,before-you-begin,create-routine,build-logic,test-debugger,configure-enable,confirm-event" number="3.2" title="Compare sensor to threshold">
          A <Tooltip tip="An allowable offset from the setpoint. The fault condition is true only after the sensor crosses setpoint plus (or minus) this offset.">deadband</Tooltip> is a buffer around the setpoint. Without it, a sensor that briefly ticks one degree over setpoint can raise an event. With it, the zone must move further past the setpoint before the comparison turns true.

          Use a deadband when you want a more severe, less noisy alert. You can still tune the value later in Configs without rewriting the logic.

          <Steps>
            <Step title="Add Setpoint Deadband">
              Drag a `Number` parameter from Parameters. Set `Name` to `Setpoint Deadband` and `Value` to `5`.

              <Frame>
                <img src="https://mintcdn.com/kodelabs/i9tCc_I6OZNqDXAw/images/kode-os/fdd/tutorials/fdd-tutorial-add-deadband.gif?s=1a75a7700ee55382a7711f2ea523821e" alt="Adding a Number parameter block named Setpoint Deadband with value 5" width="2066" height="1270" data-path="images/kode-os/fdd/tutorials/fdd-tutorial-add-deadband.gif" />
              </Frame>
            </Step>

            <Step title="Sum setpoint and deadband">
              Drag a `Sum` block. Connect `ZAT Setpoint` `Value` to the first operand. Connect `Setpoint Deadband` `Output` to the second operand.

              The Sum result is your effective threshold: setpoint plus deadband.

              <Frame>
                <img src="https://mintcdn.com/kodelabs/i9tCc_I6OZNqDXAw/images/kode-os/fdd/tutorials/fdd-tutorial-add-sum.gif?s=457d55548f9ddbad763a35a747d6235e" alt="Connecting setpoint Value and Setpoint Deadband Output into a Sum block" width="2066" height="1270" data-path="images/kode-os/fdd/tutorials/fdd-tutorial-add-sum.gif" />
              </Frame>
            </Step>

            <Step title="Add Greater Than">
              Drag a `Greater Than` block. Connect `ZAT Sensor` `Value` to the left operand. Connect the Sum `Result` to the right operand.

              The block outputs a boolean `Result` that is true when the sensor is greater than setpoint plus deadband.

              <Frame>
                <img src="https://mintcdn.com/kodelabs/i9tCc_I6OZNqDXAw/images/kode-os/fdd/tutorials/fdd-tutorial-greater-than.gif?s=a331ede9aa1a6022ee7e0a70173e7b02" alt="Connecting sensor Value and Sum Result into a Greater Than block" width="2066" height="1270" data-path="images/kode-os/fdd/tutorials/fdd-tutorial-greater-than.gif" />
              </Frame>
            </Step>
          </Steps>

          <Note>
            Building a less-than rule? Use `Less Than` instead. Comparing to a fixed limit with no setpoint? Wire the sensor to Greater Than and use the Number parameter as the right operand. Skip Sum.
          </Note>
        </TutorialSubStep>

        <TutorialSubStep tutorialId="fdd-first-routine" id="delay-alarm" parentId="build-logic" siblingIds="add-reads,compare-threshold,delay-alarm" stepIds="alarms-and-events,before-you-begin,create-routine,build-logic,test-debugger,configure-enable,confirm-event" number="3.3" title="Add delay and alarm trigger">
          Deadband reduces how often the condition becomes true. Debounce reduces how quickly a true condition becomes an event. Together they filter brief spikes and leave more meaningful alerts.

          <Steps>
            <Step title="Add Debounce">
              Drag a `Debounce` block. Set the unit to `Minutes` and the count to `15`. Connect the Greater Than `Result` to the Debounce input.

              Debounce outputs a value only when that value stays unchanged for the full period.

              <Frame>
                <img src="https://mintcdn.com/kodelabs/i9tCc_I6OZNqDXAw/images/kode-os/fdd/tutorials/fdd-tutorial-debounce.gif?s=a37ef8445ceba38790664640b5d23f8d" alt="Adding a Debounce block set to 15 minutes and connecting Greater Than Result to Debounce" width="2066" height="1270" data-path="images/kode-os/fdd/tutorials/fdd-tutorial-debounce.gif" />
              </Frame>

              <Note>
                Library routines often expose delay as an `Alarm On Delay` Number parameter. Debounce is the timing block that holds a stable true condition before the alarm.
              </Note>
            </Step>

            <Step title="Add Alarm Trigger">
              Drag an `Alarm Trigger` block. Connect the Debounce `Output` to it.

              When Alarm Trigger receives `true`, FDD generates an event. Without this block, the routine cannot create events.

              <Frame>
                <img src="https://mintcdn.com/kodelabs/i9tCc_I6OZNqDXAw/images/kode-os/fdd/tutorials/fdd-tutorial-alarm-trigger.gif?s=a96e72a5db3ada3357f3c9841a1e4fef" alt="Connecting Debounce Output to an Alarm Trigger block" width="2066" height="1270" data-path="images/kode-os/fdd/tutorials/fdd-tutorial-alarm-trigger.gif" />
              </Frame>
            </Step>
          </Steps>

          <Frame caption="Completed VAV Over Setpoint pipeline">
            <img src="https://mintcdn.com/kodelabs/i9tCc_I6OZNqDXAw/images/kode-os/fdd/tutorials/fdd-tutorial-completed-canvas.png?fit=max&auto=format&n=i9tCc_I6OZNqDXAw&q=85&s=dad98064040d4273ee3d62b4faed2ae8" alt="Completed logic canvas with ZAT Sensor Main, ZAT Setpoint Secondary, Setpoint Deadband, Sum, Greater Than, Debounce at 15 minutes, and Alarm Trigger" width="1253" height="738" data-path="images/kode-os/fdd/tutorials/fdd-tutorial-completed-canvas.png" />
          </Frame>
        </TutorialSubStep>
      </TutorialStep>

      <TutorialStep tutorialId="fdd-first-routine" id="test-debugger" number="4" title="Test in the debugger" stepIds="alarms-and-events,before-you-begin,create-routine,build-logic,test-debugger,configure-enable,confirm-event">
        <Frame caption="Debugger with over-threshold inputs and Event Started in the Simulator">
          <img src="https://mintcdn.com/kodelabs/i9tCc_I6OZNqDXAw/images/kode-os/fdd/tutorials/fdd-tutorial-debugger.png?fit=max&auto=format&n=i9tCc_I6OZNqDXAw&q=85&s=5254c6ba50556d96ca5c2749510af8c2" alt="Debugger tab showing Setpoint Deadband 5, ZAT Sensor 50, ZAT Setpoint 40, and Simulator log with Event Started and Event Ended" width="2066" height="1270" data-path="images/kode-os/fdd/tutorials/fdd-tutorial-debugger.png" />
        </Frame>

        Open the `Debugger` tab and prove the rule before you enable it on live devices.

        <Steps>
          <Step title="Review PARAMS">
            Confirm `Setpoint Deadband` is `5` (or the value you want to test).
          </Step>

          <Step title="Start Simulation">
            Select `Start Simulation`.
          </Step>

          <Step title="Send an over-threshold case">
            Set `ZAT Sensor` above setpoint plus deadband (for example, sensor `50` and setpoint `40`). Set status to `ok`, then select `Send`.

            With a 15-minute Debounce, wait for the Simulator to log `Event Started` after the delay.
          </Step>

          <Step title="Send a should-not-fire case">
            Set the sensor below the threshold and select `Send`. Confirm the routine does not start a new event for that input.
          </Step>

          <Step title="Save the routine">
            Select `Save`. The routine appears in the Routines list and becomes available under Configs.
          </Step>
        </Steps>

        <Tip>
          Debounce runs in real time during simulation. Temporarily set Debounce to seconds to speed up testing, then return to minutes before you save.
        </Tip>
      </TutorialStep>

      <TutorialStep tutorialId="fdd-first-routine" id="configure-enable" number="5" title="Configure and enable" stepIds="alarms-and-events,before-you-begin,create-routine,build-logic,test-debugger,configure-enable,confirm-event">
        <Frame caption="Select VAV Over Setpoint on Configs, then select Configure">
          <img src="https://mintcdn.com/kodelabs/i9tCc_I6OZNqDXAw/images/kode-os/fdd/tutorials/fdd-tutorial-configs-configure.png?fit=max&auto=format&n=i9tCc_I6OZNqDXAw&q=85&s=8114c0e9810f6c7cda07e939bcf83383" alt="Batch Configuration page with callouts for Configs in the sidebar, VAV Over Setpoint selected, and the Configure button" width="2066" height="1270" data-path="images/kode-os/fdd/tutorials/fdd-tutorial-configs-configure.png" />
        </Frame>

        Apply the routine to devices and start monitoring.

        <Steps>
          <Step title="Open Configs">
            Open `FDD` > `Configs`. Search for `VAV Over Setpoint`.
          </Step>

          <Step title="Select the routine and Configure">
            Select the checkbox for `VAV Over Setpoint`, then select `Configure` in the bottom toolbar.
          </Step>

          <Step title="Choose a notification policy">
            Batch configure asks you to pick a <Tooltip tip="Defines which contacts receive notifications and through which channels.">notification policy</Tooltip> before it finishes.

            Choose an existing policy for this building, or create one under `Policies` first. See [Notification policies](/products/fdd/notification-policies) if your site does not have one yet.
          </Step>

          <Step title="Finish device and status setup">
            Select compatible VAVs. In `Routine Params`, set `Setpoint Deadband` for this building.

            In `Status Setup`, turn on `Event Config` so the routine can generate events. Enable `Routine Config` so the folder monitors devices.
          </Step>

          <Step title="Configure and Enable">
            Select `Configure and Enable` when you want monitoring to start immediately.
          </Step>
        </Steps>

        <Info>
          If your site always prompts for a policy during Configure, that is expected for this path. You can change the assigned policy later in Config Details under Notification Settings.
        </Info>

        See [FDD configuration](/products/fdd/configuration) for Multi-Config folders and detailed settings.
      </TutorialStep>

      <TutorialStep tutorialId="fdd-first-routine" id="confirm-event" number="6" title="Confirm the event" stepIds="alarms-and-events,before-you-begin,create-routine,build-logic,test-debugger,configure-enable,confirm-event">
        Close the loop by confirming the routine can produce a live event.

        <Steps>
          <Step title="Open Events">
            Open `FDD` > `Events` > `List`.
          </Step>

          <Step title="Find your routine">
            Filter or search for `VAV Over Setpoint` (or the device you enabled).
          </Step>

          <Step title="Open the event report">
            Open the event and confirm the device, parameters, and condition match the rule you built.
          </Step>
        </Steps>

        <Check>
          You created a flexible sensor-to-threshold routine, tested it in the debugger, enabled it on a device, and confirmed an event in FDD.
        </Check>

        <AccordionGroup>
          <Accordion title="Events are not generating">
            Confirm `Event Config` and `Routine Config` are on. Check that Debounce and deadband match real conditions. Confirm the routine status is Enabled.
          </Accordion>

          <Accordion title="Too many notifications">
            Increase Debounce duration or widen `Setpoint Deadband` to filter transient conditions.
          </Accordion>

          <Accordion title="No compatible devices found">
            Verify devices have the correct point templating. Routines match devices from the canonical types and entities on the routine.
          </Accordion>
        </AccordionGroup>
      </TutorialStep>
    </div>
  </div>
</div>

## Related reading

<CardGroup cols={2}>
  <Card title="What is Fault Detection and Diagnostics?" icon="radar" href="/products/fdd/overview" arrow={true}>
    Learn how events, incidents, and faults fit together.
  </Card>

  <Card title="Routine logic blocks" icon="puzzle" href="/products/fdd/routine-logic-blocks" arrow={true}>
    Explore comparison, timing, parameter, and alarm blocks beyond this walkthrough.
  </Card>

  <Card title="FDD configuration" icon="sliders-horizontal" href="/products/fdd/configuration" arrow={true}>
    Tune devices, parameters, Multi-Config folders, and status setup.
  </Card>

  <Card title="Notification policies" icon="bell-ring" href="/products/fdd/notification-policies" arrow={true}>
    Control who gets notified and through which channels when events fire.
  </Card>

  <Card title="Events" icon="bell" href="/products/fdd/events" arrow={true}>
    Triage, acknowledge, and investigate events from the Events list.
  </Card>

  <Card title="Routine library" icon="library" href="/products/fdd/routine-library" arrow={true}>
    Browse pre-built routines you can configure without building logic from scratch.
  </Card>
</CardGroup>
