> ## Documentation Index
> Fetch the complete documentation index at: https://documentation.kodelabs.com/llms.txt
> Use this file to discover all available pages before exploring further.
# Routines
> Create, test, import, export, and manage FDD routines using the logic builder and debugger to define custom fault detection rules for your equipment.
FDD routines define the logical rules that monitor your building equipment for specific fault conditions. Cloud BMS provides a pre-configured library of routines and a logic builder for creating custom rules.
Navigate to `FDD` from the left sidebar, then select `Routines` from the secondary sidebar.
## Routines list
The Routines list displays routines built in your client environment. Use the search bar and `Filters` button to find specific routines.
Global routines from the FDD library are not available on this page. Access library routines through [FDD configuration](/products/fdd/configuration).
 | Column | Description |
| ----------------- | -------------------------------------------------- |
| `Name` | Routine name |
| `Description` | Summary of the fault condition the routine detects |
| `Domain` | Equipment domain the routine applies to |
| `Priority` | Default priority level for generated events |
| `Grouping Policy` | How related events are consolidated |
### Row actions
Select the three-dot menu on any routine row to access available actions:
* **Edit Routine**: Open the routine in the logic builder
* **Export Routine**: Download the routine as a file for sharing or backup
* **Duplicate Routine**: Create a copy of the routine with a new name
* **Delete Routine**: Permanently remove the routine
| Column | Description |
| ----------------- | -------------------------------------------------- |
| `Name` | Routine name |
| `Description` | Summary of the fault condition the routine detects |
| `Domain` | Equipment domain the routine applies to |
| `Priority` | Default priority level for generated events |
| `Grouping Policy` | How related events are consolidated |
### Row actions
Select the three-dot menu on any routine row to access available actions:
* **Edit Routine**: Open the routine in the logic builder
* **Export Routine**: Download the routine as a file for sharing or backup
* **Duplicate Routine**: Create a copy of the routine with a new name
* **Delete Routine**: Permanently remove the routine
 ## Create a routine
Select `+ Create Routine` from the toolbar. The `Workflow Details` tab opens.
## Create a routine
Select `+ Create Routine` from the toolbar. The `Workflow Details` tab opens.
 Complete the following fields:
| Field | Description |
| ----------------- | ------------------------------------------------- |
| `Name` | A descriptive name for the fault condition |
| `Description` | Explanation of what the routine detects |
| `Domains` | Equipment domains this routine applies to |
| `Events Grouping` | How events from this routine are grouped |
| `Priority` | Default priority level for generated events |
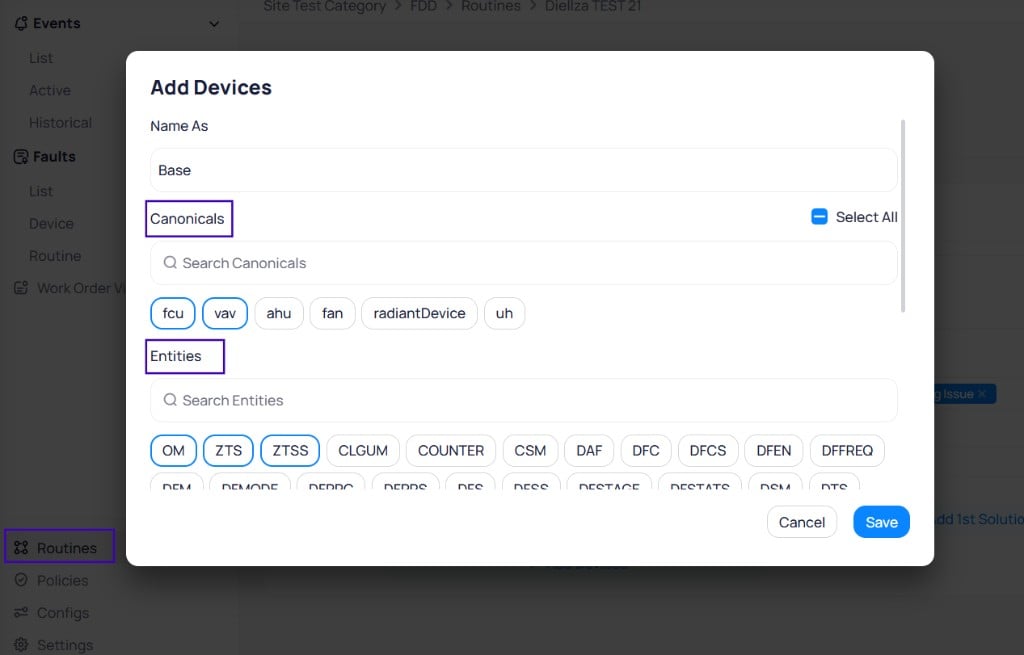
| `Canonical Types` | Equipment types for base and reference devices |
| `Entities` | Entity definitions for base and reference devices |
When you select entities in **Add Devices**, the first click includes the entity as a required field. A second click marks the entity in red. A red (excluded) entity means the routine looks for devices that have the other required entities and do **not** contain that excluded entity. Use exclusion when you need to filter out devices that carry an unwanted field.
Complete the following fields:
| Field | Description |
| ----------------- | ------------------------------------------------- |
| `Name` | A descriptive name for the fault condition |
| `Description` | Explanation of what the routine detects |
| `Domains` | Equipment domains this routine applies to |
| `Events Grouping` | How events from this routine are grouped |
| `Priority` | Default priority level for generated events |
| `Canonical Types` | Equipment types for base and reference devices |
| `Entities` | Entity definitions for base and reference devices |
When you select entities in **Add Devices**, the first click includes the entity as a required field. A second click marks the entity in red. A red (excluded) entity means the routine looks for devices that have the other required entities and do **not** contain that excluded entity. Use exclusion when you need to filter out devices that carry an unwanted field.
 Open the `Logic` tab. The left panel contains available logic blocks organized by category: Read (String Point, Number Point, Boolean Point, Enum Point, arrays), Parameters (Number, Boolean, String), Organize (Folder), and Constants (Result).
Drag blocks from the left panel onto the canvas to build the detection logic. Connect blocks in sequence to create the logical path from data input to alarm output. Each routine must start with at least one Read block and end with an Alarm Trigger block.
Open the `Logic` tab. The left panel contains available logic blocks organized by category: Read (String Point, Number Point, Boolean Point, Enum Point, arrays), Parameters (Number, Boolean, String), Organize (Folder), and Constants (Result).
Drag blocks from the left panel onto the canvas to build the detection logic. Connect blocks in sequence to create the logical path from data input to alarm output. Each routine must start with at least one Read block and end with an Alarm Trigger block.
 See [Routine logic blocks](/products/fdd/routine-logic-blocks) for a complete reference of available block types and their functions.
Open the `Debugger` tab. The left sidebar displays `PARAMS` (adjustable parameter values) and `INPUTS` (simulated device data). The main screen shows the Simulator output.
See [Routine logic blocks](/products/fdd/routine-logic-blocks) for a complete reference of available block types and their functions.
Open the `Debugger` tab. The left sidebar displays `PARAMS` (adjustable parameter values) and `INPUTS` (simulated device data). The main screen shows the Simulator output.
 1. Review the `PARAMS` section and adjust parameter values as needed.
2. Select `Start Simulation` to begin the test.
3. Update `INPUT` values to simulate different conditions, then select `Send`.
1. Review the `PARAMS` section and adjust parameter values as needed.
2. Select `Start Simulation` to begin the test.
3. Update `INPUT` values to simulate different conditions, then select `Send`.
 4. Verify that the routine produces the expected response for each scenario.
Delay times run in real time during simulation. To speed up testing, temporarily change time units to seconds on timer logic blocks. Return to the correct units before deploying.
Test boundary values thoroughly. Verify conditions that should trigger events and conditions that should not. This catches threshold errors before deployment.
Select `Save`. The routine appears in the Routines list and becomes available for configuration in the Configs page.
## Export and import routines
Transfer routines between environments as `.json` files. Export downloads proven rules. Import uploads them without rebuilding logic.
The export feature lets you download routines as files for sharing or transferring to other environments.
Select the checkboxes next to the routines you want to export. The `Export` button at the bottom right shows the count of selected routines.
4. Verify that the routine produces the expected response for each scenario.
Delay times run in real time during simulation. To speed up testing, temporarily change time units to seconds on timer logic blocks. Return to the correct units before deploying.
Test boundary values thoroughly. Verify conditions that should trigger events and conditions that should not. This catches threshold errors before deployment.
Select `Save`. The routine appears in the Routines list and becomes available for configuration in the Configs page.
## Export and import routines
Transfer routines between environments as `.json` files. Export downloads proven rules. Import uploads them without rebuilding logic.
The export feature lets you download routines as files for sharing or transferring to other environments.
Select the checkboxes next to the routines you want to export. The `Export` button at the bottom right shows the count of selected routines.
 Enter a name for the export file in the `File Name` dialog and select `Save`.
 The file downloads to your computer as a `.json` file.
 The import feature lets you upload routines from exported files to add proven rules without rebuilding them.
Select `Import` at the top right of the Routines page. The Import Routines dialog opens with a file upload area.
The import feature lets you upload routines from exported files to add proven rules without rebuilding them.
Select `Import` at the top right of the Routines page. The Import Routines dialog opens with a file upload area.
 Select a file from your computer or drag and drop it into the upload area. The dialog displays the imported routines with editable fields for name, description, priority, and grouping policy.
In the `Replace` column, choose how to handle conflicts with existing routines:
* **Replace** overwrites the existing routine with the imported version
* **Keep both** retains the existing routine and adds the imported version
* **Keep old** ignores the imported routine and retains the existing version
Select a file from your computer or drag and drop it into the upload area. The dialog displays the imported routines with editable fields for name, description, priority, and grouping policy.
In the `Replace` column, choose how to handle conflicts with existing routines:
* **Replace** overwrites the existing routine with the imported version
* **Keep both** retains the existing routine and adds the imported version
* **Keep old** ignores the imported routine and retains the existing version
 Select `Import` to finalize. The imported routines appear in your routines list. Select `Discard` to cancel without importing.
## Data and permissions
Routines are the intellectual property of the party that created them. Neither KODE Labs nor partners hold exclusive rights over general fault detection concepts.
Export and import permissions are managed at the role level. Only super admins can access these features. Backend logs track who created, exported, and imported each routine.
This feature works for both FDD routines and FTT workflows. The same export and import process applies to both module types.
## Next steps
Explore the available block types for building routine detection logic.
Browse pre-configured routines for airside, chilled water, and hot water systems.
Apply routines to your devices and configure monitoring parameters.
Select `Import` to finalize. The imported routines appear in your routines list. Select `Discard` to cancel without importing.
## Data and permissions
Routines are the intellectual property of the party that created them. Neither KODE Labs nor partners hold exclusive rights over general fault detection concepts.
Export and import permissions are managed at the role level. Only super admins can access these features. Backend logs track who created, exported, and imported each routine.
This feature works for both FDD routines and FTT workflows. The same export and import process applies to both module types.
## Next steps
Explore the available block types for building routine detection logic.
Browse pre-configured routines for airside, chilled water, and hot water systems.
Apply routines to your devices and configure monitoring parameters.