> ## Documentation Index
> Fetch the complete documentation index at: https://documentation.kodelabs.com/llms.txt
> Use this file to discover all available pages before exploring further.
# Deployment manager
> Deploy Building BI dashboards across multiple buildings, manage predefined and custom views, and maintain portfolio-wide consistency.
The Deployment Manager enables you to deploy dashboards across multiple buildings from the [portfolio view](/products/building-bi/overview#portfolio-and-building-scope). See [How Building BI permissions work](/products/building-bi/concepts/how-permissions-work) and [templating versus deployment](/products/building-bi/concepts/templating-vs-deployment) to choose the right distribution approach. Only users with the `Sync/Bulk Deploy` permission can access it.
## Access the Deployment Manager
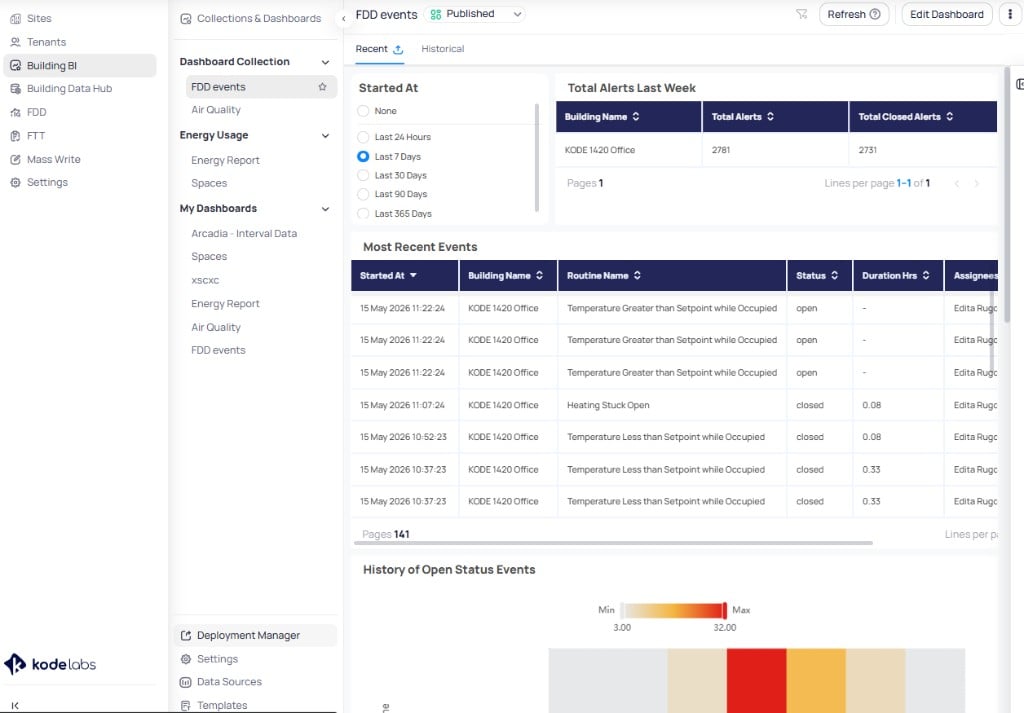
Navigate to the portfolio view of Building BI and select `Deployment Manager` from the left navigation bar.
You can also access deployment options directly from a dashboard by opening the three-dot menu on the dashboard and selecting `Deploy`.
 ## Deployment list
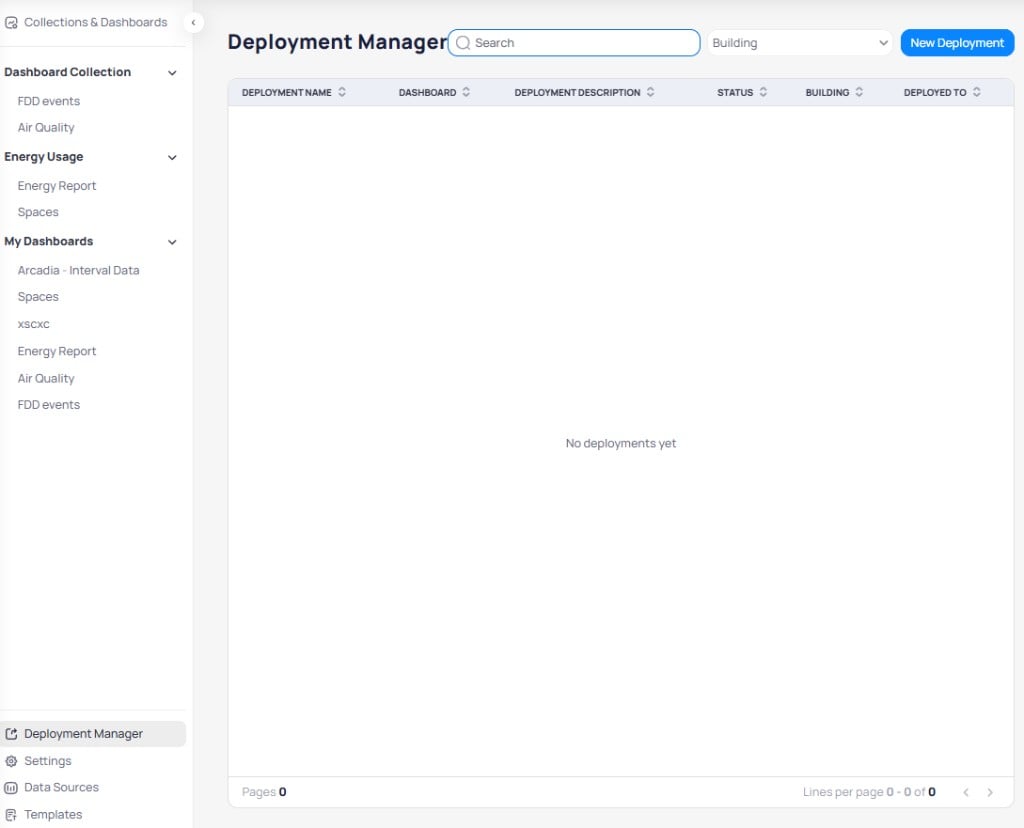
The deployment list displays all current and past deployments with the following columns:
| Column | Description |
| ---------------------- | ------------------------------------------------ |
| Deployment Name | Name assigned to the deployment |
| Dashboard | Dashboard being deployed |
| Deployment Description | Purpose or context for the deployment |
| Status | Current state: Completed, Failed, or In progress |
| Building | Source building for the deployment |
| Deployed to | Number of target buildings |
## Deployment list
The deployment list displays all current and past deployments with the following columns:
| Column | Description |
| ---------------------- | ------------------------------------------------ |
| Deployment Name | Name assigned to the deployment |
| Dashboard | Dashboard being deployed |
| Deployment Description | Purpose or context for the deployment |
| Status | Current state: Completed, Failed, or In progress |
| Building | Source building for the deployment |
| Deployed to | Number of target buildings |
 ### Row actions
Each deployment row has a three-dot menu with the following options:
* `View Details` -- View the full list of target buildings and deployment status
* `Edit` -- Modify deployment configuration
* `Delete` -- Remove the deployment
## Deploy a new dashboard
**Deployment risk:** Deployed dashboards retain the data filters, chart configurations, and settings defined on the host building's dashboard. If the target buildings do not contain the same data, equipment, naming conventions, or configuration, some charts may return errors or no data. Before deploying, confirm that all selected buildings support the dashboard's requirements.
Select `New Deployment` from the deployment list view.
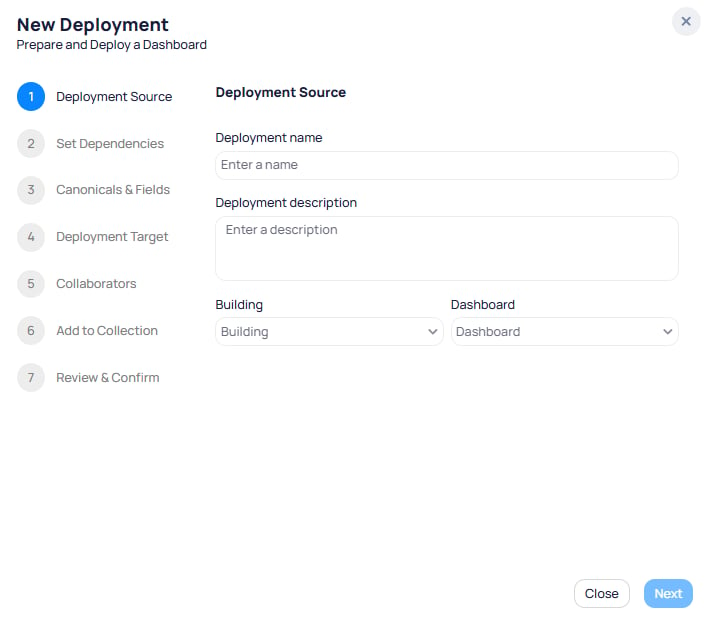
Enter a `Deployment name` and an optional `Deployment description`. Select the source `Building` and the `Dashboard` you want to deploy, then select `Next`.
### Row actions
Each deployment row has a three-dot menu with the following options:
* `View Details` -- View the full list of target buildings and deployment status
* `Edit` -- Modify deployment configuration
* `Delete` -- Remove the deployment
## Deploy a new dashboard
**Deployment risk:** Deployed dashboards retain the data filters, chart configurations, and settings defined on the host building's dashboard. If the target buildings do not contain the same data, equipment, naming conventions, or configuration, some charts may return errors or no data. Before deploying, confirm that all selected buildings support the dashboard's requirements.
Select `New Deployment` from the deployment list view.
Enter a `Deployment name` and an optional `Deployment description`. Select the source `Building` and the `Dashboard` you want to deploy, then select `Next`.
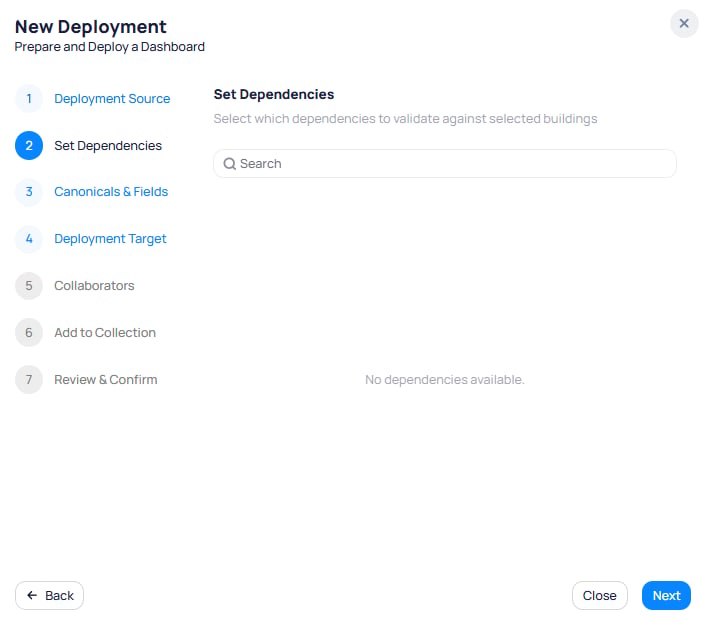
 Select which dependencies to validate against the target buildings. The system checks that each target building has the required data sources and ontology points. If the dashboard has no dependencies, the step displays "No dependencies available." Select `Next` to continue.
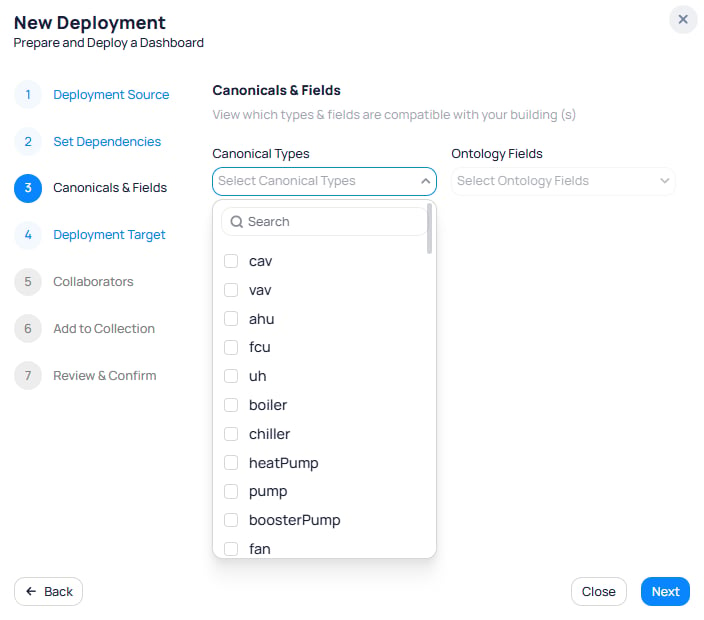
 Select a `Canonical Type` and `Ontology Fields` to verify which types and fields are compatible with your target buildings. Use the searchable dropdown to filter canonical types such as `cav`, `vav`, `ahu`, `fcu`, `boiler`, `chiller`, `heatPump`, `pump`, and others. This step is optional. Select `Next` to continue.
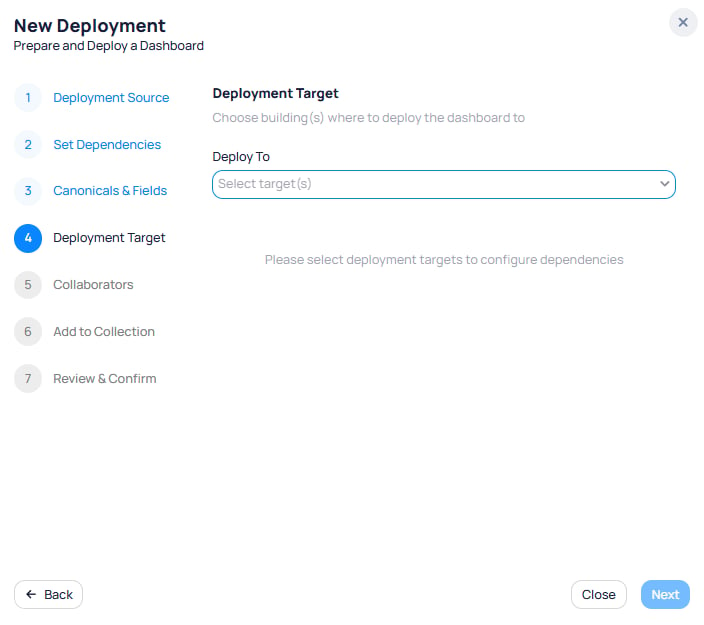
 Choose the buildings where the dashboard should be deployed. Use the `Deploy To` dropdown to search and select specific buildings, or select all buildings in your portfolio. Select `Next` to continue.
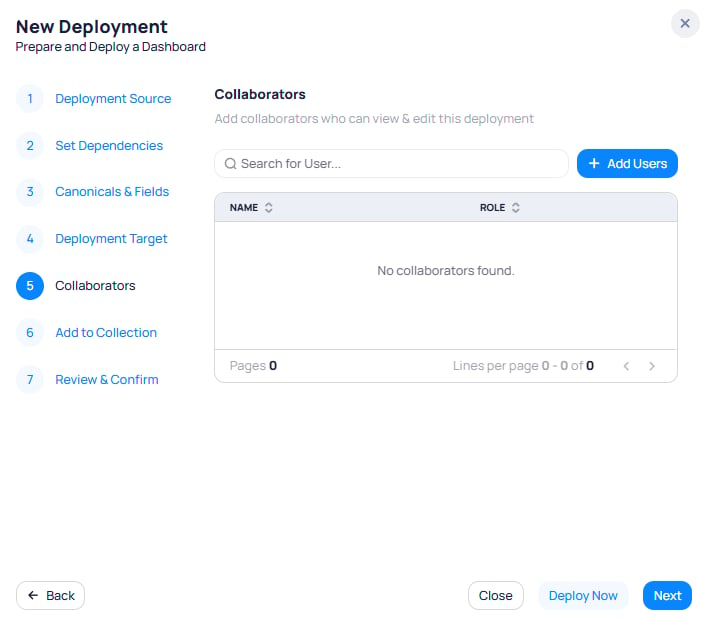
 Add collaborators who can view and edit this deployment. Search for users and select `+ Add Users` to add them. The table shows each collaborator's name and role. This step is optional. Select `Next` to continue, or select `Deploy Now` to skip the remaining steps and deploy immediately.
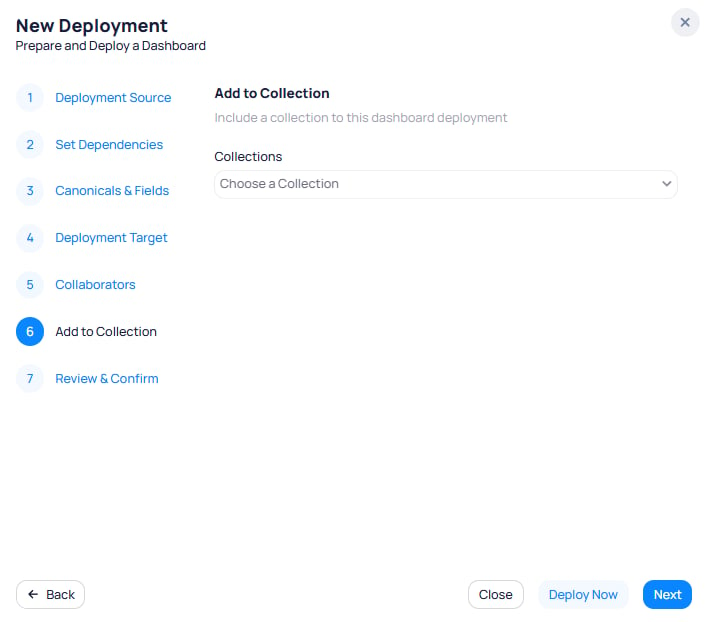
 Choose a collection to organize the deployed dashboard. Use the `Collections` dropdown to select an existing collection. This step is optional. Select `Next` to continue, or select `Deploy Now` to deploy immediately.
 Review the deployment summary. Confirm all settings are correct, then select `Deploy`.
## Manage existing deployments
### View details
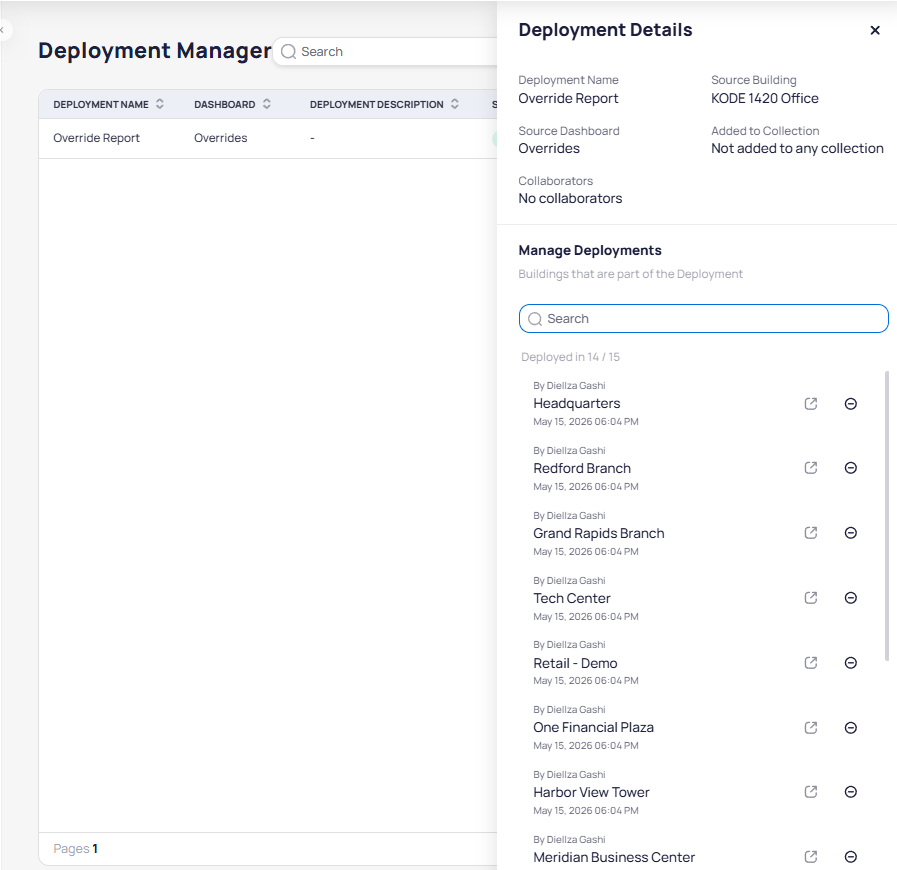
Open the three-dot menu on a deployment row and select `View Details`. The Deployment Details panel opens on the right, showing the deployment name, source building, source dashboard, collection, and collaborators. Below the summary, the `Manage Deployments` section lists all target buildings with the deployer name, deployment timestamp, and icons to open or remove each building.
Review the deployment summary. Confirm all settings are correct, then select `Deploy`.
## Manage existing deployments
### View details
Open the three-dot menu on a deployment row and select `View Details`. The Deployment Details panel opens on the right, showing the deployment name, source building, source dashboard, collection, and collaborators. Below the summary, the `Manage Deployments` section lists all target buildings with the deployer name, deployment timestamp, and icons to open or remove each building.
 ### Edit a deployment
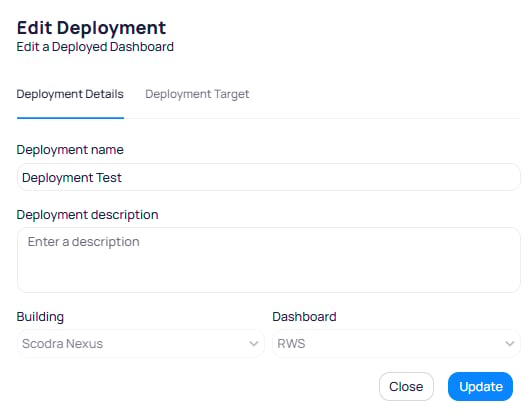
Open the three-dot menu on a deployment row and select `Edit`. The Edit Deployment dialog has two tabs: `Deployment Details` and `Deployment Target`. Update the deployment name, description, source building, or dashboard on the Details tab. Switch to the Target tab to modify target buildings. Select `Update` to save your changes.
### Edit a deployment
Open the three-dot menu on a deployment row and select `Edit`. The Edit Deployment dialog has two tabs: `Deployment Details` and `Deployment Target`. Update the deployment name, description, source building, or dashboard on the Details tab. Switch to the Target tab to modify target buildings. Select `Update` to save your changes.
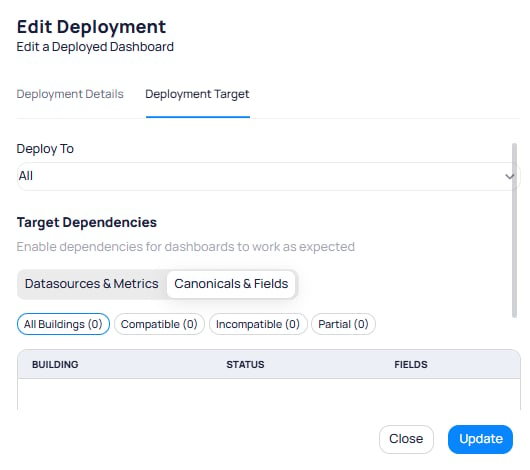
 The `Deployment Target` tab lets you update where the dashboard is deployed and verify target dependencies. Set the `Deploy To` field to select buildings, then review `Target Dependencies` under the `Datasources & Metrics` and `Canonicals & Fields` tabs. Buildings are categorized as `All Buildings`, `Compatible`, `Incompatible`, or `Partial` based on whether they meet the dashboard requirements.
 ### Delete a deployment
Open the three-dot menu on a deployment row and select `Delete`. Confirm the deletion when prompted.
Deleting a deployment does not remove dashboards already deployed to target buildings. It only removes the deployment record.
## Predefined and custom views
### Predefined view
A predefined view is the portfolio-controlled version of a deployed dashboard. When you publish a new version of the source dashboard, all buildings with the predefined view receive the update automatically.
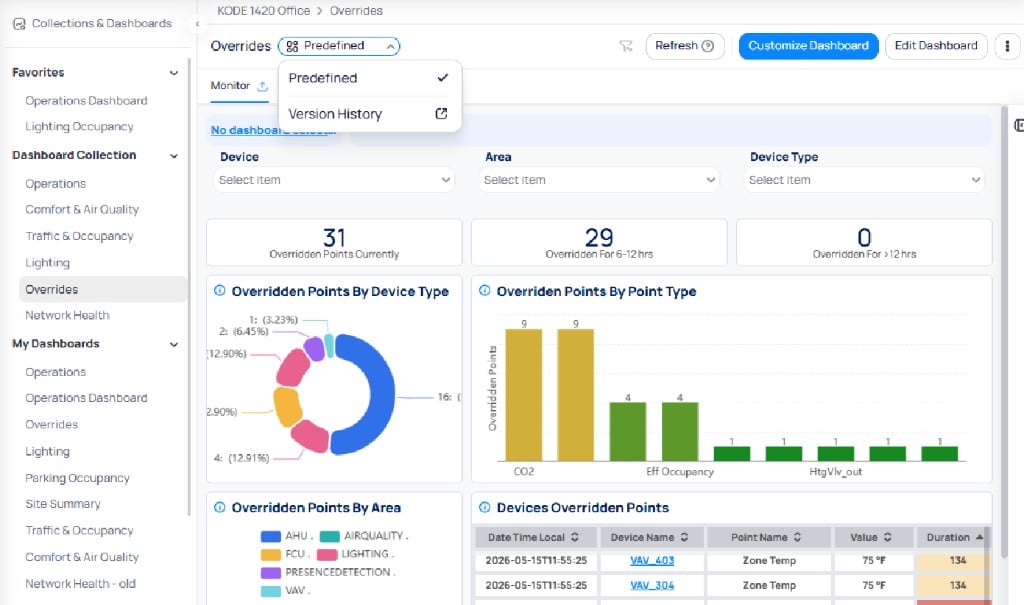
Predefined dashboards display a `Predefined` chip next to the dashboard name. The status dropdown shows `Predefined` with a checkmark and provides access to `Version History`.
Filter-only changes on a predefined dashboard do not break sync. Edits beyond filter values unlink that site from the source. Building BI warns before you enter edit mode. Once unlinked into a custom view, that site no longer receives predefined updates until you delete the custom view and revert.
### Delete a deployment
Open the three-dot menu on a deployment row and select `Delete`. Confirm the deletion when prompted.
Deleting a deployment does not remove dashboards already deployed to target buildings. It only removes the deployment record.
## Predefined and custom views
### Predefined view
A predefined view is the portfolio-controlled version of a deployed dashboard. When you publish a new version of the source dashboard, all buildings with the predefined view receive the update automatically.
Predefined dashboards display a `Predefined` chip next to the dashboard name. The status dropdown shows `Predefined` with a checkmark and provides access to `Version History`.
Filter-only changes on a predefined dashboard do not break sync. Edits beyond filter values unlink that site from the source. Building BI warns before you enter edit mode. Once unlinked into a custom view, that site no longer receives predefined updates until you delete the custom view and revert.
 ### Custom view
A custom view is a locally editable version of a deployed dashboard for a specific site. Custom views are independent of predefined updates -- changes to the source dashboard do not affect them.
To create a custom view:
1. Open the predefined dashboard at the target site.
2. Select `Customize Dashboard`.
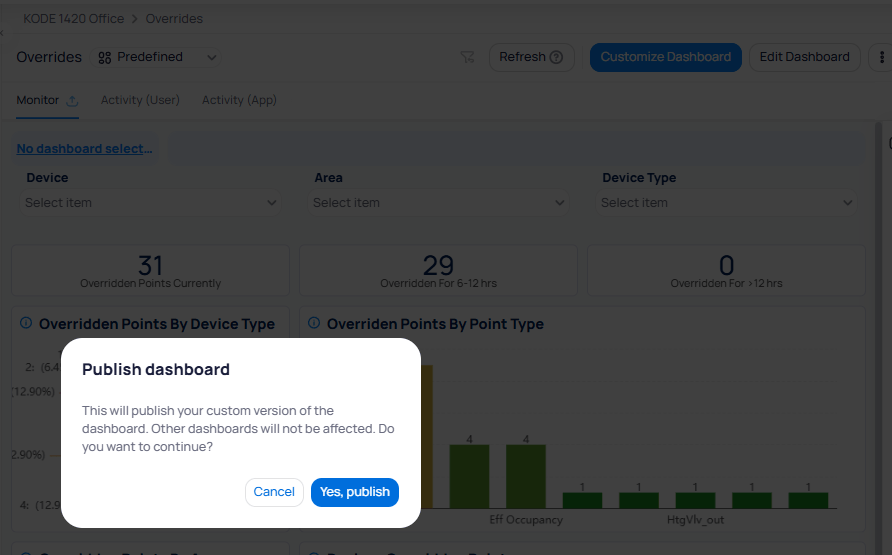
3. A confirmation dialog appears. Select `Yes, publish` to publish your custom version. Other dashboards are not affected.
### Custom view
A custom view is a locally editable version of a deployed dashboard for a specific site. Custom views are independent of predefined updates -- changes to the source dashboard do not affect them.
To create a custom view:
1. Open the predefined dashboard at the target site.
2. Select `Customize Dashboard`.
3. A confirmation dialog appears. Select `Yes, publish` to publish your custom version. Other dashboards are not affected.
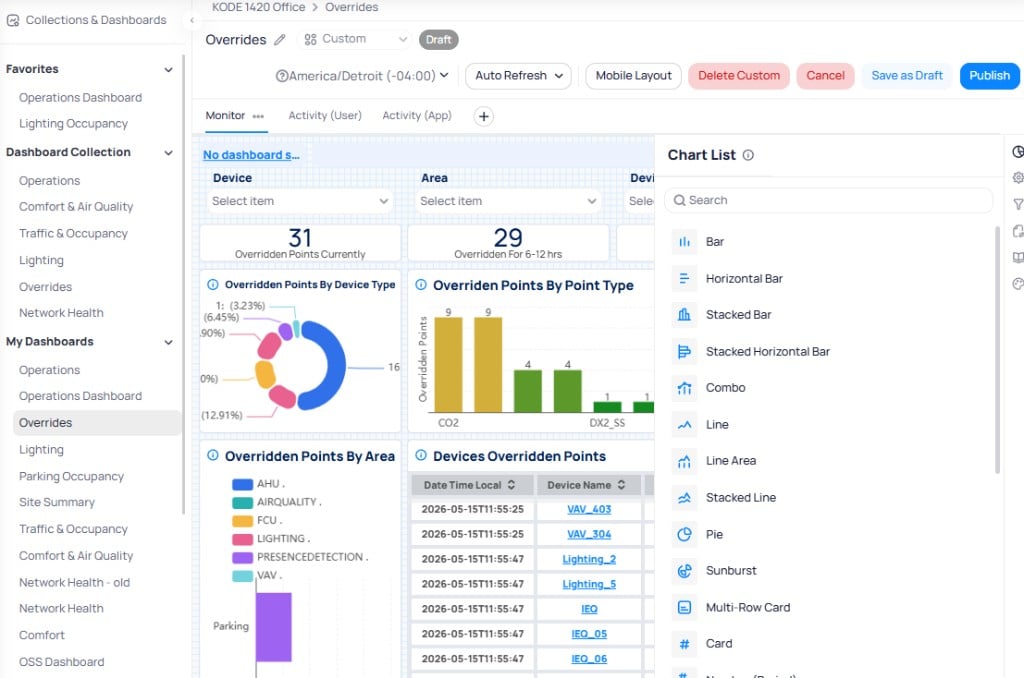
 The dashboard displays a `Custom` chip after customization. You can edit the custom view like any other dashboard, with the full Chart List, edit toolbar, and all styling options available. Use `Delete Custom` to revert to the predefined version, `Save as Draft` to save privately, or `Publish` to push your custom changes live.
 Use custom views only when a specific site requires a layout or data configuration that differs from the portfolio standard. This keeps maintenance overhead low.
## Enable the Deployment Manager
To grant access to the Deployment Manager:
1. Navigate to Launchpad > `Apps` > `Cloud BMS` > `Roles`.
2. Enable `Deployment Manager Read/Write` under the Building BI module.
Only users with the appropriate role permission can create, edit, or delete deployments. Read-only access allows viewing deployment details without modification.
## Best practices
* Test dashboards thoroughly at a single site before deploying across the portfolio.
* Use collections to group related deployments for easier management.
* Limit custom views to sites that genuinely need different configurations.
* Audit deployments periodically to remove outdated or failed entries.
## Related reading
Control visibility and organize dashboards by audience.
Choose independent copies or governed portfolio parity.
Compare collection, dashboard, page, and chart templates.
Deploy dashboards and manage predefined versus custom views.
## Next steps
Create and configure interactive dashboards with charts, tables, and widgets.
Organize dashboards into shared groups with role-based access control.
Use custom views only when a specific site requires a layout or data configuration that differs from the portfolio standard. This keeps maintenance overhead low.
## Enable the Deployment Manager
To grant access to the Deployment Manager:
1. Navigate to Launchpad > `Apps` > `Cloud BMS` > `Roles`.
2. Enable `Deployment Manager Read/Write` under the Building BI module.
Only users with the appropriate role permission can create, edit, or delete deployments. Read-only access allows viewing deployment details without modification.
## Best practices
* Test dashboards thoroughly at a single site before deploying across the portfolio.
* Use collections to group related deployments for easier management.
* Limit custom views to sites that genuinely need different configurations.
* Audit deployments periodically to remove outdated or failed entries.
## Related reading
Control visibility and organize dashboards by audience.
Choose independent copies or governed portfolio parity.
Compare collection, dashboard, page, and chart templates.
Deploy dashboards and manage predefined versus custom views.
## Next steps
Create and configure interactive dashboards with charts, tables, and widgets.
Organize dashboards into shared groups with role-based access control.